之前有简单介绍过abba锁,在了解crash的时候,发现其特别方便用于熟悉和调试内核,能够查看其实时的变量状态和出现堆栈后的状态,本文基于锁来简单演示通过crash查看锁状态,从而提供调试锁的一种方法
测试代码
在<ABBA锁介绍>的文章中提供了测试代码,复用即可
spinlock测试
在测试之前,我们查看spinlock结构体如下
crash> struct qspinlock -o -x
struct qspinlock {
        union {
  [0x0]     atomic_t val;
            struct {
  [0x0]         u8 locked;
  [0x1]         u8 pending;
            };
            struct {
  [0x0]         u16 locked_pending;
  [0x2]         u16 tail;
            };
        };
}
SIZE: 0x4
读取变量的信息如下
crash> rd -8 spinlock_a 4
ffffffc001542030:  00 00 00 00                                       ....
crash> rd -8 spinlock_b 4
ffffffc001542018:  00 00 00 00                                       ....
我们开启spinlock测试
echo 1 > /sys/module/test/parameters/testsuite
此时我们可以观察到spinlock_a/b变量的值如下
crash> rd -8 spinlock_a 4
ffffffc001542030:  01 01 00 00                                       ....
crash> rd -8 spinlock_b 4
ffffffc001542018:  01 01 00 00                                       ....
上面数据需要注意大小端,我们可以直接解析如下
crash> struct qspinlock spinlock_a -x
struct qspinlock {
  {
    val = {
      counter = 0x101
    },
    {
      locked = 0x1,
      pending = 0x1
    },
    {
      locked_pending = 0x101,
      tail = 0x0
    }
  }
}

crash> struct qspinlock spinlock_b -x
struct qspinlock {
  {
    val = {
      counter = 0x101
    },
    {
      locked = 0x1,
      pending = 0x1
    },
    {
      locked_pending = 0x101,
      tail = 0x0
    }
  }
}
可以看到,spinlock_a/b 的信息如下:
- locked是1,代表锁被持有
- pending是1,代表有一个任务尝试获取锁
可以看到,与代码现象ABBA锁相符
mutex测试
同样的,测试之前先读取数据结构
crash> struct mutex -o -x
struct mutex {
   [0x0] atomic_long_t owner;
   [0x8] spinlock_t wait_lock;
  [0x20] struct optimistic_spin_queue osq;
  [0x28] struct list_head wait_list;
}
SIZE: 0x38
然后我们确定mutex的owner默认值是0
crash> struct mutex.owner mutex_a -x
  owner = {
    counter = 0x0
  }
crash> struct mutex.owner mutex_b -x
  owner = {
    counter = 0x0
  }
开始测试
echo 2 > /sys/module/test/parameters/testsuite
此时我们看到mutex.owner变成了一个值,说明有人持有这个锁,如下
crash> struct mutex.owner mutex_a -x
  owner = {
    counter = 0xffffff804e286581
  }
crash> struct mutex.owner mutex_b -x
  owner = {
    counter = 0xffffff800dfd1d01
  }
对于mutex,我们知道其flag如下
#define MUTEX_FLAG_WAITERS 0x01
其中含义: 是有任务正在等待锁
在这个flag之外,mutex的owner是一个task_struct结构体如下
static inline struct task_struct *__owner_task(unsigned long owner)
{
        return (struct task_struct *)(owner & ~MUTEX_FLAGS);
}
故我们计算出持有mutex_a的任务是
crash> struct task_struct.pid,comm 0xffffff804e286580
  pid = 2818
  comm = "spinlock_thread"
同样的持有mutex_b的任务是
crash> struct task_struct.pid,comm 0xffffff800dfd1d00
  pid = 2819
  comm = "spinlock_thread"
ps查看信息如下
crash> ps | grep 2819
   2819      2   5  ffffff800dfd1d00  UN   0.0       0      0  [spinlock_thread]
crash> ps | grep 2818
   2818      2   4  ffffff804e286580  UN   0.0       0      0  [spinlock_thread]
这样我们就找到了谁在持有这个锁。
semaphore测试
先查看semaphore的结构体
crash> struct semaphore -o -x
struct semaphore {
   [0x0] raw_spinlock_t lock;
  [0x18] unsigned int count;
  [0x20] struct list_head wait_list;
}
SIZE: 0x30
其初始值如下
crash> struct semaphore.count semaphore_a
  count = 1
crash> struct semaphore.count semaphore_b
  count = 1
此时我们开启测试
echo 3 > /sys/module/test/parameters/testsuite
semaphore的作用是down占用了资源,需要等待up恢复资源,默认情况下count是1,如果down了则是0,我们查看死锁后状态如下
crash> struct semaphore.count semaphore_b
  count = 0
crash> struct semaphore.count semaphore_a
  count = 0
可以看到semaphore变量a/b都是被占座了,所以产生了ABBA锁。
总结
本文主要是通过crash的方式来辅助定位死锁问题,在实际问题中,相当于多了一种方式排查问题,我们知道最有效排查死锁的问题还是内核提供的CONFIG,毋庸置疑。
我们在讨论linux的实时的时候,有时候会拿RTOS来做对比,根据最近对RTOS的理解,总结出来关于为什么linux实时不如RTOS的几个点,分享之
中断的不确定性
中断不能嵌套
在rtems中我们看的中断在特殊情况如内核态是支持中断嵌套的,但是linux是不允许中断嵌套。
也就是说,在Linux中,如何一个中断触发来,那么必须等到同CPU的上一个中断处理完成。
这时候,中断是不确定的
softirq
linux支持中断上下文(hardirq和softirq),我们知道softirq的优先级是高于kthread这类线程任务的(tasklet,timer,netrx等)
如果某个外设驱动的softirq一直占用某个core,那么整个core上的thread很可能都得不到运行
我处理can的报文接收(netrx)的时候就遇到过这类情况,它直接导致来一个cpu core不工作。
那么这也就是另一个不确定性,也就是softirq是外设驱动代码,由客户自己编写的,如果softirq执行时间不确定,那么中断就是不确定的 。
spinlock影响高优先级任务的不确定性
例如某个cpu core上,有一个普通任务正在spin lock,那么core上的任务必须等spin unlock后,才能得以调度。
那么此时其任务就是不确定的。因为谁也没办法知道要等多久才能unlock。这样高优先级就不知道什么时候才能得以运行了。
内存的lazy模式导致进程不确定性
在linux中内存是使用的时候才分配的,高优先级任务在使用内存的时候,内存分配过程只能保证你分配到,但是不能保证你在确定时间内申请到。 甚至可能没有内存导致oom出现。
PREEMPT_RT的作用
基于上面提到的,PREEMPT_RT主要解决如下三个问题
- 中断可以被抢占,嵌套
- 中断线程化
- softirq可以被抢占
- mutex替换spin_lock
对于中断风暴,做法是在线程内disable irq,线程化完成之后,自动enable irq
而softirq线程化,做法是全部将其添加到ksoftirqd(tasklet,timer,netrx等)执行
spinlock的做法就是将raw_spin_lock 替换成 rt_mutex (可睡眠的,支持优先级继承的mutex,避免优先级翻转)
PREEMPT_RT的问题
根据上面就知道
- 对于中断,普通中断响应更差了
- 对于softirq,相比于原来运行路径更长了,且容易被常规任务抢占
- 对于锁,可睡眠就会导致进程切换,多次进程切换代价太大,性能远不如spin_lock
所以可以得出结论,添加PREEMPT_RT的内核,它可以保证某个高优先级任务的一定的实时性,但其负面作用会导致其他所有常规任务性能低下。 所以只适合于定制的特殊场景。
如何优化特殊场景下要求的实时任务呢
根据上面提到的,使用PREEMPT-RT的内核,一定程度上保持了高优先级任务的实时性,那么基于此,我们还需要做哪些事情来定制操作系统,满足这个实时任务的确定性要求呢?
DEADLINE调度
内核其实提供了EDF调度,也就是SCHED_DEADLINE。我们让这个实时任务在这个特殊的调度类中。
chrt工具动态设置进程的调度政策,如chrt --deadline / --fifo
当然pthread_setschedparam也可以设置调度器种类,如SCHED_DEADLINE/SCHED_FIFO传参
isolate和taskset
通过bootargs传参隔离某个cpu,然后通过taskset将实时任务绑定到这个cpu上跑
timer
如果要高实时,建议直接汇编使用寄存器调用arm64的高精度定时器来封装特定代码。
优先级继承
对于多线程的实时任务,pthread线程创建前建议设置优先级继承,避免优先级翻转。 也就是pthread_muterattr_setprotocol中传参PTHREAD_PRIO_INHERIT。 其默认是NONE。
占住堆
默认从内核申请的内存都可能被交换,那么申请的内存调用mlock锁住即可,这样这块内存不会被换出。同时,带mlock标志位的内存会在申请的时候,自动触发缺页异常,分配物理页面。相当于lazy机制的逃逸了。
占住栈
堆和栈都是内存,对于堆好办,我们直接mlock即可,对于栈,这是操作系统分配的,我们设置了最大栈大小之后,例如是8M,如果是线程,那么可以设置pthread_attr_setstacksize
在所有函数调用之前,调用一个函数,然后通过局部变量申请一个8M,或者你设置的栈大小的空间,将其占住,然后进行memset一次调用。此时栈会通过缺页异常申请内存,后续就不会在缺页异常申请了。 文字表现力不强,如下是代码
void stack_prefetch() {
    const size_t size = 8 * 1024 * 1024 - 4096;
    char buffer[size];
    memset(buffer, 0, sizeof(buffer));
}
避免数据伪共享
跑在多核的程序,需要利用好cache一致性,例如局部性原理,但是这里要说的是避免数据伪共享,所以多线程访问同一个结构体时,最好cacheline对齐
__attribute__((aligned(cachesize)))
其他
其他就是性能优化相关的了,通过性能优化可以保证任务的低时延。
总结
本文初衷是介绍一下Linux实时内核,并说明Linux实时并不能硬实时的原因,但是为了表述清楚,也补充了使用PREEMPT-RT补丁的内核,和实时应用程序的编写建议,这些建议纯粹属于经验分享性质,不代表权威信息。
总之,PREEMPT-RT是基于linux内核上,为了保证某个实时任务的确定性做的优化,它需要配合该实时任务的很多其他措施一起使用,否则体现不了实时的确定性。 也就是说我们讨论实时任务的时候,应该讨论整个链路的实时性,而不是某一个方面的实时确定性,那没有任何意义
并且,PREEMPT-RT是牺牲整体系统性能为代价而提供的,使用时需要认清利弊。
PREEMPT-RT做不到完全的硬实时确定性,所以如果面临产品级的开发,推荐使用Linux + RTOS 双OS的策略,RTOS本身关注确定性任务,Linux本身关注复杂计算。
之前将了crash中查看结构体,这个是非常常用调试内核状态的方式,文章是《使用crash查看内核结构体》,但是大部分情况下,我们需要看的是堆栈信息。为了演示,这里根据crash中的bt信息,手动推导函数堆栈,用作熟悉crash工具的回溯栈区的方式
获取一个堆栈
这里直接获取了ping的bt,如下
crash> bt 49105
PID: 49105  TASK: ffffff805e2ee580  CPU: 0   COMMAND: "ping"
 #0 [ffffffc0149b3830] __switch_to at ffffffc008017540
 #1 [ffffffc0149b3850] __schedule at ffffffc0095162d0
 #2 [ffffffc0149b38f0] schedule at ffffffc009516900
 #3 [ffffffc0149b3910] schedule_timeout at ffffffc00951ac64
 #4 [ffffffc0149b39a0] __skb_wait_for_more_packets at ffffffc0091a0248
 #5 [ffffffc0149b3a20] __skb_recv_datagram at ffffffc0091a0e00
 #6 [ffffffc0149b3a90] skb_recv_datagram at ffffffc0091a0ea0
 #7 [ffffffc0149b3ac0] ping_recvmsg at ffffffc00928a7ec
 #8 [ffffffc0149b3b20] inet_recvmsg at ffffffc009279340
 #9 [ffffffc0149b3b70] sock_recvmsg at ffffffc009188084
#10 [ffffffc0149b3ba0] ____sys_recvmsg at ffffffc009188d3c
#11 [ffffffc0149b3c90] ___sys_recvmsg at ffffffc00918c410
#12 [ffffffc0149b3d80] __sys_recvmsg at ffffffc00918c7e4
#13 [ffffffc0149b3e20] __arm64_sys_recvmsg at ffffffc00918c864
#14 [ffffffc0149b3e30] el0_svc_common at ffffffc008025508
#15 [ffffffc0149b3e70] do_el0_svc at ffffffc008025690
#16 [ffffffc0149b3e80] el0_svc at ffffffc009513510
#17 [ffffffc0149b3ea0] el0_sync_handler at ffffffc009513d54
#18 [ffffffc0149b3fe0] el0_sync at ffffffc008011e14
     PC: 0000007f86ec2994   LR: 000000558e2a9f6c   SP: 0000007fcdff7a20
    X29: 0000007fcdff7a20  X28: 00000000000000c0  X27: 0000007fcdff7ae0
    X26: 0000007fcdff7bb8  X25: 000000558e2c1000  X24: 0000007fcdff7b38
    X23: 0000000000000000  X22: 000000558e2c2078  X21: 0000007f870ca710
    X20: 0000007fcdff7b00  X19: 0000000000000003  X18: 0000000000000001
    X17: 0000007f86ec2960  X16: 000000558e2c1b48  X15: 000000007fffffde
    X14: 0000000000000001  X13: 0000000000000037  X12: 000000007fffffff
    X11: 00000012b9b749a3  X10: 0014d207f0963169   X9: 0000000000000018
     X8: 00000000000000d4   X7: 00000000001d1c32   X6: 0000000029aaaaf1
     X5: 0000000000000080   X4: 0000000000000001   X3: 0000007f870c9f10
     X2: 0000000000000000   X1: 0000007fcdff7b00   X0: 0000000000000003
    ORIG_X0: 0000000000000003  SYSCALLNO: d4  PSTATE: 60001000
我们知道crash更多是用于内核的问题排查,在使用ping的过程中,内核并没有死锁和堆栈,所以当前寄存器是用户空间的寄存器的值,这些不是很方便crash排查,但这不妨碍我们回溯内核栈,下面基于此bt的信息来回溯栈
什么是回溯栈
我们知道aarch64的FP和LR寄存器他们的作用如下
- x29寄存器Frame Point。它会保存栈底位置,然后根据aapcs分配栈帧大小
- x30寄存器Link Regiter。它会保存调入函数的下一条指令
同样的,我们还知道,aarch64中指令大小是32位,那么对应4字节。所以我们可以演示上述两点
x29寄存器
根据上面的堆栈,我们知道最后是在ffffffc008017540也就是函数__switch_to中切出,那么我们知道__switch_to的x29寄存器是ffffffc0149b3830,于是我们读出其值如下
crash> rd ffffffc0149b3830
ffffffc0149b3830:  ffffffc0149b3850
可以看到ffffffc0149b3850是__schedule的x29寄存器。可以发现x29具备list的特性,所以为了直接回溯,借用list指令可以一次性读出所有的x29寄存器,如下
crash> list ffffffc0149b3830
ffffffc0149b3830
ffffffc0149b3850
ffffffc0149b38f0
ffffffc0149b3910
ffffffc0149b39a0
ffffffc0149b3a20
ffffffc0149b3a90
ffffffc0149b3ac0
ffffffc0149b3b20
ffffffc0149b3b70
ffffffc0149b3ba0
ffffffc0149b3c90
ffffffc0149b3d80
ffffffc0149b3e20
ffffffc0149b3e30
ffffffc0149b3e70
ffffffc0149b3e80
ffffffc0149b3ea0
ffffffc0149b3fe0
x30寄存器
我们批量得到了x29寄存器的值,那么我们可以知道x30寄存器是x29+8。同样因为是地址+8,我们借助list的特性,可以得到如下
crash> list -s list_head.prev ffffffc0149b3830
ffffffc0149b3830
  prev = 0xffffffc0095162d4 <__schedule+692>
ffffffc0149b3850
  prev = 0xffffffc009516904 <schedule+68>
ffffffc0149b38f0
  prev = 0xffffffc00951ac68 <schedule_timeout+376>
ffffffc0149b3910
  prev = 0xffffffc0091a024c <__skb_wait_for_more_packets+276>
ffffffc0149b39a0
  prev = 0xffffffc0091a0e04 <__skb_recv_datagram+124>
ffffffc0149b3a20
  prev = 0xffffffc0091a0ea4 <skb_recv_datagram+60>
ffffffc0149b3a90
  prev = 0xffffffc00928a7f0 <ping_recvmsg+112>
ffffffc0149b3ac0
  prev = 0xffffffc009279344 <inet_recvmsg+76>
ffffffc0149b3b20
  prev = 0xffffffc009188088 <sock_recvmsg+72>
ffffffc0149b3b70
  prev = 0xffffffc009188d40 <____sys_recvmsg+128>
ffffffc0149b3ba0
  prev = 0xffffffc00918c414 <___sys_recvmsg+124>
ffffffc0149b3c90
  prev = 0xffffffc00918c7e8 <__sys_recvmsg+96>
ffffffc0149b3d80
  prev = 0xffffffc00918c868 <__arm64_sys_recvmsg+32>
ffffffc0149b3e20
  prev = 0xffffffc00802550c <el0_svc_common+108>
ffffffc0149b3e30
  prev = 0xffffffc008025694 <do_el0_svc+28>
ffffffc0149b3e70
  prev = 0xffffffc009513514 <el0_svc+28>
ffffffc0149b3e80
  prev = 0xffffffc009513d58 <el0_sync_handler+168>
ffffffc0149b3ea0
  prev = 0xffffffc008011e18 <el0_sync+344>
ffffffc0149b3fe0
  prev = 0x0
可以看到,这里的x30寄存器保存这返回地址的下一个指令,那么我们计算返回地址就是上述地址-4即可。
总结
至此,我们通过一个例子,将crash的bt的回栈进行了解析。
在内核中调试会经常使用crash工具,此工具可以调试死锁,假死等问题,之前《RK平台上使用crash进行live debug》上已经分析了crash工具的安装和基本使用,本文作为加强理解篇,以读取系统的task_struct的tasks字段,从而获取当前进程的所有进程的task_struct。
ps 命令
我们通过ps可以查看到当前系统的进程信息,以前10个为例
   PID    PPID  CPU       TASK        ST  %MEM     VSZ    RSS  COMM
>     0      0   0  ffffffc00a6d23c0  RU   0.0       0      0  [swapper/0]
>     0      0   1  ffffff81f0856580  RU   0.0       0      0  [swapper/1]
>     0      0   2  ffffff81f0898000  RU   0.0       0      0  [swapper/2]
      0      0   3  ffffff81f0898e80  RU   0.0       0      0  [swapper/3]
      0      0   4  ffffff81f0899d00  RU   0.0       0      0  [swapper/4]
>     0      0   5  ffffff81f089ab80  RU   0.0       0      0  [swapper/5]
>     0      0   6  ffffff81f089ba00  RU   0.0       0      0  [swapper/6]
>     0      0   7  ffffff81f089c880  RU   0.0       0      0  [swapper/7]
      1      0   2  ffffff81f0808000  IN   0.1  245056   6372  systemd
      2      0   6  ffffff81f0808e80  IN   0.0       0      0  [kthreadd]
      3      2   0  ffffff81f0809d00  ID   0.0       0      0  [rcu_gp]
      4      2   0  ffffff81f080ab80  ID   0.0       0      0  [rcu_par_gp]
      8      2   0  ffffff81f080e580  ID   0.0       0      0  [mm_percpu_wq]
      9      2   0  ffffff81f0850000  IN   0.0       0      0  [rcu_tasks_rude_]
通过上面信息可以发现,cpu0,1,2,5,6,7都是idle状态,只有cpu3和4是运行的状态。
从TASK一列,我们能够拿到struct task_struct的结构体地址,接下来我们基于此来进行实践crash工具
swapper/x由来
struct task_struct init_task
start_kernel
  sched_init
    init_idle
      sprintf(idle->comm, "%s/%d", INIT_TASK_COMM, cpu);
      #define INIT_TASK_COMM "swapper"
task_struct结构体
对于此结构体我们关注tasks链表,所以我们需要得到pid和comm和tasks list,以swapper/0为例
crash> struct task_struct.pid,comm ffffffc00a6d23c0
  pid = 0
  comm = "swapper/0\000\000\000\000\000\000"
  tasks = {
    next = 0xffffff81f0808438,
    prev = 0xffffff80b2a82fb8
  }
根据上面代码,我们知道每个cpu都有一个idle进程,所以包含cpu 1-7的信息如下
crash> struct task_struct.pid,comm,tasks ffffff81f0856580
  pid = 0
  comm = "swapper/1\000\000\000\000\000\000"
  tasks = {
    next = 0xffffff81f08092b8,
    prev = 0xffffffc00a6d27f8 <init_task+1080>
  }
crash> struct task_struct.pid,comm,tasks ffffff81f0898000
  pid = 0
  comm = "swapper/2\000\000\000\000\000\000"
  tasks = {
    next = 0xffffff81f08092b8,
    prev = 0xffffffc00a6d27f8 <init_task+1080>
  }
crash> struct task_struct.pid,comm,tasks ffffff81f0898e80
  pid = 0
  comm = "swapper/3\000\000\000\000\000\000"
  tasks = {
    next = 0xffffff81f08092b8,
    prev = 0xffffffc00a6d27f8 <init_task+1080>
  }
crash> struct task_struct.pid,comm,tasks ffffff81f0899d00
  pid = 0
  comm = "swapper/4\000\000\000\000\000\000"
  tasks = {
    next = 0xffffff81f08092b8,
    prev = 0xffffffc00a6d27f8 <init_task+1080>
  }
crash> struct task_struct.pid,comm,tasks ffffff81f089ab80
  pid = 0
  comm = "swapper/5\000\000\000\000\000\000"
  tasks = {
    next = 0xffffff81f08092b8,
    prev = 0xffffffc00a6d27f8 <init_task+1080>
  }
crash> struct task_struct.pid,comm,tasks ffffff81f089ba00
  pid = 0
  comm = "swapper/6\000\000\000\000\000\000"
  tasks = {
    next = 0xffffff81f08092b8,
    prev = 0xffffffc00a6d27f8 <init_task+1080>
  }
crash> struct task_struct.pid,comm,tasks ffffff81f089c880
  pid = 0
  comm = "swapper/7\000\000\000\000\000\000"
  tasks = {
    next = 0xffffff81f08092b8,
    prev = 0xffffffc00a6d27f8 <init_task+1080>
  }
tasks成员
我们知道所有的task通过tasks串起来,所以我们可以先定位tasks位于task_struct的举例,如下
crash> struct task_struct.tasks -o -x
struct task_struct {
  [0x438] struct list_head tasks;
}
这里可以知道位于task_struct的0x438个字节。我们打印tasks的链表,这里先以swapper/0为例如下
crash> struct task_struct.pid,comm,tasks ffffffc00a6d23c0
  pid = 0
  comm = "swapper/0\000\000\000\000\000\000"
  tasks = {
    next = 0xffffff81f0808438,
    prev = 0xffffff81f09e8438
  }
此时我们知道其next指针是0xffffff81f0808438,它是其他进程task_struct.tasks的指针,所以我们可以通过计算偏移量来获得 task_struct。如下
>>> hex(0xffffff81f0808438-0x438)
'0xffffff81f0808000'
此时我们获得了next的 task_struct指针,所以我们打印如下
crash> struct task_struct.pid,comm,tasks 0xffffff81f0808000
  pid = 1
  comm = "systemd\000\000\000\000\000\000\000\000"
  tasks = {
    next = 0xffffff81f08092b8,
    prev = 0xffffffc00a6d27f8 <init_task+1080>
  }
同样的,对于非swapper/0上的idle进程,我们可以获取其next的进程信息,它们默认是kthreadd如下
crash> struct task_struct.pid,comm,tasks ffffff81f0856580
  pid = 0
  comm = "swapper/1\000\000\000\000\000\000"
  tasks = {
    next = 0xffffff81f08092b8,
    prev = 0xffffffc00a6d27f8 <init_task+1080>
  }
计算地址
>>> hex(0xffffff81f08092b8-0x438)
'0xffffff81f0808e80'
打印task_struct
crash> struct task_struct.pid,comm,tasks 0xffffff81f0808e80
  pid = 2
  comm = "kthreadd\000\000\000\000\000\000\000"
  tasks = {
    next = 0xffffff81f080a138,
    prev = 0xffffff81f0808438
  }
使用list命令
根据上面我们可以简单通过tasks来获取next的task_struct,接下来我们使用list命令。对于swapper/0,我们list获取链表所有成员如下
crash> list -h 0xffffff81f0808438
ffffff81f0808438
ffffff81f08092b8
ffffff81f080a138
这样可以直接计算出所有的task_struct,通过如下
for addr in addresses:
    print("struct task_struct.pid,comm,tasks", hex(int(addr, 16) - 0x438))
这里粘贴前五个打印如下
crash> struct task_struct.pid,comm,tasks 0xffffff81f0808000
  pid = 1
  comm = "systemd\000\000\000\000\000\000\000\000"
  tasks = {
    next = 0xffffff81f08092b8,
    prev = 0xffffffc00a6d27f8 <init_task+1080>
  }
crash> struct task_struct.pid,comm,tasks 0xffffff81f0808e80
  pid = 2
  comm = "kthreadd\000\000\000\000\000\000\000"
  tasks = {
    next = 0xffffff81f080a138,
    prev = 0xffffff81f0808438
  }
crash> struct task_struct.pid,comm,tasks 0xffffff81f0809d00
  pid = 3
  comm = "rcu_gp\000d\000\000\000\000\000\000\000"
  tasks = {
    next = 0xffffff81f080afb8,
    prev = 0xffffff81f08092b8
  }
crash> struct task_struct.pid,comm,tasks 0xffffff81f080ab80
  pid = 4
  comm = "rcu_par_gp\000\000\000\000\000"
  tasks = {
    next = 0xffffff81f080e9b8,
    prev = 0xffffff81f080a138
  }
crash> struct task_struct.pid,comm,tasks 0xffffff81f080e580
  pid = 8
  comm = "mm_percpu_wq\000\000\000"
  tasks = {
    next = 0xffffff81f0850438,
    prev = 0xffffff81f080afb8
  }
对于swapper/1-7,这里以3个作为示例,如下
crash> struct task_struct.pid,comm,tasks 0xffffff81f0809d00
  pid = 3
  comm = "rcu_gp\000d\000\000\000\000\000\000\000"
  tasks = {
    next = 0xffffff81f080afb8,
    prev = 0xffffff81f08092b8
  }
crash> struct task_struct.pid,comm,tasks 0xffffff81f080ab80
  pid = 4
  comm = "rcu_par_gp\000\000\000\000\000"
  tasks = {
    next = 0xffffff81f080e9b8,
    prev = 0xffffff81f080a138
  }
crash> struct task_struct.pid,comm,tasks 0xffffff81f080e580
  pid = 8
  comm = "mm_percpu_wq\000\000\000"
  tasks = {
    next = 0xffffff81f0850438,
    prev = 0xffffff81f080afb8
  }
可以看到,这里信息和最上面的ps得到的进程信息完全一致。
总结
至此,我们根据crash做了一个简单的实验,通过task_struct的tasks遍历查找所有的pid和comm,它可以方便的实时查看内核的结构体数据,从而学习内核和定位内核问题。
之前讲清楚了中断向量表,rtems中只实现了sp0和spx的irq中断。那么本文基于timer中断的入口handle来讲解中断是如何触发的
什么是timer
操作系统的ticker是基于硬件timer实现的,为了了解中断触发,timer是非常合适的一个例子,系统启动后,记录的每一个tick值都是一次timer的定时到期。
在arm64中,timer默认是读取cntfrq_el0寄存器,如下
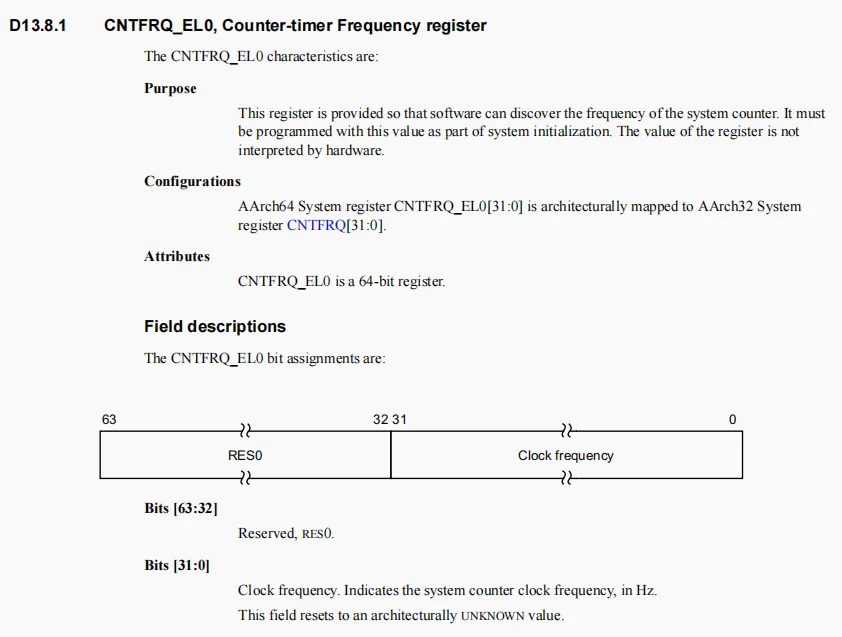
其代码实现如下
void arm_generic_timer_get_config( uint32_t *frequency, uint32_t *irq )
{
  uint64_t val;
  __asm__ volatile (
    "mrs %[val], cntfrq_el0"
    : [val] "=&r" (val)
  );
  *frequency = val;

#ifdef ARM_GENERIC_TIMER_USE_VIRTUAL
  *irq = BSP_TIMER_VIRT_PPI;
#elif defined(AARCH64_GENERIC_TIMER_USE_PHYSICAL_SECURE)
  *irq = BSP_TIMER_PHYS_S_PPI;
#else
  *irq = BSP_TIMER_PHYS_NS_PPI;
#endif
}
我们知道默认情况下使用的是no-secure el0,所以中断号设置是30,如下
#define BSP_TIMER_PHYS_NS_PPI 30
对于timer的使用,主要如下几个步骤
- 设置cntp_ctl 的enable 为1
- 设置cntp_cval 一个初值
至此timer会倒计时发生中断,然后就是中断触发了,对于中断触发,其流程如下
- 中断发生,进入irq
- 保存中断上下文
- 读取GIC控制器,确定ISR程序
- 进入中断ISR程序
- 中断返回
- 恢复中断上下文
- 返回中断现场
关于中断等下会讲,现在先简单把timer说清楚
关于设置cntp_ctl,代码如下
void arm_gt_clock_set_control(uint32_t ctl)
{
  __asm__ volatile (
#ifdef AARCH64_GENERIC_TIMER_USE_VIRTUAL
    "msr cntv_ctl_el0, %[ctl]"
#elif defined(AARCH64_GENERIC_TIMER_USE_PHYSICAL_SECURE)
    "msr cntps_ctl_el1, %[ctl]"
#else
    "msr cntp_ctl_el0, %[ctl]"
#endif
    :
    : [ctl] "r" (ctl)
  );
}
关于设置timer的计数值,代码如下
void arm_gt_clock_set_compare_value(uint64_t cval)
{
  __asm__ volatile (
#ifdef AARCH64_GENERIC_TIMER_USE_VIRTUAL
    "msr cntv_cval_el0, %[cval]"
#elif defined(AARCH64_GENERIC_TIMER_USE_PHYSICAL_SECURE)
    "msr cntps_cval_el1, %[cval]"
#else
    "msr cntp_cval_el0, %[cval]"
#endif
    :
    : [cval] "r" (cval)
  );
}
至此,我们先简单把timer说清楚了。
注册中断
对于一个中断,我们需要填充其ISR才能正常工作,所以为了让中断触发能够跳到自己设置的ISR,我们需要注册中断,RTEMS中注册中断的方式如下
static void arm_gt_clock_handler_install(rtems_interrupt_handler handler)
{
  rtems_status_code sc;

  rtems_interrupt_entry_initialize(
    &arm_gt_interrupt_entry,
    handler,
    &arm_gt_clock_instance,
    "Clock"
  );
  sc = rtems_interrupt_entry_install(
    arm_gt_clock_instance.irq,
    RTEMS_INTERRUPT_UNIQUE,
    &arm_gt_interrupt_entry
  );
  if (sc != RTEMS_SUCCESSFUL) {
    bsp_fatal(BSP_ARM_FATAL_GENERIC_TIMER_CLOCK_IRQ_INSTALL);
  }
}
这里的install动作我们关注如下调用
rtems_interrupt_entry_install
  bsp_interrupt_entry_install
    bsp_interrupt_entry_install_first
此函数的代码如下
static rtems_status_code bsp_interrupt_entry_install_first(
  rtems_vector_number       vector,
  rtems_option              options,
  rtems_interrupt_entry    *entry
)
{
  rtems_vector_number index;

  index = vector;

  bsp_interrupt_entry_store_release(
    bsp_interrupt_get_dispatch_table_slot( index ),
    entry
  );

  bsp_interrupt_set_handler_unique(
    index,
    RTEMS_INTERRUPT_IS_UNIQUE( options )
  );

  bsp_interrupt_vector_enable( vector );

  return RTEMS_SUCCESSFUL;
}
可以发现其做了如下几个事情
- 原子的保持中断入口
- 用位图标记是否中断共享
- 在gic-v3中设置redistributor使能
至此,通过上述操作,中断会注册到向量表上,如下
&_Record_Interrupt_dispatch_table[ 30 ];
bsp_interrupt_dispatch_table[ 30 ]
上面两个地址是相等的
bsp_interrupt_dispatch_table[ i ] = &_Record_Interrupt_entry_table[ i ];
此时当中断发生时,可以通过此表找到对应的ISR。
中断发生
对于timer中断,其通过curr_el_spx_irq触发,之前提过中断向量表了,这里我们只关心行为,那么首先要做的是JUMP_HANDLER
	.macro	JUMP_HANDLER
/* Mask to use in BIC, lower 7 bits */
	mov x0, #0x7f
/* LR contains PC, mask off to the base of the current vector */
	bic x0,	lr,	x0
/* Load address from the last word in the vector */
	ldr x0,	[x0,	#0x78]
/*
 * Branch and link to the address in x0. There is no reason to save the current
 * LR since it has already been saved and the current contents are junk.
 */
	blr x0
/* Pop x0,lr from stack */
	ldp x0,	lr,	[sp],	#0x10
/* Return from exception */
	eret
	nop
	nop
	nop
	nop
	nop
	nop
	nop
	nop
	nop
	nop
	nop
	nop
	nop
	nop
	nop
	nop
	nop
	nop
	nop
	nop
	nop
	nop
	.endm
进入中断处理程序的代码是
ldr x0, [x0, #0x78]
根据RTEMS的中断管理之中断向量表的分析,其入口函数是_AArch64_Exception_interrupt_no_nest。
保存中断上下文
对于_AArch64_Exception_interrupt_no_nest的代码,其实现如下
_AArch64_Exception_interrupt_no_nest:
/* Execution template:
Save volatile registers on thread stack(some x, all q, ELR, etc.)
Switch to interrupt stack
Execute interrupt handler
Switch to thread stack
Call thread dispatch
Restore volatile registers from thread stack
Return to embedded exception vector code
*/


/* Push interrupt context */
	push_interrupt_context

/*
 * Switch to interrupt stack, interrupt dispatch may enable interrupts causing
 * nesting
 */
	msr	spsel, #0

/* Jump into the handler */
	bl .AArch64_Interrupt_Handler

/*
 * Switch back to thread stack, interrupt dispatch should disable interrupts
 * before returning
 */
	msr	spsel, #1

/*
 * Check thread dispatch necessary, ISR dispatch disable and thread dispatch
 * disable level.
 */
	cmp	x0, #0
	bne	.Lno_need_thread_dispatch
	bl	_AArch64_Exception_thread_dispatch

.Lno_need_thread_dispatch:
/*
 * SP should be where it was pre-handler (pointing at the exception frame)
 * or something has leaked stack space
 */
/* Pop interrupt context */
	pop_interrupt_context
/* Return to vector for final cleanup */
	ret
可以看的保存中断上下文代码是push_interrupt_context,那么其实现如下
.macro	push_interrupt_context
/*
 * Push x1-x21 on to the stack, need 19-21 because they're modified without
 * obeying PCS
 */
	stp lr,		x1,	[sp, #-0x10]!
	stp x2,		x3,	[sp, #-0x10]!
	stp x4,		x5,	[sp, #-0x10]!
	stp x6,		x7,	[sp, #-0x10]!
	stp x8,		x9,	[sp, #-0x10]!
	stp x10,	x11,	[sp, #-0x10]!
	stp x12,	x13,	[sp, #-0x10]!
	stp x14,	x15,	[sp, #-0x10]!
	stp x16,	x17,	[sp, #-0x10]!
	stp x18,	x19,	[sp, #-0x10]!
	stp x20,	x21,	[sp, #-0x10]!
/*
 * Push q0-q31 on to the stack, need everything because parts of every register
 * are volatile/corruptible
 */
	stp q0,		q1,	[sp, #-0x20]!
	stp q2,		q3,	[sp, #-0x20]!
	stp q4,		q5,	[sp, #-0x20]!
	stp q6,		q7,	[sp, #-0x20]!
	stp q8,		q9,	[sp, #-0x20]!
	stp q10,	q11,	[sp, #-0x20]!
	stp q12,	q13,	[sp, #-0x20]!
	stp q14,	q15,	[sp, #-0x20]!
	stp q16,	q17,	[sp, #-0x20]!
	stp q18,	q19,	[sp, #-0x20]!
	stp q20,	q21,	[sp, #-0x20]!
	stp q22,	q23,	[sp, #-0x20]!
	stp q24,	q25,	[sp, #-0x20]!
	stp q26,	q27,	[sp, #-0x20]!
	stp q28,	q29,	[sp, #-0x20]!
	stp q30,	q31,	[sp, #-0x20]!
/* Get exception LR for PC and spsr */
	mrs x0, ELR_EL1
	mrs x1, SPSR_EL1
/* Push pc and spsr */
	stp x0,		x1,	[sp, #-0x10]!
/* Get fpcr and fpsr */
	mrs x0, FPSR
	mrs x1, FPCR
/* Push fpcr and fpsr */
	stp x0,		x1,	[sp, #-0x10]!
.endm
可以看的,其操作如下
- 将x1-x21保存在sp位置往前推的位置 (前变基)
- 保存q0-q31
- 保存ELR和SPSR
- 保存FPSR和FPCR
切换到中断栈
将spsel设置为0,这样栈跳到sp_el0上,然后执行AArch64_Interrupt_Handler
msr	spsel, #0
bl .AArch64_Interrupt_Handler
我们先看AArch64_Interrupt_Handler做了哪些事情
.AArch64_Interrupt_Handler:
/* Get per-CPU control of current processor */
	GET_SELF_CPU_CONTROL	SELF_CPU_CONTROL_GET_REG

/* Increment interrupt nest and thread dispatch disable level */
	ldr	w2, [SELF_CPU_CONTROL, #PER_CPU_ISR_NEST_LEVEL]
	ldr	w3, [SELF_CPU_CONTROL, #PER_CPU_THREAD_DISPATCH_DISABLE_LEVEL]
	add	w2, w2, #1
	add	w3, w3, #1
	str	w2, [SELF_CPU_CONTROL, #PER_CPU_ISR_NEST_LEVEL]
	str	w3, [SELF_CPU_CONTROL, #PER_CPU_THREAD_DISPATCH_DISABLE_LEVEL]

/* Save LR */
	mov	x21, LR

/* Call BSP dependent interrupt dispatcher */
	bl	bsp_interrupt_dispatch

/* Restore LR */
	mov	LR, x21

/* Load some per-CPU variables */
	ldr	w0, [SELF_CPU_CONTROL, #PER_CPU_THREAD_DISPATCH_DISABLE_LEVEL]
	ldrb	w1, [SELF_CPU_CONTROL, #PER_CPU_DISPATCH_NEEDED]
	ldr	w2, [SELF_CPU_CONTROL, #PER_CPU_ISR_DISPATCH_DISABLE]
	ldr	w3, [SELF_CPU_CONTROL, #PER_CPU_ISR_NEST_LEVEL]

/* Decrement levels and determine thread dispatch state */
	eor	w1, w1, w0
	sub	w0, w0, #1
	orr	w1, w1, w0
	orr	w1, w1, w2
	sub	w3, w3, #1

/* Store thread dispatch disable and ISR nest levels */
	str	w0, [SELF_CPU_CONTROL, #PER_CPU_THREAD_DISPATCH_DISABLE_LEVEL]
	str	w3, [SELF_CPU_CONTROL, #PER_CPU_ISR_NEST_LEVEL]

/* Return should_skip_thread_dispatch in x0 */
	mov	x0, x1
/* Return from handler */
	ret
主要做了如下事情,代码有注释,也很好理解
- 获取percpu的结构体
- 对中断嵌套计数器(PER_CPU_ISR_NEST_LEVEL)和线程调度等级(PER_CPU_THREAD_DISPATCH_DISABLE_LEVEL)自加
- 保存LR寄存器到x21
- 进入中断分发函数bsp_interrupt_dispatch
- 从x21中恢复LR寄存器
- 从percpu结构体中加载thread_dispatch_disable_level/dispatch_necessary/isr_dispatch_disable/isr_nest_level
- 自减1操作后存储到percpu变量
- 将dispatch_necessary赋值给x0,作为函数的返回值
percpu结构体的四个变量如下
  /**
   *  This contains the current interrupt nesting level on this
   *  CPU.
   */
  uint32_t isr_nest_level;

  /**
   * @brief Indicates if an ISR thread dispatch is disabled.
   *
   * This flag is context switched with each thread.  It indicates that this
   * thread has an interrupt stack frame on its stack.  By using this flag, we
   * can avoid nesting more interrupt dispatching attempts on a previously
   * interrupted thread's stack.
   */
  uint32_t isr_dispatch_disable;

  /**
   * @brief The thread dispatch critical section nesting counter which is used
   * to prevent context switches at inopportune moments.
   */
  volatile uint32_t thread_dispatch_disable_level;

  /**
   * @brief This is set to true when this processor needs to run the thread
   * dispatcher.
   *
   * It is volatile since interrupts may alter this flag.
   *
   * This member is not protected by a lock and must be accessed only by this
   * processor.  Code (e.g. scheduler and post-switch action requests) running
   * on another processors must use an inter-processor interrupt to set the
   * thread dispatch necessary indicator to true.
   *
   * @see _Thread_Get_heir_and_make_it_executing().
   */
  volatile bool dispatch_necessary;
进入ISR程序
根据上面的解析,此时中断会调整到bsp_interrupt_dispatch中,然后寻找ISR程序运行,bsp_interrupt_dispatch代码如下
void bsp_interrupt_dispatch(void)
{
  while (true) {
    uint32_t icciar = READ_SR(ICC_IAR1);
    rtems_vector_number vector = GIC_CPUIF_ICCIAR_ACKINTID_GET(icciar);
    uint32_t status;

    if (!bsp_interrupt_is_valid_vector(vector)) {
      break;
    }

    status = arm_interrupt_enable_interrupts();
    bsp_interrupt_handler_dispatch_unchecked(vector);
    arm_interrupt_restore_interrupts(status);

    WRITE_SR(ICC_EOIR1, icciar);
  }
}
可以看的上述代码,它步骤如下
- 读取了ICC_IAR1获得了中断号
- 然后打开全局中断
- 从中断号和bsp_interrupt_dispatch_table计算出ISR函数地址
- 执行ISR
对于执行函数,如下
static inline void bsp_interrupt_dispatch_entries(
  const rtems_interrupt_entry *entry
)
{
  do {
    ( *entry->handler )( entry->arg );
    entry = bsp_interrupt_entry_load_acquire( &entry->next );
  } while ( RTEMS_PREDICT_FALSE( entry != NULL ) );
}
值得注意的是,我们这里的handler就是之前注册的timer中断
Clock_driver_support_install_isr( Clock_isr );
也就是Clock_isr函数,这个函数也就是计算tick后重新激活timer。这里主要关心中断触发,接下来看中断返回
中断返回
在AArch64_Interrupt_Handler中,就介绍了中断返回的部分代码,这里简单复述一下
- 恢复LR寄存器
- 设置percpu结构体
返回中断栈
在AArch64_Interrupt_Handler返回之后,还是回到中断向量表指定函数_AArch64_Exception_interrupt_no_nest中了,这里继续做剩下的操作,如下
- 将spsel设置为1,切回sp_el1栈
- 在AArch64_Interrupt_Handler会返回dispatch_necessary,这里判断x0的值是否为0
- 如果为0,则恢复中断上下文
- 如果为1,则进入主动调用线程调度,这里最后讲
- 最后执行恢复中断上下文
恢复中断上下文
AArch64_Interrupt_Handler返回之后,就直接恢复中断上下文,恢复的步骤就是将之前保存的寄存器恢复,函数是pop_interrupt_context其实现如下
.macro pop_interrupt_context
/* Pop fpcr and fpsr */
	ldp x0,		x1,	[sp], #0x10
/* Restore fpcr and fpsr */
	msr FPCR, x1
	msr FPSR, x0
/* Pop pc and spsr */
	ldp x0,		x1,	[sp], #0x10
/* Restore exception LR for PC and spsr */
	msr SPSR_EL1, x1
	msr ELR_EL1, x0
/* Pop q0-q31 */
	ldp q30,	q31,	[sp], #0x20
	ldp q28,	q29,	[sp], #0x20
	ldp q26,	q27,	[sp], #0x20
	ldp q24,	q25,	[sp], #0x20
	ldp q22,	q23,	[sp], #0x20
	ldp q20,	q21,	[sp], #0x20
	ldp q18,	q19,	[sp], #0x20
	ldp q16,	q17,	[sp], #0x20
	ldp q14,	q15,	[sp], #0x20
	ldp q12,	q13,	[sp], #0x20
	ldp q10,	q11,	[sp], #0x20
	ldp q8,		q9,	[sp], #0x20
	ldp q6,		q7,	[sp], #0x20
	ldp q4,		q5,	[sp], #0x20
	ldp q2,		q3,	[sp], #0x20
	ldp q0,		q1,	[sp], #0x20
/* Pop x1-x21 */
	ldp x20,	x21,	[sp], #0x10
	ldp x18,	x19,	[sp], #0x10
	ldp x16,	x17,	[sp], #0x10
	ldp x14,	x15,	[sp], #0x10
	ldp x12,	x13,	[sp], #0x10
	ldp x10,	x11,	[sp], #0x10
	ldp x8,		x9,	[sp], #0x10
	ldp x6,		x7,	[sp], #0x10
	ldp x4,		x5,	[sp], #0x10
	ldp x2,		x3,	[sp], #0x10
	ldp lr,		x1,	[sp], #0x10
/* Must clear reservations here to ensure consistency with atomic operations */
	clrex
.endm
保存和恢复的步骤是差不多的,其步骤简单介绍如下
- 恢复浮点相关寄存器
- 恢复spsr和elr
- 恢复x1-x21寄存器
- 清空独占监视器
等到AArch64_Interrupt_Handler返回之后,代码回到宏JUMP_HANDLER上,我们之前代码执行的blr,那么接下来做如下动作
	blr x0
/* Pop x0,lr from stack */
	ldp x0,	lr,	[sp],	#0x10
/* Return from exception */
	eret
这里从sp开始,去16个字节保存到x0和lr寄存器上,然后调用eret返回到中断前的状态,恢复ELR_EL1和SPSR_EL1寄存器。这里因为JUMP_HANDLER是宏,所以继续回溯到curr_el_spx_irq函数中来看ldp这条指令,如下
curr_el_spx_irq:
	stp x0,	lr,	[sp, #-0x10]!	/* Push x0,lr on to the stack */
	bl curr_el_spx_irq_get_pc	/* Get current execution address */
curr_el_spx_irq_get_pc:			/* The current PC is now in LR */
	JUMP_HANDLER
	JUMP_TARGET_SPx
.balign 0x80
可以看的,之前stp其实讲x0和lr的值保存在sp-0x10的位置,并修改了sp的值,所以eret之前做的就是恢复进入中断前的x0和lr寄存器。
至此,一次timer中断就完成返回到了中断开始之前的状态。
主动调用线程调度
主动调用线程调度的函数是_AArch64_Exception_thread_dispatch代码如下
_AArch64_Exception_thread_dispatch:
/* Get per-CPU control of current processor */
	GET_SELF_CPU_CONTROL	SELF_CPU_CONTROL_GET_REG

/* Thread dispatch */
	mrs	NON_VOLATILE_SCRATCH, DAIF

.Ldo_thread_dispatch:

/* Set ISR dispatch disable and thread dispatch disable level to one */
	mov	w0, #1
	str	w0, [SELF_CPU_CONTROL, #PER_CPU_ISR_DISPATCH_DISABLE]
	str	w0, [SELF_CPU_CONTROL, #PER_CPU_THREAD_DISPATCH_DISABLE_LEVEL]

/* Save LR */
	mov	x21, LR

/* Call _Thread_Do_dispatch(), this function will enable interrupts */
	mov	x0, SELF_CPU_CONTROL
	mov	x1, NON_VOLATILE_SCRATCH
	mov	x2, #0x80
	bic	x1, x1, x2
	bl	_Thread_Do_dispatch

/* Restore LR */
	mov	LR, x21

/* Disable interrupts */
	msr	DAIF, NON_VOLATILE_SCRATCH

#ifdef RTEMS_SMP
	GET_SELF_CPU_CONTROL	SELF_CPU_CONTROL_GET_REG
#endif

/* Check if we have to do the thread dispatch again */
	ldrb	w0, [SELF_CPU_CONTROL, #PER_CPU_DISPATCH_NEEDED]
	cmp	w0, #0
	bne	.Ldo_thread_dispatch

/* We are done with thread dispatching */
	mov	w0, #0
	str	w0, [SELF_CPU_CONTROL, #PER_CPU_ISR_DISPATCH_DISABLE]

/* Return from thread dispatch */
	ret
这里好像没什么好详细讲的了,其实就是主动调用_Thread_Do_dispatch,主动让调度器开始下一个高优先级任务。
总结
至此,本文详细的通过timer中断介绍了中断触发的详细过程。有助于了解RTEMS在aarch64上,以及gic-v3的中断管理流程
