在《RTEMS初始化-bootcard调用流程》中就已经简单初始化中断向量表的过程,但其目的是为了梳理bootcard的调用流程,本文基于RTEMS的中断管理逻辑来分析RTEMS的中断管理功能,从而更清晰的了解RTEMS的中断管理
中断向量表
中断向量表的填充在aarch64-exception-default.S中,里面会实现全局变量bsp_start_vector_table_begin的值,根据aarch64的定义中断有如下基本点
- 向量表大小是2k
- 每个中断向量表按照128字节对齐
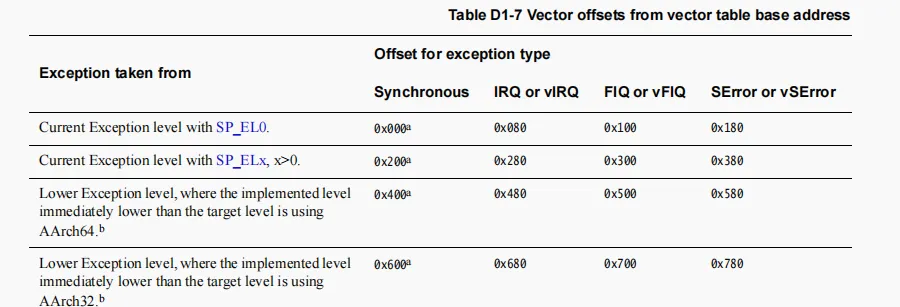
所以我们可以看到rtems填入中断的方式如下
curr_el_sp0_sync:
	.dword _AArch64_Exception_default
.balign 0x80
curr_el_sp0_irq:
	JUMP_HANDLER
	JUMP_TARGET_SP0
.balign 0x80
curr_el_sp0_fiq:
	JUMP_HANDLER
	JUMP_TARGET_SP0
.balign 0x80
curr_el_sp0_serror:
	JUMP_HANDLER
	JUMP_TARGET_SP0
.balign 0x80
curr_el_spx_sync:
	.dword _AArch64_Exception_default
.balign 0x80
curr_el_spx_irq:
	JUMP_HANDLER
	JUMP_TARGET_SPx
.balign 0x80
curr_el_spx_fiq:
	JUMP_HANDLER
	JUMP_TARGET_SPx
.balign 0x80
curr_el_spx_serror:
	JUMP_HANDLER
	JUMP_TARGET_SPx
.balign 0x80
lower_el_aarch64_sync:
	JUMP_HANDLER
	JUMP_TARGET_SPx
.balign 0x80
lower_el_aarch64_irq:
	JUMP_HANDLER
	JUMP_TARGET_SPx
.balign 0x80
lower_el_aarch64_fiq:
	JUMP_HANDLER
	JUMP_TARGET_SPx
.balign 0x80
lower_el_aarch64_serror:
	JUMP_HANDLER
	JUMP_TARGET_SPx
.balign 0x80
lower_el_aarch32_sync:
	JUMP_HANDLER
	JUMP_TARGET_SPx
.balign 0x80
lower_el_aarch32_irq:
	JUMP_HANDLER
	JUMP_TARGET_SPx
.balign 0x80
lower_el_aarch32_fiq:
	JUMP_HANDLER
	JUMP_TARGET_SPx
.balign 0x80
lower_el_aarch32_serror:
	JUMP_HANDLER
	JUMP_TARGET_SPx
可以看到,上述代码和arm64 spec描述完全一致
初始化中断向量表
这部分内容在《RTEMS初始化-bootcard调用流程》提过,这里基于gic-v3再简单描述一下。
bsp_start
  bsp_interrupt_initialize
    bsp_interrupt_facility_initialize
      arm_interrupt_facility_set_exception_handler
        AArch64_set_exception_handler
          AArch64_get_vector_base_address
            char *vbar = VBAR_EL1
            char *cvector_address = vbar + VECTOR_ENTRY_SIZE * exception + VECTOR_POINTER_OFFSET;
gic-v3初始化
初始化共两个函数,我们逐步解析
  gicv3_init_dist(ARM_GIC_DIST);
  gicv3_init_cpu_interface(_SMP_Get_current_processor());
对于init dist,如下
static void gicv3_init_dist(volatile gic_dist *dist)
{
  uint32_t id_count = gicv3_get_id_count(dist);
  uint32_t id;

  dist->icddcr = GIC_DIST_ICDDCR_ARE_NS | GIC_DIST_ICDDCR_ARE_S
               | GIC_DIST_ICDDCR_ENABLE_GRP1S | GIC_DIST_ICDDCR_ENABLE_GRP1NS
               | GIC_DIST_ICDDCR_ENABLE_GRP0;

  for (id = 0; id < id_count; id += 32) {
    /* Disable all interrupts */
    dist->icdicer[id / 32] = 0xffffffff;

    /* Set G1NS */
    dist->icdigr[id / 32] = 0xffffffff;
    dist->icdigmr[id / 32] = 0;
  }

  for (id = 0; id < id_count; ++id) {
    gic_id_set_priority(dist, id, PRIORITY_DEFAULT);
  }

  for (id = 32; id < id_count; ++id) {
    gic_id_set_targets(dist, id, 0x01);
  }
}
对于icddcr,对于GICD_CTLR寄存器,设置如下
dist->icddcr = GIC_DIST_ICDDCR_ARE_NS | GIC_DIST_ICDDCR_ARE_S
               | GIC_DIST_ICDDCR_ENABLE_GRP1S | GIC_DIST_ICDDCR_ENABLE_GRP1NS
               | GIC_DIST_ICDDCR_ENABLE_GRP0;
这里功能描述如下
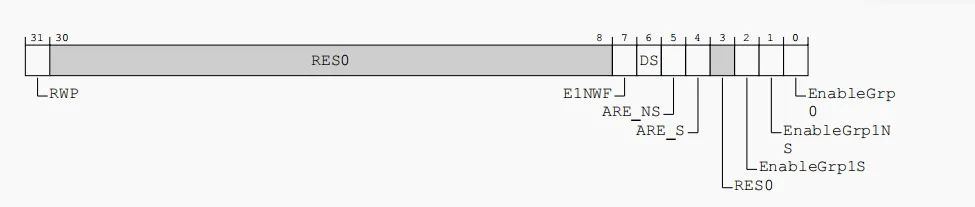
这是distributor寄存器,其中开启了
- non-secure和secure下开启 优先级路由
- non-secure和secure下开启 group1的中断分发
- 开启group0的中断分发
这里group0代表el3的中断组
group1 secure代表trustOS或EL2上的中断组。 group1 non-secure代表VMM或OS的中断组
也就是说这里开启了中断优先级路由和中断分发
对于dist->icdicer[id / 32] = 0xffffffff
这里对应寄存器GICD_ISENABLER,写1先禁用所有中断
对于dist->icdipr[id] = priority
这里对于寄存器GICD_IPRIORITYR,写入实际的优先级
对于dist->icdiptr[id] = targets;
这里对于寄存器GICD_ITARGETSR,写入中断处理目标寄存器(发给哪个CPU)
其他还有寄存器如下
- ICC_SRE: 中断使能寄存器
- ICC_PMR: 中断优先级屏蔽寄存器
- ICC_BPR: 中断优先级分组寄存器
volatile gic_redist *redist = gicv3_get_redist(cpu_index);
redistributor寄存器地址
查看中断向量表
在gdb中,我们可以查看中断向量表基地址为bsp_start_vector_table_begin,如下
0x6d000 <bsp_start_vector_table_begin>
对于中断的入口函数,其地址是entry + 0x78。 因为向量表的offset就是0x78,如下
#define VECTOR_POINTER_OFFSET 0x78
如果是sp0_irq,那么其地址是0x6dc98,0x6dc98是入口地址_AArch64_Exception_interrupt_nest
(gdb) x curr_el_sp0_irq + 0x78
0x6d0f8 <curr_el_sp0_irq_get_pc+112>:       0x000000000006dc98
(gdb) x 0x000000000006dc98
0x6dc98 <_AArch64_Exception_interrupt_nest>:
如果是spx_irq,那么其地址是0x6ddac,0x6ddac是入口地址_AArch64_Exception_interrupt_no_nest
(gdb) x curr_el_spx_irq + 0x78
0x6d2f8 <curr_el_spx_irq_get_pc+112>:       0x000000000006ddac
(gdb) x 0x000000000006ddac
0x6ddac <_AArch64_Exception_interrupt_no_nest>:
对于未设置入口的sp0,其宏定义如下
	.macro	JUMP_TARGET_SP0
	.dword .print_exception_dump_sp0
	.endm
以curr_el_sp0_fiq为例也就是.print_exception_dump_sp0 其他类似
(gdb) x curr_el_sp0_fiq + 0x78
0x6d178 <curr_el_sp0_fiq_get_pc+112>:       0x000000000006d844
(gdb) x 0x000000000006d844
0x6d844 <.print_exception_dump_sp0>:
对于未设置入口的spx,其宏定义如下
	.macro	JUMP_TARGET_SPx
	.dword .print_exception_dump_spx
	.endm
以curr_el_spx_fiq为例也就是.print_exception_dump_spx,值得注意的是.print_exception_dump_spx的地址等于bsp_start_vector_table_end 其他类似
(gdb) x curr_el_spx_fiq + 0x78
0x6d378 <curr_el_spx_fiq_get_pc+112>:       0x000000000006d800
(gdb) x 0x000000000006d800
0x6d800 <bsp_start_vector_table_end>:
总结
这里讲清楚了rtems中的中断向量表和gic-v3的中断初始化过程,接下来我们从中断触发的角度继续了解中断管理
关于内存泄漏这里就不说明了,我们知道在调试过程中,很多情况下并不算内存泄漏,例如分配的内存就是需要使用的,某些机制就需要申请内存,对象销毁才回收内存,那么它就不能算作内存泄漏,为了定位这种内存的使用情况,从而减少内存的使用情况,massif工具能够刨析内存的使用情况,然后结合代码解决这种问题。
安装
安装很简单,我们需要具备valgrind和massif-visualizer两个工具,如下
apt install massif-visualizer valgrind
使用
我们借助valgrind来加载massif工具,如下命令即可
valgrind --tool=massif ./ukui-tablet-desktop
当我们程序运行之后,可以将程序退出,那么本地会生成massif.out.pid的文件,根据这个文件就可以进行分析内存使用情况
分析
分析通过massif-visualizer,命令举例如下
massif-visualizer massif.out.31446
此时我们可以看到界面如下
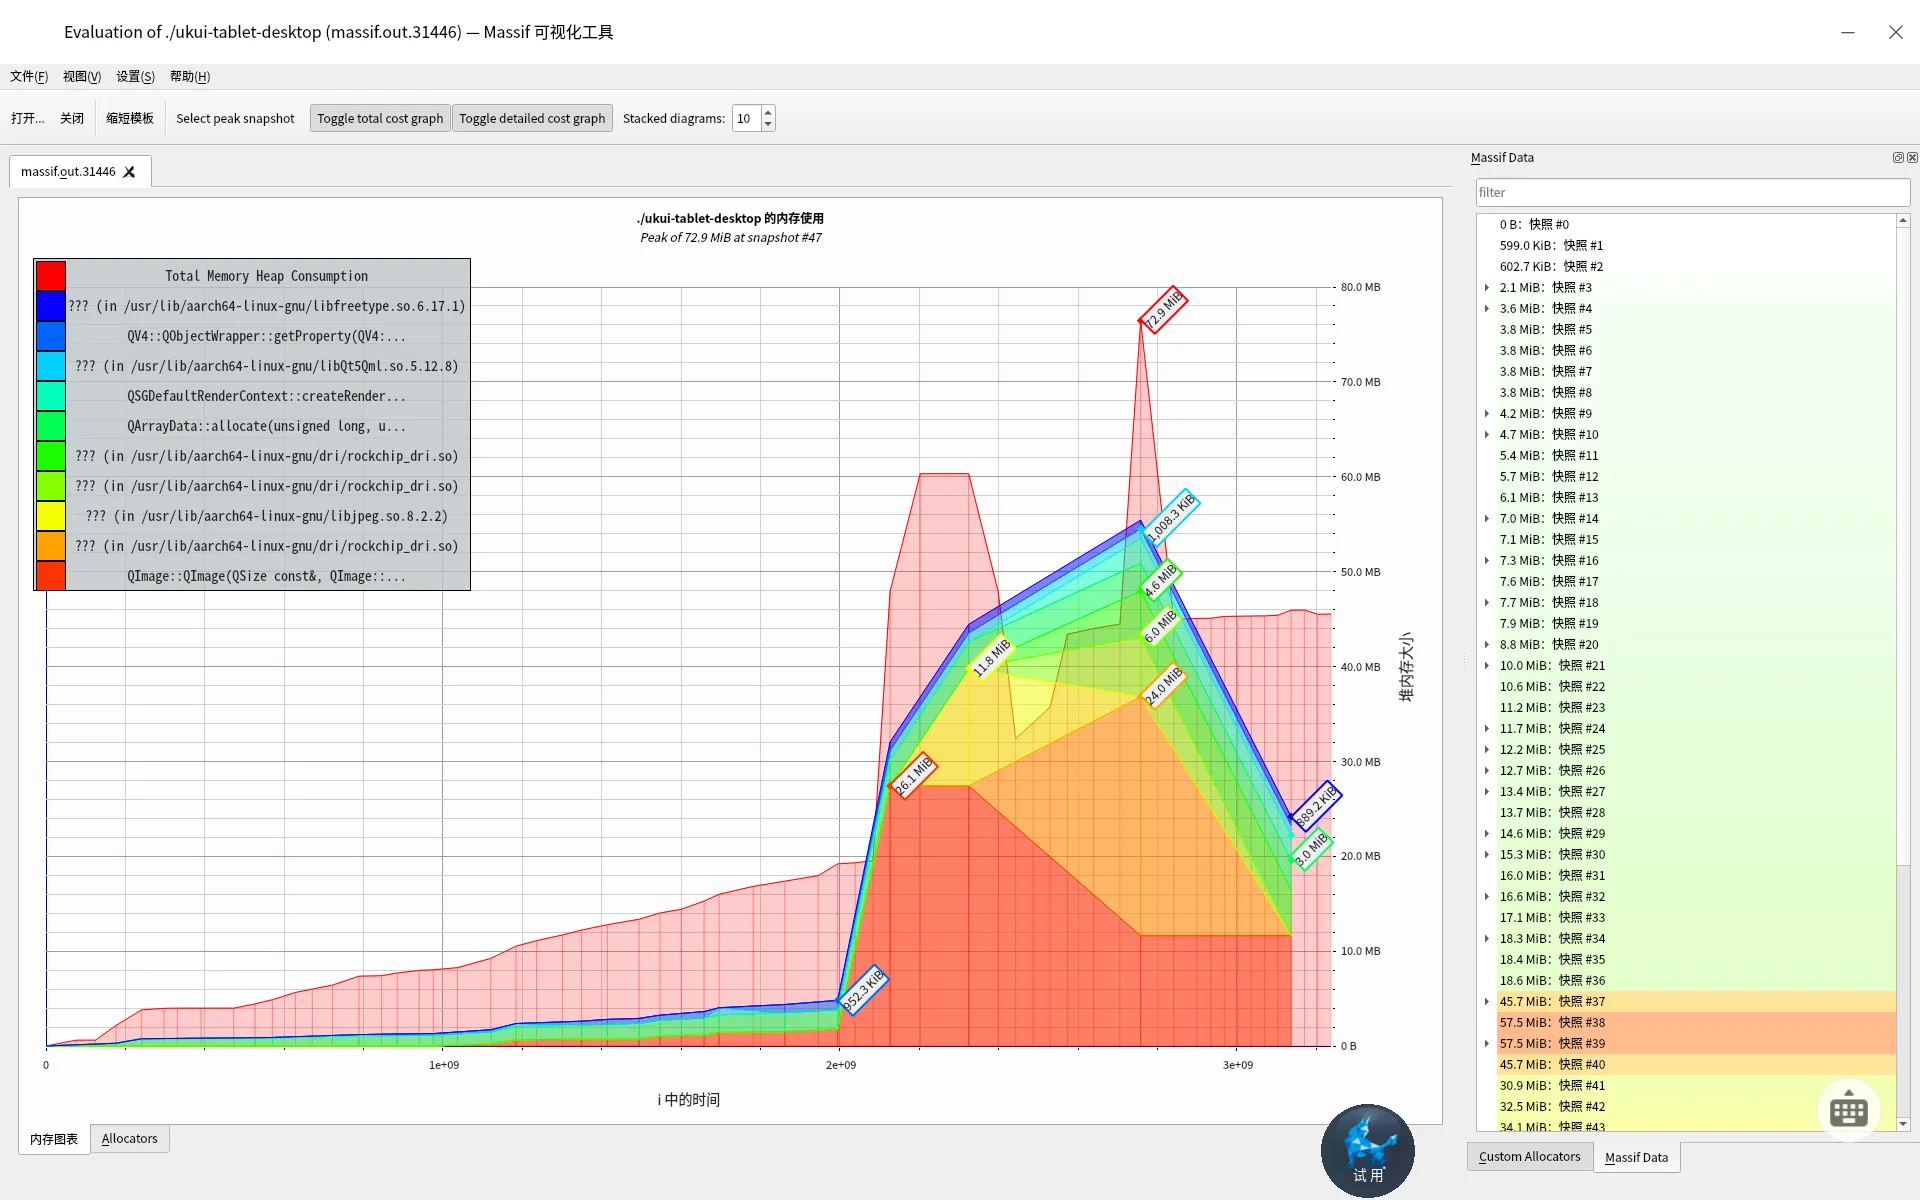
这里两个信息很重要
- 左上角的heap的消耗情况
- 右边的内存数据情况,点击它会反应在中间的图标上
为了方便查看,我特地扩展了一下右侧的信息,这样就能够很方便的知道内存占用究竟是在哪里了。如下
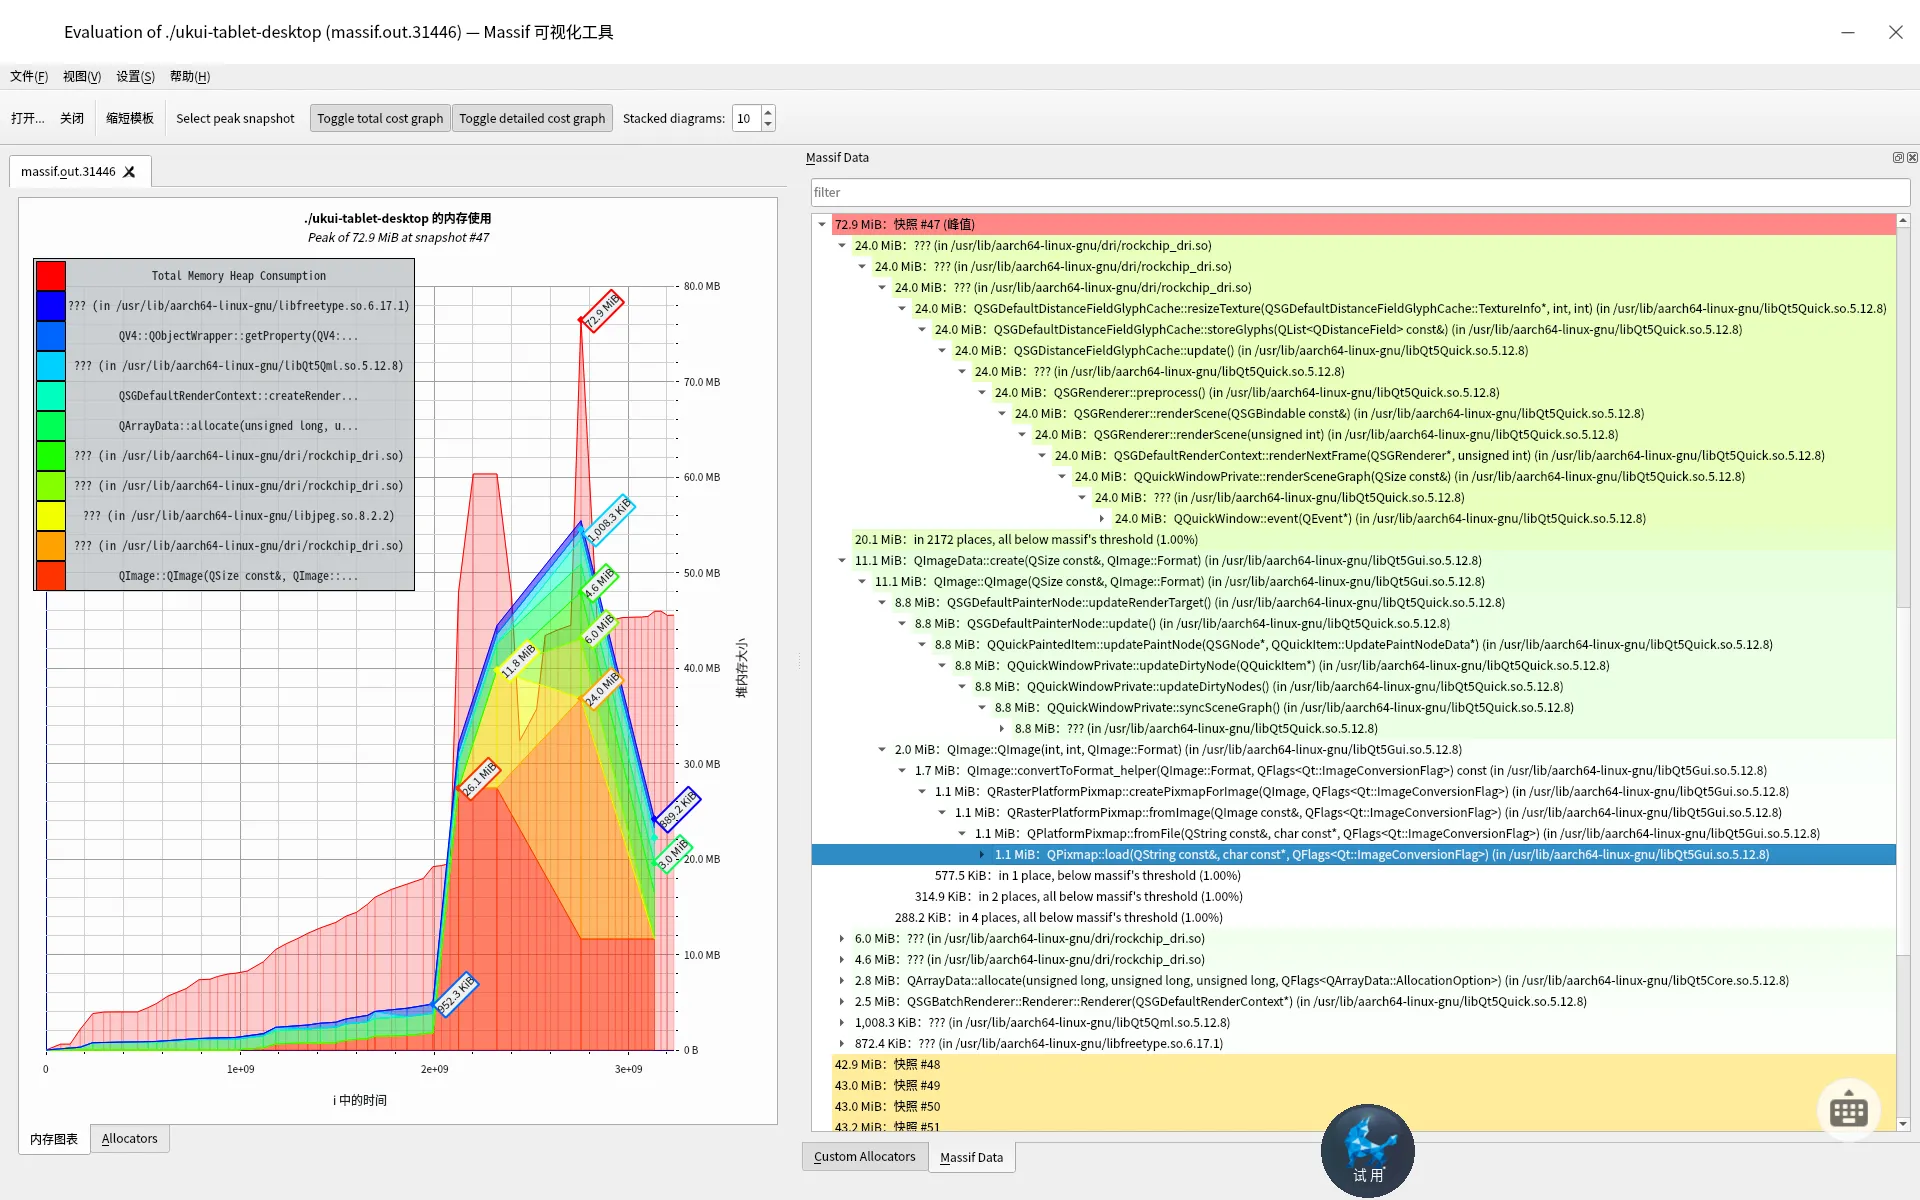
这里拿峰值的72m为例,在72m的节点上,我们知道渲染使用了24M,QImage加载图片用了11M QImage构造用了2M。这都是实实在在的内存使用情况,展开就能看到函数调用。
调试底层内存占用
massif能够查看内存占用,这些默认是基于上层代码函数的,如果是基于底层malloc, calloc, realloc, memalign, new等函数的,那么我们需要添加一个参数 --pages-as-heap=yes 即可。这样我们查看内存的使用情况关注点就来到了glibc上或自写的内存池上了。
为什么要这样查看呢,其实问题到这里的时候已经不是内存泄漏了,而是内存使用情况了,如果不去看底层内存管理机制,那么想降低内存的使用情况只能动复用内存或内存池或自行实现内存管理。所以才有--pages-as-heap=yes的出现。
那么演示如下:
首先我们收集日志如下
valgrind --tool=massif --pages-as-heap=yes ./ukui-tablet-desktop
退出程序之后,我们打开massif的日志界面 如下,这里我直接在峰值展开如下
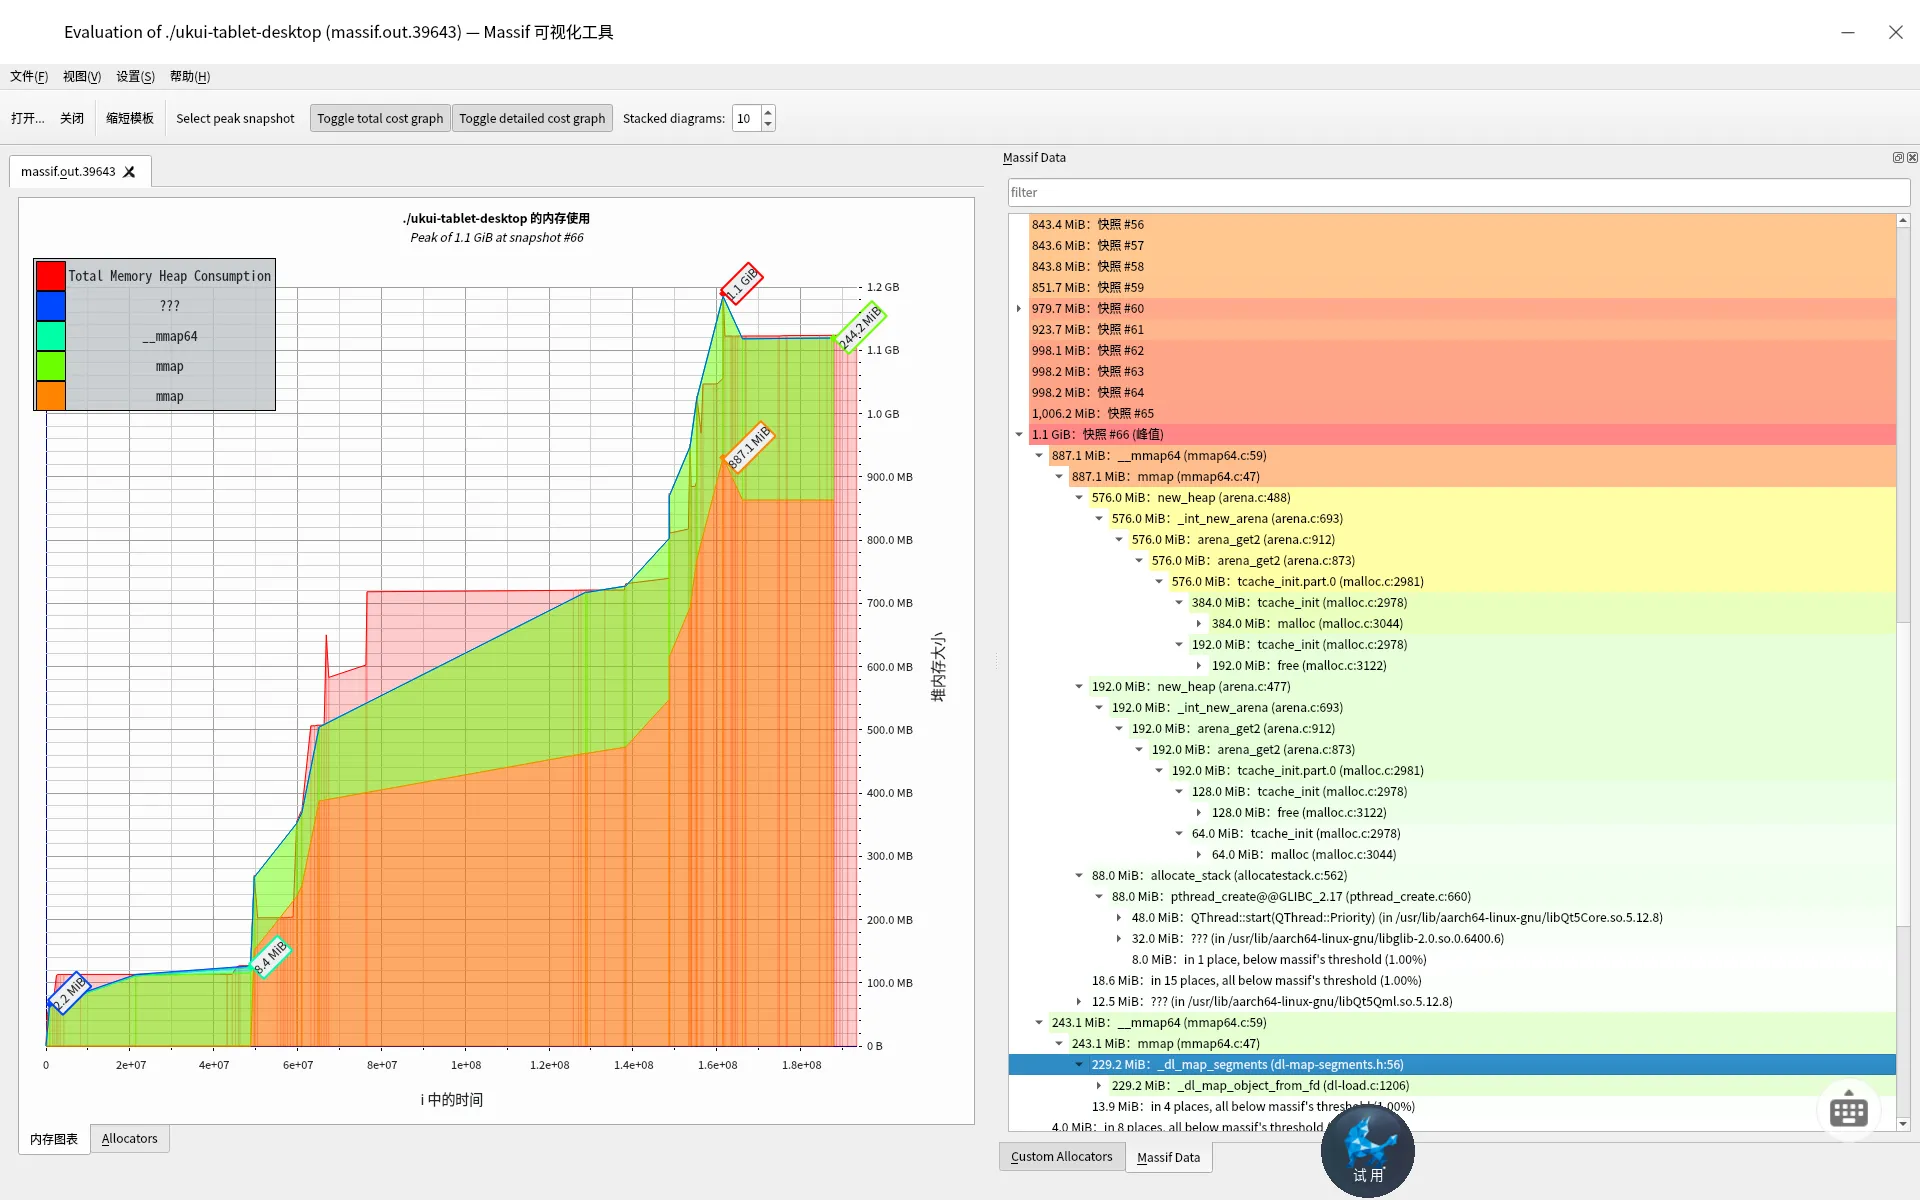
这里我们就可以看到glibc内存管理的细节了,我们看到mmap arena tcache malloc free dl_map_segments 这类底层函数内存占用了。我们可以通过这些信息,为内存管理投其所好的进行内存优化,例如常用fastbin,大内存直接mmap等方式减少内存碎片。
了解glibc的简单原理可看我之前的文章。
总结
并不是所有的内存问题都是泄漏,很多情况下其实是内存占用太大而已,实际还是需要使用的,那么这种情况下我们需要使用massif来查看内存布局,massif可以从两个角度调试,一个是应用角度,根据信息结合代码来进行初步调优,另一个是内存管理角度,根据信息结合glibc内存管理策略或自己写的内存管理程序策略来优化内存的分配,提高小块内存的利用率和减少大块内存的重复分配以及减少内存碎片。
这里介绍了massif,后续如果定位非内存泄漏问题会非常方便。
参考文章
massif可以参考如下文章,原理性的东西我就不二转手了。
heaptrack是kde的内存调试工具,我们在定位内存泄漏的时候,为了方便定位可以安装此工具来排查,下面是heaptrack的使用方法
安装
安装方式如下
apt install heaptrack heaptrack-gui libheaptrack
监听内存泄漏
heaptrack不需要太多的参数支持,直接heaptrack追加需要监控的进程即可,如下
heaptrack ./ukui-tablet-desktop
因为我们调试内存泄漏的时候,大概是知道泄漏的点或者行为,此时进入程序触发泄漏行为即可。当泄漏出现的时候,我们关掉程序,可以在当前目录获得名字为heaptrack.name.pid.gz类似的文件,此时直接加载此调试文件即可,如下
打开分析界面
直接使用heaptrack_gui即可,如下
heaptrack_gui /home/kylin/heaptrack.ukui-tablet-desktop.29058.gz
此时我们可以看到图片如下
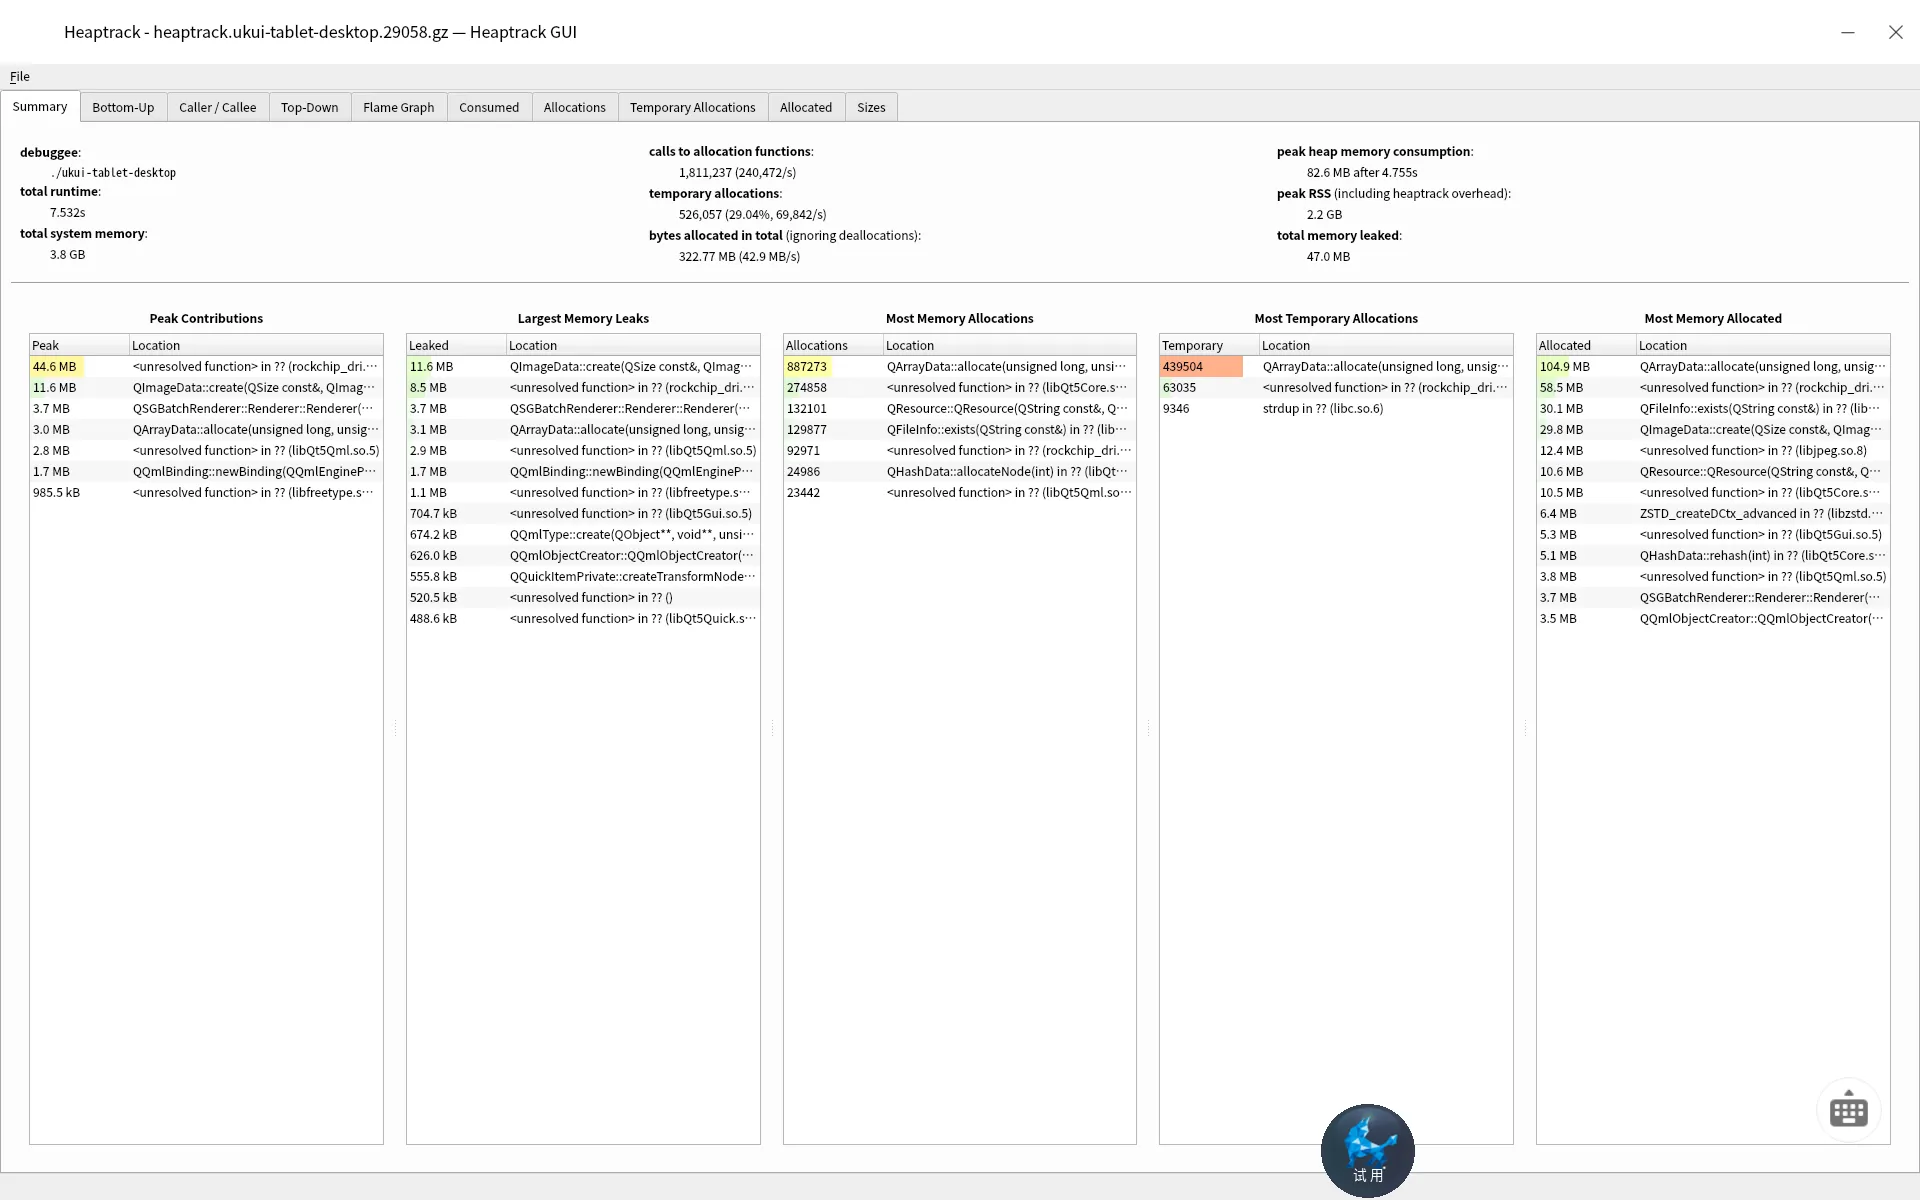
这里已经大概告诉你泄漏的函数原因了,可以继续追代码了。
如果我们需要看详细的统计数据,我们可以跳转到Flame Graph中,当然任何内存泄漏都有一定阈值,我们可以设置Cost Threshold即可,这里设置10%。如下所示
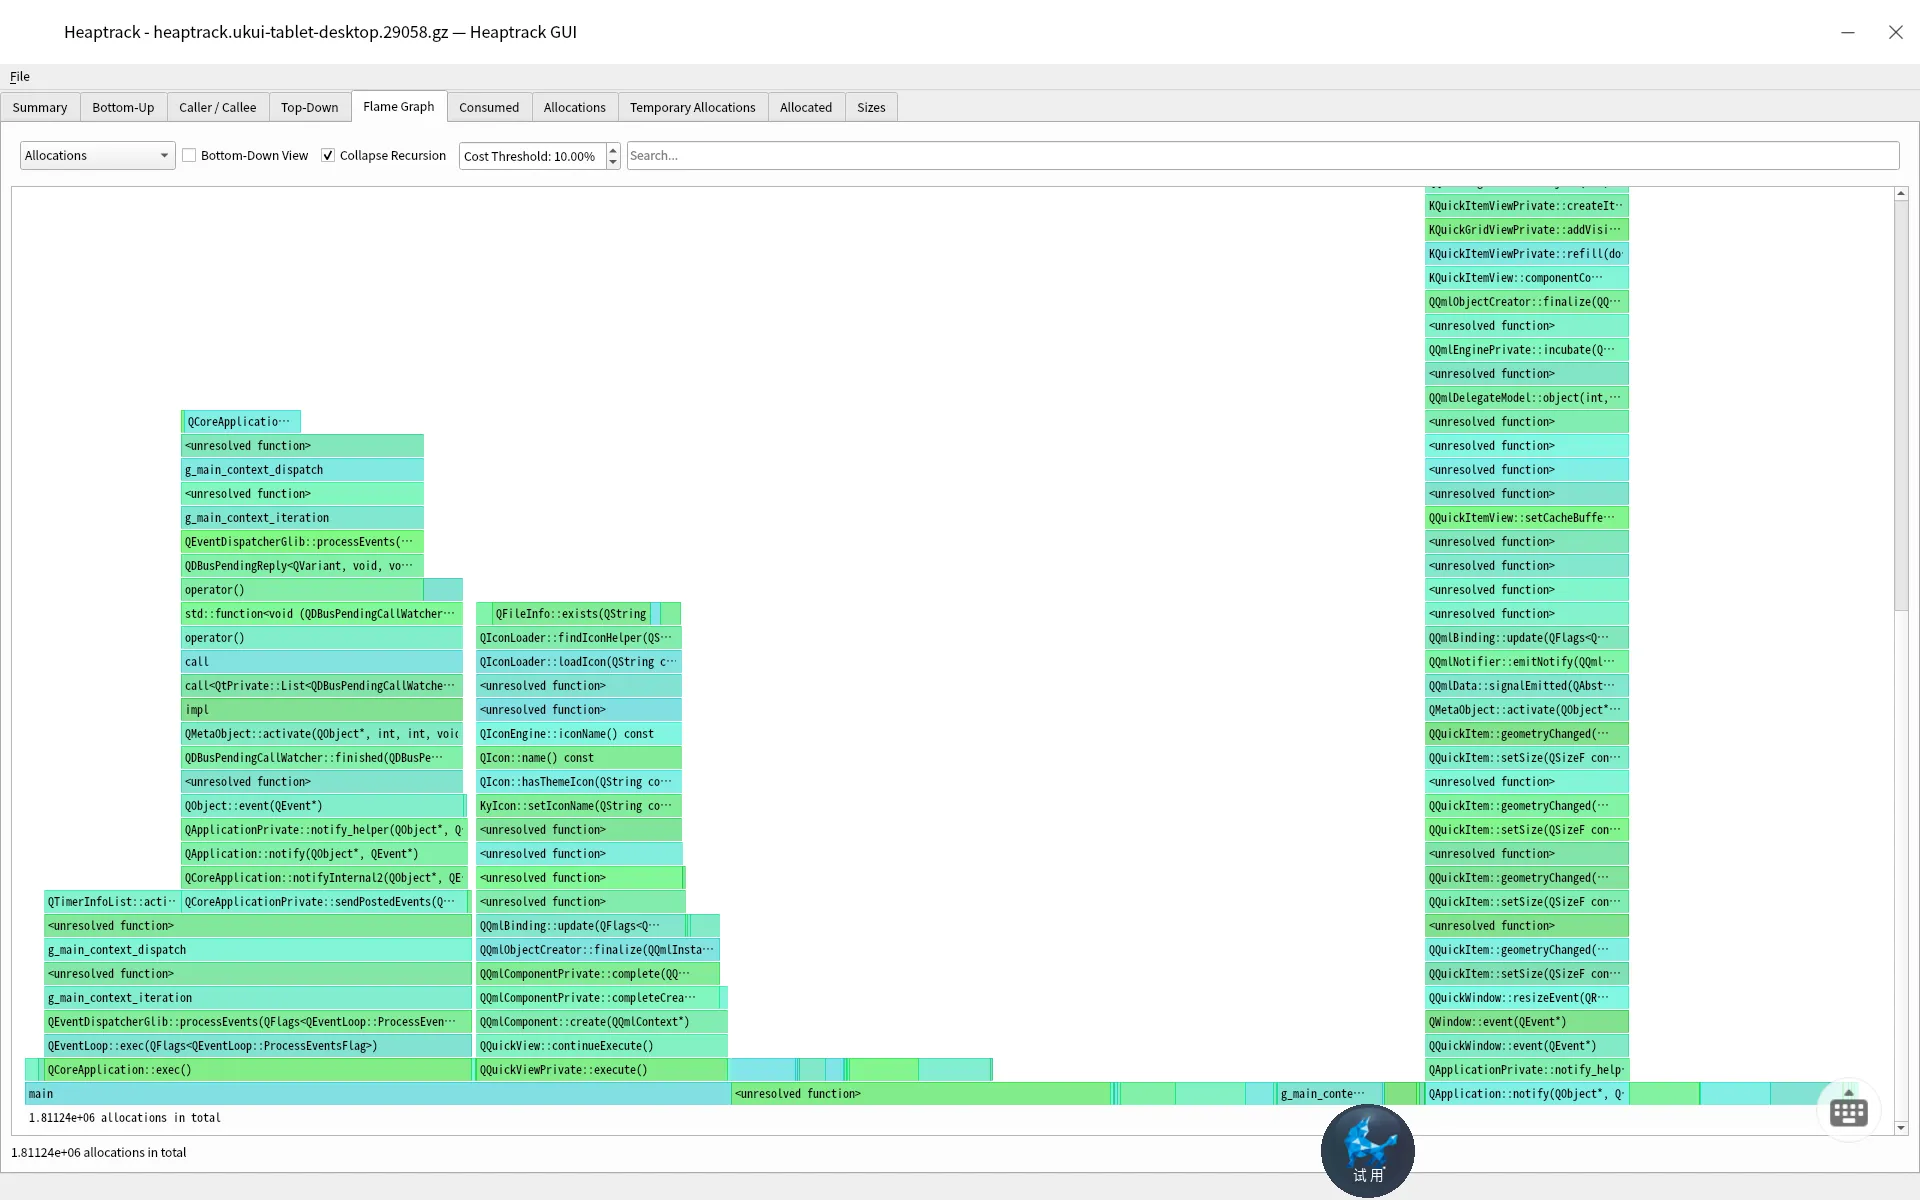
这里就直接看到超过10%的Cost的调用,直接就能看出原因。
虽然上面可以查看到简单的内存泄漏,但是内存泄漏是长期的,我们需要长时间盯着内存的消耗增长,那么我们可以挂机72小时后,在Consumed中查看其增长情况,如下。
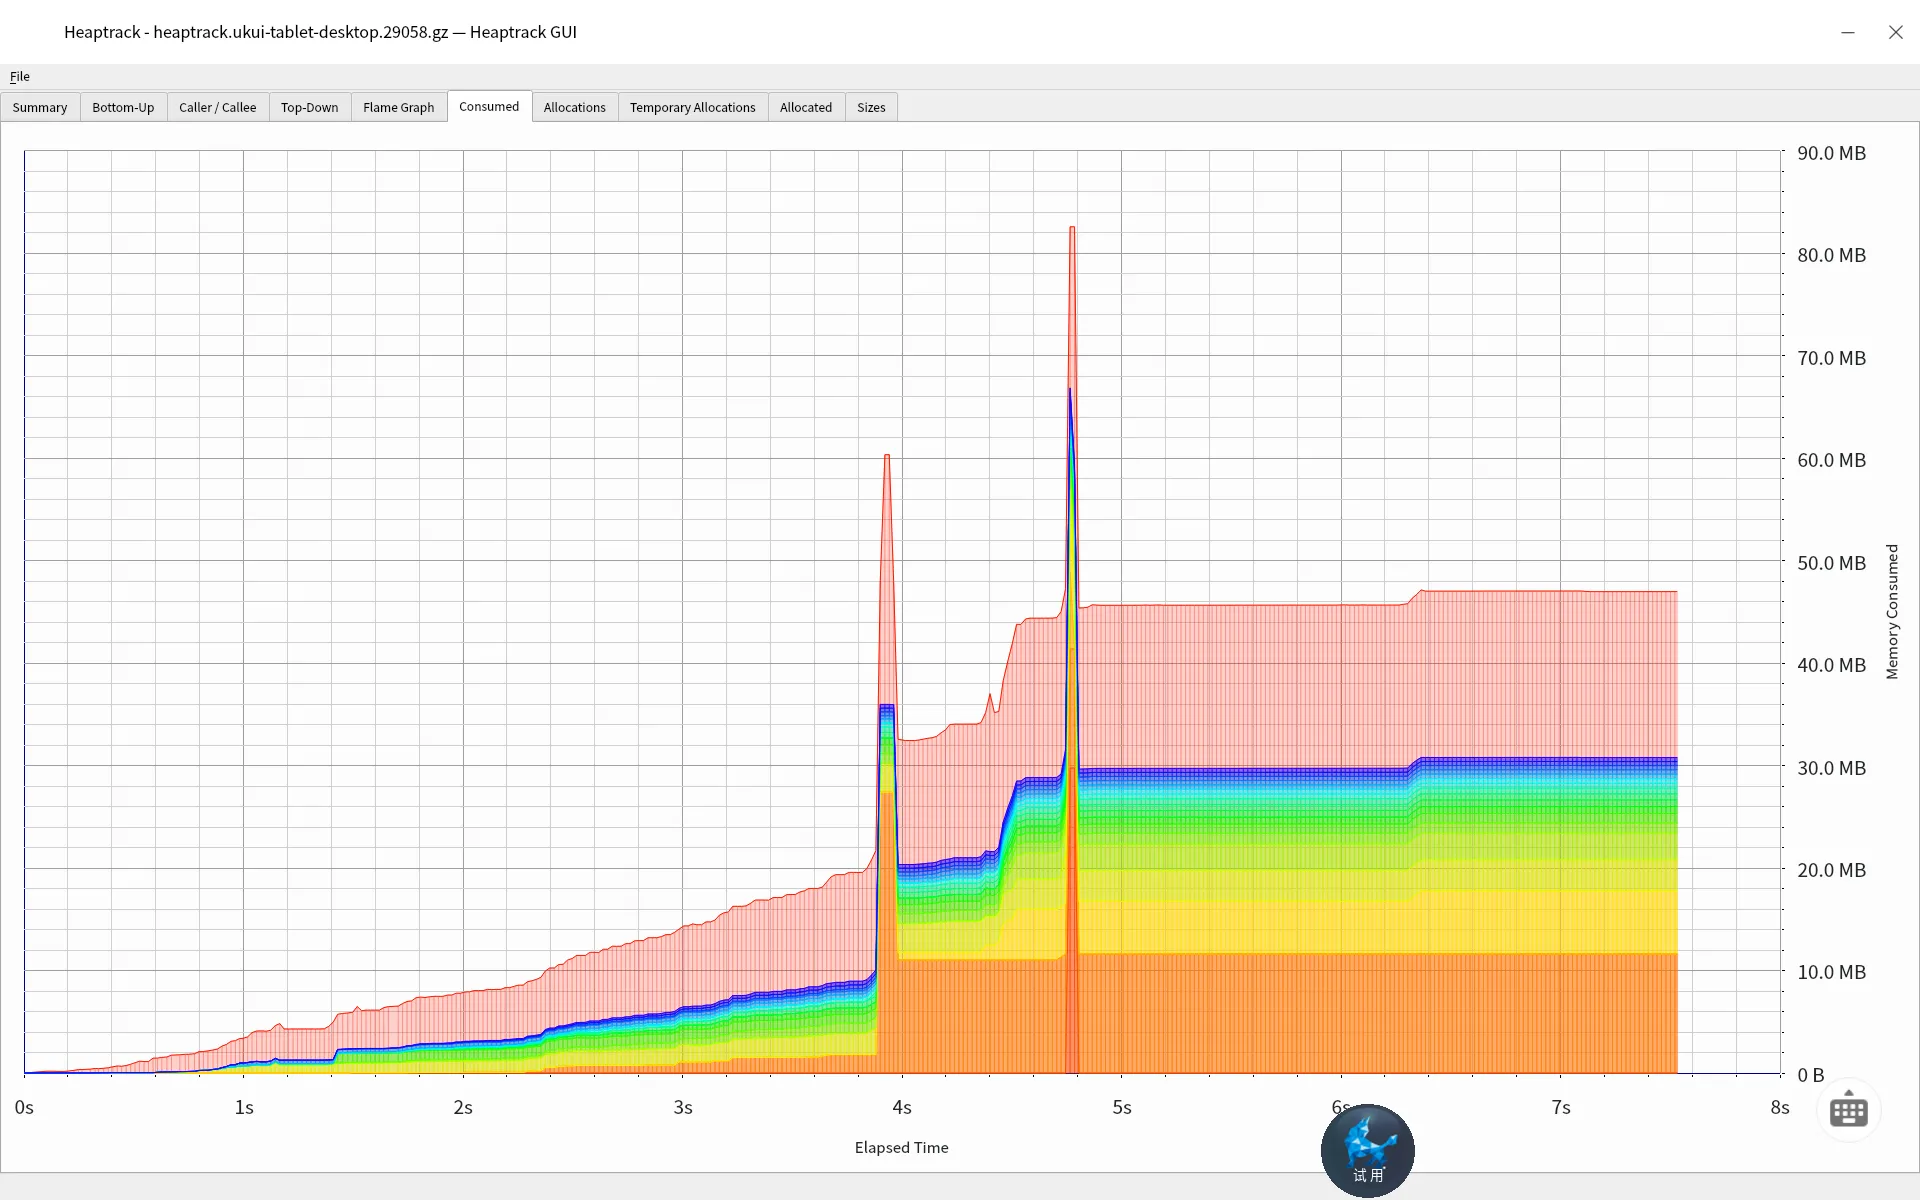
此时如果是长时间挂机,内存不是趋于平稳,那么就说明内存泄漏比较明显了。否则我们只能说内存会被一定情况下被使用。
总结
至此,我们基于heaptrack能够很方便的定位内存泄漏问题了,它不同于valgrind,大型的程序使用valgrind会导致性能十分低下,不方便排查问题。而像kde这种大型qt项目或其他,heaptrack是一个非常不错的选择。
之前把rtems上支持的所有的调度器介绍了一遍,但是一直都没有说上下文是如何切换的。其实上下文切换的逻辑就是保存线程TCB和通用寄存器,然后根据新的线程TCB信息进行运行。本文从上下文切换的角度来讲清楚RTEMS中是怎么完成上下文切换的
从schedule函数角度看
对于任何的任务,调用schedule就是根据当前任务的情况执行调度,那么主动调用如下函数
( *scheduler->Operations.schedule )( scheduler, the_thread );
这里不同的调度算法实现的回调不一样,为了方便介绍,这里以优先级调度为例,那么最后调用函数如下
static inline void _Scheduler_uniprocessor_Update_heir(
  Thread_Control *heir,
  Thread_Control *new_heir
)
{
  _Assert( heir != new_heir );
#if defined(RTEMS_SMP)
  /*
   * We need this state only for _Thread_Get_CPU_time_used_locked().  Cannot
   * use _Scheduler_Thread_change_state() since THREAD_SCHEDULER_BLOCKED to
   * THREAD_SCHEDULER_BLOCKED state changes are illegal for the real SMP
   * schedulers.
   */
  heir->Scheduler.state = THREAD_SCHEDULER_BLOCKED;
  new_heir->Scheduler.state = THREAD_SCHEDULER_SCHEDULED;
#endif
  _Thread_Update_CPU_time_used( heir, _Thread_Get_CPU( heir ) );
  _Thread_Heir = new_heir;
  _Thread_Dispatch_necessary = true;
}
再设置完一些state之后,我们重点关注如下两个值的设置
  _Thread_Heir = new_heir;
  _Thread_Dispatch_necessary = true;
这里的new_heir是即将要运行的任务,他是Thread_Control * 指针。而_Thread_Dispatch_necessary是Per_CPU_Control结构体的一个成员dispatch_necessary,我们通过dispatch_necessary来判断当前任务是否要scheduler。
从_Thread_Do_dispatch函数角度看
我们当任务在合适的实际,我们可以设置dispatch enable,或者直接调用_Thread_Do_dispatch函数,这样线程就直接开始开始调度的实际行为。 我们看起核心代码如下
  do {
    Thread_Control                     *heir;
    heir = _Thread_Get_heir_and_make_it_executing( cpu_self );

    if ( heir == executing ) {
      break;
    }

    _ISR_Local_enable( level );

    _Thread_Save_fp( executing );
    _Context_Switch( &executing->Registers, &heir->Registers );
    _Thread_Restore_fp( executing );
    _User_extensions_Thread_switch( NULL, executing );

    cpu_self = _Per_CPU_Get();

    _ISR_Local_disable( level );
  } while ( cpu_self->dispatch_necessary );
可以看到,只要dispatch_necessary设置为true,那么任务就会执行调度。执行调度的函数为_Context_Switch,它会根据每个架构的实现来运行上下文切换,我们基于armv8架构来介绍
从_CPU_Context_switch函数来看
这里主要是Arm64的实现,先看源码
DEFINE_FUNCTION_AARCH64(_CPU_Context_switch)
	.globl	_CPU_Context_switch_no_return
	.set	_CPU_Context_switch_no_return, _CPU_Context_switch
#ifdef AARCH64_MULTILIB_ARCH_V8_ILP32
/* Sanitize inputs for ILP32 ABI */
	mov w0, w0
	mov w1, w1
  #ifdef RTEMS_SMP
    #define reg_2 x2
  #else
    #define reg_2 w2
  #endif
#else
#define reg_2 x2
#endif

/* Start saving context */
	GET_SELF_CPU_CONTROL	reg_2
	ldr	w3, [x2, #PER_CPU_ISR_DISPATCH_DISABLE]  // 读取isr_dispatch_disable

	stp x19, x20, [x0]               // 保存aapcs中规定的callee寄存器 也就是x19-x28
	stp x21, x22, [x0, #0x10]
	stp x23, x24, [x0, #0x20]
	stp x25, x26, [x0, #0x30]
	stp x27, x28, [x0, #0x40]
	stp fp,  lr,  [x0, #0x50]       // 保存fp和lr
	mov x4,  sp                     // 保存sp寄存器
	str x4,  [x0, #0x60]

#ifdef AARCH64_MULTILIB_VFP
	add	x5, x0, #AARCH64_CONTEXT_CONTROL_D8_OFFSET
	stp d8,  d9,  [x5]              // 保存浮点寄存器
	stp d10, d11, [x5, #0x10]
	stp d12, d13, [x5, #0x20]
	stp d14, d15, [x5, #0x30]
#endif

	str	x3, [x0, #AARCH64_CONTEXT_CONTROL_ISR_DISPATCH_DISABLE] //将本线程的isr_dispatch_disable设置到x0

#ifdef RTEMS_SMP
	/*
	 * The executing thread no longer executes on this processor.  Switch
	 * the stack to the temporary interrupt stack of this processor.  Mark
	 * the context of the executing thread as not executing.
	 */
	dmb	SY          //所有数据dmb
	add	sp, x2, #(PER_CPU_INTERRUPT_FRAME_AREA + CPU_INTERRUPT_FRAME_SIZE) //分配一个栈
	mov	x3, #0  //将0写到is_executing中
	strb	w3, [x0, #AARCH64_CONTEXT_CONTROL_IS_EXECUTING_OFFSET]

.L_check_is_executing:

	/* Check the is executing indicator of the heir context */
	add	x3, x1, #AARCH64_CONTEXT_CONTROL_IS_EXECUTING_OFFSET //获取is_executing的值
	ldaxrb	w4, [x3] //原子读取x3的内容到w4
	cmp	x4, #0
	bne	.L_get_potential_new_heir  //如果已经其他cpu执行则跳到其他线程tcb上重新判断

	/* Try to update the is executing indicator of the heir context */
	mov	x4, #1
	stlxrb	w5, w4, [x3]   // 将is_executing设置回去,结果保存在w5
	cmp	x5, #0
	bne	.L_get_potential_new_heir // 如果设置失败,则跳到其他tcb上重新判断
	dmb	SY  // dmb所有数据
#endif

/* Start restoring context */
.L_restore:
#if !defined(RTEMS_SMP) && defined(AARCH64_MULTILIB_HAS_LOAD_STORE_EXCLUSIVE)
	clrex  // 清空独占监视器
#endif

	ldr	x3, [x1, #AARCH64_CONTEXT_CONTROL_THREAD_ID_OFFSET]  // 加载下一个线程的thread_id

	ldr	x4, [x1, #AARCH64_CONTEXT_CONTROL_ISR_DISPATCH_DISABLE] // 加载下一个线程的isr_dispatch_disable

#ifdef AARCH64_MULTILIB_VFP
	add	x5, x1, #AARCH64_CONTEXT_CONTROL_D8_OFFSET // 加载下一个线程的浮点寄存器
	ldp d8,  d9,  [x5]
	ldp d10, d11, [x5, #0x10]
	ldp d12, d13, [x5, #0x20]
	ldp d14, d15, [x5, #0x30]
#endif

	msr	TPIDR_EL0, x3   // 将x3设置到TPIDR_EL0

	str	w4, [x2, #PER_CPU_ISR_DISPATCH_DISABLE]  // 更新isr_dispatch_disable

	ldp x19, x20, [x1]  // 恢复下一个线程的callee寄存器
	ldp x21, x22, [x1, #0x10]
	ldp x23, x24, [x1, #0x20]
	ldp x25, x26, [x1, #0x30]
	ldp x27, x28, [x1, #0x40]
	ldp fp,  lr,  [x1, #0x50]   // 恢复fp和lr
	ldr x4,  [x1, #0x60]
	mov sp,  x4       //恢复sp
	ret
上面代码尽可能给出了注释,有些补充解释如下
x0和x1
我们知道_CPU_Context_switch的原型是:
_CPU_Context_switch( _executing, _heir )
所以x0 是当前线程tcb,x1是下一个线程的tcb
Context_Control结构体
我们知道需要保存x19-x30 sp等寄存器,那么保存的地方在TPIDR_EL0上,TPIDR_EL0上存在的是Context_Control的指针,所以Context_Control结构体如下。
typedef struct {
  uint64_t register_x19;
  uint64_t register_x20;
  uint64_t register_x21;
  uint64_t register_x22;
  uint64_t register_x23;
  uint64_t register_x24;
  uint64_t register_x25;
  uint64_t register_x26;
  uint64_t register_x27;
  uint64_t register_x28;
  uint64_t register_fp;
  uint64_t register_lr;
  uint64_t register_sp;
  uint64_t isr_dispatch_disable;
  uint64_t thread_id;
#ifdef AARCH64_MULTILIB_VFP
  uint64_t register_d8;
  uint64_t register_d9;
  uint64_t register_d10;
  uint64_t register_d11;
  uint64_t register_d12;
  uint64_t register_d13;
  uint64_t register_d14;
  uint64_t register_d15;
#endif
#ifdef RTEMS_SMP
  volatile bool is_executing;
#endif
} Context_Control;
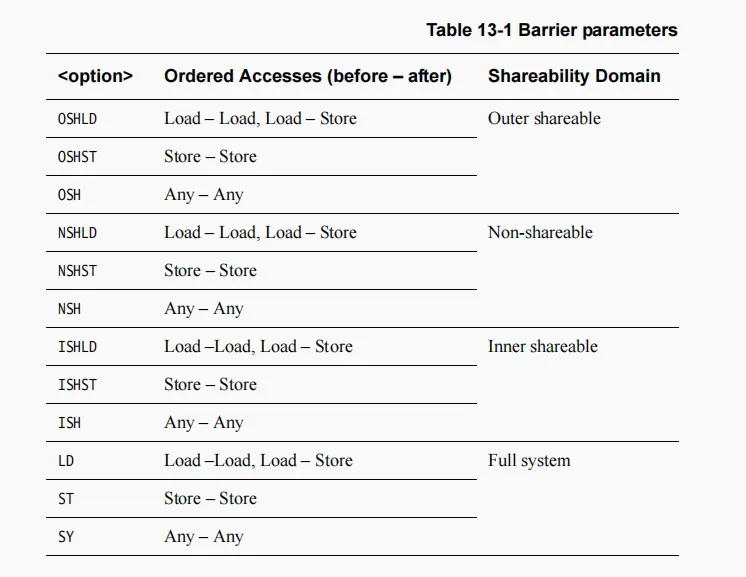
dmb SY
dmb是数据内存同步,SY是对全系统进行刷新,SY的解释如下
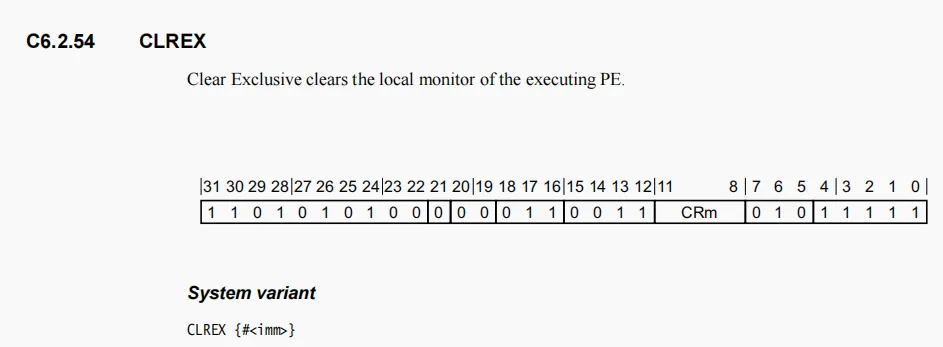
CLREX
Clear Exclusive access monitor,清空独占监视器,请问接下来要做独占访问,这里直接清空独占监视器
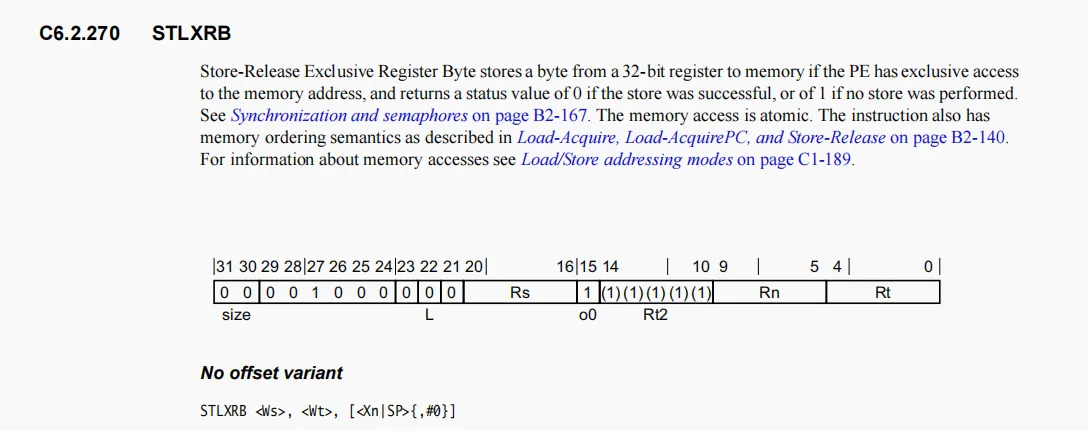
ldaxrb和stlxrb
这两个都是独占访问内存和独占存储内存,

其中stlxrb会将"<Ws>"的值返回出来,如果是0则独占访问成功,如果非0则失败
总结
至此,我们根据上下文切换的代码分析,清楚的知道了调度器在任务运行时的寄存器保存过程和sp分配过程等。相关演示操作在之前的文章有过体现,gdb能够很清楚的看到任务分配后的寄存器显示,这里就没有必要重复了。
关于cbs调度算法,我们上面知道了其默认基于edf,以截止时间作为优先级,每个任务都有预算,当预算完成时任务也完成了,那么更新预算,重新周期,如果任务的unblock后的剩余占比大于设置预算设置占比,则将任务推迟运行。
本文基于rtems的测试用例,简单演示一下cbs调度算法
测试代码
为了支持测试,我们需要创建四个任务,这个比较常规,使用 rtems_task_create和rtems_task_start即可
在cbs中,我们需要额外调用rtems_cbs_initialize即可。那么代码如下
  for ( index = 1 ; index <= NUM_TASKS ; index++ ) {
    status = rtems_task_create(
      Task_name[ index ],
      Priorities[ index ],
      RTEMS_MINIMUM_STACK_SIZE * 4,
      RTEMS_DEFAULT_MODES,
      RTEMS_DEFAULT_ATTRIBUTES,
      &Task_id[ index ]
    );
    directive_failed( status, "rtems_task_create loop" );
  }

  rtems_cbs_initialize();

  for ( index = 1 ; index <= NUM_PERIODIC_TASKS ; index++ ) {
    status = rtems_task_start( Task_id[ index ], Tasks_Periodic, index );
    directive_failed( status, "rtems_task_start loop" );
  }
根据上面,任务开始时会默认调用Tasks_Periodic,我们在这里设置任务
首先,我们需要按照edf的规范,设置周期,主要调用如下
rtems_rate_monotonic_create
rtems_rate_monotonic_ident
rtems_rate_monotonic_period
对于cbs而言,我们需要预设deadline和budget,并且如果任务超限,也就是cpu利用率大于1时,我们可以设置一个函数回调,如下
params.deadline = Periods[ argument ]; params.budget = Execution[ argument ]+1; rtems_cbs_create_server( ¶ms, &overrun_handler_task_4, &server_id )
如果我们需要在任务运行的时候,重设cbs的预算和截止时间,可以使用如下函数
rtems_cbs_set_parameters
至此,我们的测试程序如下
rtems_task Tasks_Periodic( rtems_task_argument argument ) { rtems_id rmid; rtems_id test_rmid; rtems_status_code status; bool scenario_done = 0; int start, stop, now; rtems_cbs_server_id server_id, tsid; rtems_cbs_parameters params, tparams; params.deadline = Periods[ argument ]; params.budget = Execution[ argument ]+1; if ( argument == 4 ) { if ( rtems_cbs_create_server( ¶ms, &overrun_handler_task_4, &server_id )) printf( "ERROR: CREATE SERVER FAILED\n" ); } else { if ( rtems_cbs_create_server( ¶ms, NULL, &server_id ) ) printf( "ERROR: CREATE SERVER FAILED\n" ); } if ( rtems_cbs_attach_thread( server_id, Task_id[ argument ] ) ) printf( "ERROR: ATTACH THREAD FAILED\n" ); if ( rtems_cbs_get_server_id( Task_id[ argument ], &tsid ) ) printf( "ERROR: GET SERVER ID FAILED\n" ); if ( tsid != server_id ) printf( "ERROR: SERVER ID MISMATCH\n" ); if ( rtems_cbs_get_parameters( server_id, &tparams ) ) printf( "ERROR: GET PARAMETERS FAILED\n" ); if ( params.deadline != tparams.deadline || params.budget != tparams.budget ) printf( "ERROR: PARAMETERS MISMATCH\n" ); status = rtems_rate_monotonic_create( argument, &rmid ); directive_failed( status, "rtems_rate_monotonic_create" ); put_name( Task_name[ argument ], FALSE ); printf( "- rtems_rate_monotonic_create id = 0x%08" PRIxrtems_id "\n", rmid ); status = rtems_rate_monotonic_ident( argument, &test_rmid ); directive_failed( status, "rtems_rate_monotonic_ident" ); put_name( Task_name[ argument ], FALSE ); printf( "- rtems_rate_monotonic_ident id = 0x%08" PRIxrtems_id "\n", test_rmid ); if ( rmid != test_rmid ) { printf( "RMID's DO NOT MATCH (0x%" PRIxrtems_id " and 0x%" PRIxrtems_id ")\n", rmid, test_rmid ); rtems_test_exit( 0 ); } put_name( Task_name[ argument ], FALSE ); printf( "- (0x%08" PRIxrtems_id ") period %" PRIu32 "\n", rmid, Periods[ argument ] ); status = rtems_task_wake_after( 2 + Phases[argument] ); directive_failed( status, "rtems_task_wake_after" ); while (FOREVER) { if (rtems_rate_monotonic_period(rmid, Periods[argument])==RTEMS_TIMEOUT) printf("P%" PRIdPTR " - Deadline miss\n", argument); start = rtems_clock_get_ticks_since_boot(); printf("P%" PRIdPTR "-S ticks:%d\n", argument, start); if ( start >= 2*HP_LENGTH ) break; /* stop */ /* Specific scenario for task 4: tries to exceed announced budget, the task priority has to be pulled down to background. */ now = rtems_clock_get_ticks_since_boot(); if ( !scenario_done && argument == 4 && now >= 200 ) { Violating_task[ argument ] = 1; scenario_done = 1; } /* Specific scenario for task 3: changes scheduling parameters. */ if ( !scenario_done && argument == 3 && now >= 250 ) { Periods[ argument ] = Periods[ argument ] * 2; Execution[ argument ] = Execution[ argument ] * 2; params.deadline = Periods[ argument ]; params.budget = Execution[ argument ]+1; if ( rtems_cbs_set_parameters( server_id, ¶ms) ) printf( "ERROR: SET PARAMETERS FAILED\n" ); if ( rtems_cbs_get_parameters( server_id, &tparams ) ) printf( "ERROR: GET PARAMETERS FAILED\n" ); if ( params.deadline != tparams.deadline || params.budget != tparams.budget ) printf( "ERROR: PARAMETERS MISMATCH\n" ); scenario_done = 1; } /* Specific scenario for task 2: late unblock after being blocked by itself, the task priority has to be pulled down to background. */ if ( !scenario_done && argument == 2 && now >= 500 ) { Violating_task[ argument ] = 1; scenario_done = 1; } if (argument == 2 && Violating_task[ argument ]) rtems_task_wake_after( 10 ); /* active computing */ while(FOREVER) { now = rtems_clock_get_ticks_since_boot(); if ( argument == 4 && !Violating_task[ argument ] && (now >= start + Execution[argument])) break; if ( argument != 4 && (now >= start + Execution[argument]) ) break; } stop = rtems_clock_get_ticks_since_boot(); printf("P%" PRIdPTR "-F ticks:%d\n", argument, stop); } /* delete period and SELF */ status = rtems_rate_monotonic_delete( rmid ); if ( status != RTEMS_SUCCESSFUL ) { printf("rtems_rate_monotonic_delete failed with status of %d.\n",status); rtems_test_exit( 0 ); } if ( rtems_cbs_cleanup() ) printf( "ERROR: CBS CLEANUP\n" ); fflush(stdout); TEST_END(); rtems_test_exit( 0 ); }
代码比较容易理解,下面运行查看日志
日志
*** TEST CBS SCHEDULER 3 ***
PT1 - rtems_rate_monotonic_create id = 0x42010001
PT1 - rtems_rate_monotonic_ident id = 0x42010001
PT1 - (0x42010001) period 30
PT2 - rtems_rate_monotonic_create id = 0x42010002
PT2 - rtems_rate_monotonic_ident id = 0x42010002
PT2 - (0x42010002) period 40
PT3 - rtems_rate_monotonic_create id = 0x42010003
PT3 - rtems_rate_monotonic_ident id = 0x42010003
PT3 - (0x42010003) period 50
PT4 - rtems_rate_monotonic_create id = 0x42010004
PT4 - rtems_rate_monotonic_ident id = 0x42010004
PT4 - (0x42010004) period 70
AT5 AT6 P1-S ticks:2
P1-F ticks:12
P2-S ticks:12
P2-F ticks:22
P3-S ticks:22
P1-S ticks:32
P1-F ticks:42
P3-F ticks:42
P4-S ticks:42
P2-S ticks:52
P2-F ticks:62
P1-S ticks:62
P1-F ticks:72
P4-F ticks:72
P3-S ticks:72
P3-F ticks:82
AT6-S ticks:82
P6-F ticks:87
Killing task 6
AT5-S ticks:87
P1-S ticks:92
P1-F ticks:102
P2-S ticks:102
P2-F ticks:112
P4-S ticks:112
P1-S ticks:122
P1-F ticks:132
P3-S ticks:132
P3-F ticks:142
P2-S ticks:142
P2-F ticks:152
P4-F ticks:152
P1-S ticks:152
P1-F ticks:162
P2-S ticks:172
P2-F ticks:182
P1-S ticks:182
P1-F ticks:192
P3-S ticks:192
P3-F ticks:202
P4-S ticks:202
P1-S ticks:212
P1-F ticks:222
P4-F ticks:222
P2-S ticks:222
P2-F ticks:232
P3-S ticks:232
P3-F ticks:242
P1-S ticks:242
P1-F ticks:252
P2-S ticks:252
P2-F ticks:262
P4-S ticks:262
P1-S ticks:272
P1-F ticks:282
P3-S ticks:283
P3-F ticks:293
P2-S ticks:293
P2-F ticks:303
P1-S ticks:303
P1-F ticks:313
Signal overrun, fixing the task
P4-F ticks:313
P5-F ticks:313
Killing task 5
P3-S ticks:322
P1-S ticks:332
P1-F ticks:342
P3-F ticks:342
P2-S ticks:342
P2-F ticks:352
P4-S ticks:352
P4-F ticks:362
P1-S ticks:362
P1-F ticks:372
P2-S ticks:372
P2-F ticks:382
P3-S ticks:382
P1-S ticks:392
P1-F ticks:402
P4-S ticks:402
P2-S ticks:412
P2-F ticks:422
P1-S ticks:422
P1-F ticks:432
P4-F ticks:432
P3-F ticks:432
P1-S ticks:452
P1-F ticks:462
P2-S ticks:462
P2-F ticks:472
P4-S ticks:472
P1-S ticks:482
P1-F ticks:492
P4-F ticks:492
P2-S ticks:492
P2-F ticks:502
P3-S ticks:502
P1-S ticks:512
P1-F ticks:522
P3-F ticks:522
P2-S ticks:532
P4-S ticks:532
P1-S ticks:542
P1-F ticks:552
P4-F ticks:552
P2-F ticks:552
P1-S ticks:572
P1-F ticks:582
P2-S ticks:582
P3-S ticks:582
P1-S ticks:602
P1-F ticks:612
P3-F ticks:612
P4-S ticks:612
P4-F ticks:622
P2-F ticks:622
P2 - Deadline miss
P2-S ticks:622
P1-S ticks:632
P1-F ticks:642
P2-F ticks:642
P1-S ticks:662
P1-F ticks:672
P2-S ticks:672
P4-S ticks:672
P4-F ticks:682
P3-S ticks:682
P1-S ticks:692
P1-F ticks:702
P3-F ticks:702
P2-F ticks:702
P2 - Deadline miss
P2-S ticks:702
P2-F ticks:712
P1-S ticks:722
P1-F ticks:732
P2-S ticks:742
P4-S ticks:742
P1-S ticks:752
P1-F ticks:762
P4-F ticks:762
P2-F ticks:762
P3-S ticks:772
P1-S ticks:782
P1-F ticks:792
P2-S ticks:792
P3-F ticks:792
P2-F ticks:802
P1-S ticks:812
P1-F ticks:822
P2-S ticks:822
P4-S ticks:822
P4-F ticks:832
P2-F ticks:832
P1-S ticks:842
*** END OF TEST CBS SCHEDULER 3 ***
我们简单分析一下
- 首先,任务按照1>2>3>4的优先级运行,并且每个任务都会在自己周期内完成,我们可以留意0-82 ticks
- 然后,我们知道任务如果紧张,那么任务4在不能在周期内完成,那么overrun回调就会调用,例如任务4上次完成是222,下次完成在313时,花费了91ticks,故看到日志Signal overrun, fixing the task
- 最后,当任务在周期内,一直得不到优先级执行,那么当deadline达到的时候,在周期函数内会返回timeout,代表任务未在deadline中执行完毕,故看到从p2的ticks 582开始,到ticks 622之间,我们发现p2的任务一直被p3,p1,p4占用,导致最后p2在deadline上无法正常运行。
总结
至此,我们演示清楚了cbs调度器的示例,希望可以加深大家对cbs调度算法的理解
