Openharmony在使用hdmi显示时,发现接上鼠标之后,光标并不显示,于是开始定位,如下是相关分析解释
一、问题定位
Openharmony4.0的rk3588系统上,插上hdmi后显示,鼠标不亮,不方便非触摸屏的设备进行开发使用。
根据openharmony代码熟悉,根据文章《Openharmony目录树》可以知道其可能涉及子系统代码位置在foundation/multimodalinput/位置,如下图
 根据BUILD.gn可以发现mmi_tests工具可以测试光标事件,但是实际上我们存在光标事件,只是光标不显示,故此工具不适用此问题,只能从代码角度分析
根据sa配置可以知道,multimodalinput服务关键服务是libmmi-server.so,如下
# cat /system/profile/multimodalinput.json
{
 "process": "multimodalinput",
 "systemability": [
 {
 "name": 3101,
 "libpath": "libmmi-server.z.so",
 "run-on-create": true,
 "distributed": true,
 "dump_level": 1
 }
 ]
根据service/BUILD.gn可以发现,与libmmi-server.so相关的代码如下
ohos_shared_library("libmmi-server") {
 sources = libmmi_service_sources
......
 if (input_feature_mouse) {
 sources += [
 "mouse_event_normalize/src/mouse_device_state.cpp",
 "mouse_event_normalize/src/mouse_event_normalize.cpp",
 "mouse_event_normalize/src/mouse_transform_processor.cpp",
 "touch_event_normalize/src/gesture_transform_processor.cpp",
 "touch_event_normalize/src/touchpad_transform_processor.cpp",
 ]
 if (input_feature_pointer_drawing) {
 sources += [ "window_manager/src/pointer_drawing_manager.cpp" ]
 } else {
 sources += [ "window_manager/src/i_pointer_drawing_manager.cpp" ]
 }
 }
libmmi_service_sources = [
 "$mmi_path/frameworks/proxy/event_handler/src/bytrace_adapter.cpp",
 "delegate_task/src/delegate_tasks.cpp",
 "device_config/src/device_config_file_parser.cpp",
 "device_manager/src/input_device_manager.cpp",
 "dfx/src/dfx_hisysevent.cpp",
 "display_state_manager/src/display_event_monitor.cpp",
 "event_dispatch/src/event_dispatch_handler.cpp",
 "event_dump/src/event_dump.cpp",
 "event_handler/src/anr_manager.cpp",
 "event_handler/src/event_normalize_handler.cpp",
 "event_handler/src/input_event_handler.cpp",
 "event_handler/src/key_auto_repeat.cpp",
 "event_handler/src/key_event_value_transformation.cpp",
 "event_handler/src/key_map_manager.cpp",
 "fingersense_wrapper/src/fingersense_wrapper.cpp",
 "libinput_adapter/src/hotplug_detector.cpp",
 "libinput_adapter/src/libinput_adapter.cpp",
 "message_handle/src/server_msg_handler.cpp",
 "module_loader/src/mmi_service.cpp",
 "module_loader/src/uds_server.cpp",
 "permission_helper/src/permission_helper.cpp",
 "timer_manager/src/timer_manager.cpp",
 "window_manager/src/input_display_bind_helper.cpp",
 "window_manager/src/input_windows_manager.cpp",
 ]
于是阅读代码和定位逻辑,可以发现输入设备的识别和管理在input_device_manager.cpp实现
foundation/multimodalinput/input/service/device_manager/src/input_device_manager.cpp
而光标图层管理的代码在input_windows_manager.cpp实现
foundation/multimodalinput/input/service/window_manager/src/input_windows_manager.cpp
实际的光标绘制的代码在pointer_drawing_manager.cpp实现
foundation/multimodalinput/input/service/window_manager/src/pointer_drawing_manager.cpp
二、代码梳理
相关问题定位清晰后,随针对此三块代码进行分析和调试。
2.1 input_device_manager
此文件功能作为输入设备的识别,添加,其关键函数如下,详细代码实现不必列出:
GetInputDevice	实例化InputDevice,返回InputDevice对象
FillInputDevice	填充InputDevice对象的数据
OnInputDeviceAdded	通过libinput库获得设备信息,并分发光标绘制任务
ScanPointerDevice	遍历InputDevice实例,找到pointer设备
IsPointerDevice	如果libinput_device_get_tags存在EVDEV_UDEV_TAG_MOUSE,则是pointer设备
2.2 input_windows_manager
此文件功能作为输入设备的图层显示设置,窗口信息,光标事件。其关键函数如下
GetClientFd	根据pointer事件获取client的fd值,用作后续获取session的句柄
GetDisplayId	根据pointer事件获取displayid
UpdateDisplayInfo	通过displayGroupInfo更新displayid和WindowInfo
SendPointerEvent	通过session发送点击事件
DispatchPointer	通过session发送点击事件(存在上次点击事件的情况)
GetPhysicalDisplayCoord	通过libinput获取触摸的坐标
SetPointerStyle	设置光标style
GetPointerStyle	获取光标style
SelectWindowInfo	根据点击事件获取windowid,从而获得WindowInfo
UpdateMouseTarget	更新鼠标位置和显示
UpdateTargetPointer	根据pointer的类型选择更新对应事件位置和显示
UpdateAndAdjustMouseLocation	调整鼠标位置
2.3 pointer_drawing_manager
此文件处理真正的光标绘制需求,根据光标的位置和style来执行绘制请求
DrawPointer	绘制光标
InitLayer	初始化光标层
CreatePointerWindow	创建surface节点用于绘制光标层
GetSurfaceBuffer	根据传入的surface节点,获取sufface buffer
DrawPixelmap	根据icon使用canvas绘制bitmap
SetMouseIcon	设置鼠标icon
DecodeImageToPixelMap	将icon解码成pixelmap
SetPointerColor	设置光标颜色
SetPointerSize	设置光标大小
UpdatePointerDevice	更新光标设备
DrawManager	绘制管理,根据是否是光标设备来判断是否绘制和销毁窗口
UpdatePointerVisible	更新光标是否可见
SetPointerStyle	设置光标style
DrawPointerStyle	绘制光标style
三、定位问题
在完成上述1.判断问题相关代码,2.熟悉代码流程之后,可以开始进行定位实际问题,主要策略如下
3.1 单独编译模块
根据解析BUILD.gn可以知道,此模块可以单独编译,如下是单独编译命令
prebuilts/build-tools/linux-x86/bin/ninja -w dupbuild=warn -C out/rk3588/ libmmi-server
3.2 更新和替换库
可以将编译成功的库文件,替换到系统内,通过hdc命令,如下
hdc -t 9b01005932503033320045da20422900 shell mount -o remount,rw /
hdc -t 9b01005932503033320045da20422900 file send /root/tf/rk3588/out/rk3588/multimodalinput/input/libmmi-server.z.so /system/lib64/
3.3 服务控制
根据上述措施,已经成功将libmmi-server推送到系统内部,这时候需要将multimodalinput服务关闭和拉起,方法如下
service_control stop multimodalinput
service_control start multimodalinput
当然,因为openharmony的服务可以自动拉起,所以直接kill也可以,如下
kill -9 `pidof multimodalinput`
3.4 hilog查看
对于调试过程中,主要是通过hilog来进行分析,本例子用到如下
1、设置hilog为调试
hilog -b D
2、定位InputDeviceManager日志
hilog -T InputDeviceManager
3、定位InputWindowsManager日志
hilog -T InputWindowsManager
4、定位PointerDrawingManager日志
hilog -T PointerDrawingManager
5、整体定位mmi服务的日志
hilog -P `pidof multimodalinput`
3.5 参考社区pr
针对此问题,可以借助社区的pr进行方向性思考,如下pr通过解决多屏同显,多屏异显对multimodalinput做了修改
https://gitee.com/openharmony/multimodalinput_input/pulls/3103/files
对于此笔pr,我们可以发现对于绘制光标的surface接口,可以做如下改变:
surfaceNode_->DetachToDisplay(screenId_);      ---->     Rosen::DisplayManager::GetInstance().RemoveSurfaceNodeFromDisplay(displayId_, surfaceNode_);
surfaceNode_->AttachToDisplay(screenId_);     ---->     Rosen::DisplayManager::GetInstance().AddSurfaceNodeToDisplay(displayId_, surfaceNode_);
可以发现,对于光标,openharmony默认直接使用surfaceNode对象来attach和detach对于的display id。此方法在3588使用hdmi时,并不生效。
而通过使用窗管代码的RemoveSurfaceNodeFromDisplay/AddSurfaceNodeToDisplay的接口,可以正常的将光标的surface绑定到对于的display上。此方法有效。
四、代码改动
根据上述内容,我们可以清楚的知道光标的实现逻辑以及代码的修改点,如下贴出代码的提交改动
BUILD.gn改动
diff --git a/service/BUILD.gn b/service/BUILD.gn
index aa307c7ac..5b908c7d8 100644
--- a/service/BUILD.gn
+++ b/service/BUILD.gn
@@ -164,7 +164,10 @@ ohos_shared_library("libmmi-server") {
external_deps = [ "c_utils:utils" ]
 if (input_feature_pointer_drawing) {
- external_deps += [ "window_manager:libwm" ]
+ external_deps += [
+ "window_manager:libdm",
+ "window_manager:libwm",
+ ]
 }
if (security_component_enable) {
window_manager/include/pointer_drawing_manager.h改动

diff --git a/service/window_manager/include/pointer_drawing_manager.h b/service/window_manager/include/pointer_drawing_manager.h
index 52a0ee255..d111b02c6 100644
--- a/service/window_manager/include/pointer_drawing_manager.h
+++ b/service/window_manager/include/pointer_drawing_manager.h
@@ -105,7 +105,7 @@ private:
 std::list<PidInfo> pidInfos_;
 bool mouseDisplayState_ { false };
 std::unique_ptr<OHOS::Media::PixelMap> userIcon_ { nullptr };
- uint64_t screenId_ { 0 };
+ Rosen::DisplayId displayId_ { 0 };
 std::shared_ptr<Rosen::RSSurfaceNode> surfaceNode_;
 std::shared_ptr<Rosen::RSCanvasNode> canvasNode_;
 int32_t userIconHotSpotX_ { 0 };
window_manager/src/input_windows_manager.cpp改动

diff --git a/service/window_manager/src/input_windows_manager.cpp b/service/window_manager/src/input_windows_manager.cpp
index c31c103d5..77a98401f 100644
--- a/service/window_manager/src/input_windows_manager.cpp
+++ b/service/window_manager/src/input_windows_manager.cpp
@@ -1470,7 +1470,10 @@ int32_t InputWindowsManager::UpdateTargetPointer(std::shared_ptr<PointerEvent> p
 #ifdef OHOS_BUILD_ENABLE_POINTER
 bool InputWindowsManager::IsInsideDisplay(const DisplayInfo& displayInfo, int32_t physicalX, int32_t physicalY)
 {
- return (physicalX >= 0 && physicalX < displayInfo.width) && (physicalY >= 0 && physicalY < displayInfo.height);
+ if (displayInfo.direction == DIRECTION0 || displayInfo.direction == DIRECTION180) {
+ return (physicalX >= 0 && physicalX < displayInfo.width) && (physicalY >= 0 && physicalY < displayInfo.height);
+ }
+ return (physicalX >= 0 && physicalX < displayInfo.height) && (physicalY >= 0 && physicalY < displayInfo.width);
 }
void InputWindowsManager::FindPhysicalDisplay(const DisplayInfo& displayInfo, int32_t& physicalX,
@@ -1490,14 +1493,25 @@ void InputWindowsManager::FindPhysicalDisplay(const DisplayInfo& displayInfo, in
 for (const auto &item : displayGroupInfo_.displaysInfo) {
 int32_t displayMaxX = 0;
 int32_t displayMaxY = 0;
- if (!AddInt32(item.x, item.width, displayMaxX)) {
- MMI_HILOGE("The addition of displayMaxX overflows");
- return;
- }
- if (!AddInt32(item.y, item.height, displayMaxY)) {
- MMI_HILOGE("The addition of displayMaxY overflows");
- return;
- }
+ if (item.direction == DIRECTION0 || item.direction == DIRECTION180) {
+ if (!AddInt32(item.x, item.width, displayMaxX)) {
+ MMI_HILOGE("The addition of displayMaxX overflows");
+ return;
+ }
+ if (!AddInt32(item.y, item.height, displayMaxY)) {
+ MMI_HILOGE("The addition of displayMaxY overflows");
+ return;
+ }
+ } else {
+ if (!AddInt32(item.x, item.height, displayMaxX)) {
+ MMI_HILOGE("The addition of displayMaxX overflows");
+ return;
+ }
+ if (!AddInt32(item.y, item.width, displayMaxY)) {
+ MMI_HILOGE("The addition of displayMaxY overflows");
+ return;
+ }
+ }
 if ((logicalX >= item.x && logicalX < displayMaxX) &&
 (logicalY >= item.y && logicalY < displayMaxY)) {
 physicalX = logicalX - item.x;
window_manager/src/pointer_drawing_manager.cpp改动
diff --git a/service/window_manager/src/pointer_drawing_manager.cpp b/service/window_manager/src/pointer_drawing_manager.cpp
index cc53d196e..e51fb4c63 100644
--- a/service/window_manager/src/pointer_drawing_manager.cpp
+++ b/service/window_manager/src/pointer_drawing_manager.cpp
@@ -19,6 +19,7 @@
 #include "image_source.h"
 #include "image_type.h"
 #include "image_utils.h"
+#include "display_manager.h"
#include "define_multimodal.h"
 #include "input_device_manager.h"
@@ -83,6 +84,12 @@ void PointerDrawingManager::DrawPointer(int32_t displayId, int32_t physicalX, in
 physicalY + displayInfo_.y,
 surfaceNode_->GetStagingProperties().GetBounds().z_,
 surfaceNode_->GetStagingProperties().GetBounds().w_);
+ if (displayId_ != static_cast<Rosen::DisplayId>(displayId)) {
+ // Move pointer to another display. 'Add' before 'Remove' to avoid the surfaceNode_ to be destroyed by dms.
+ Rosen::DisplayManager::GetInstance().AddSurfaceNodeToDisplay(displayId, surfaceNode_);
+ Rosen::DisplayManager::GetInstance().RemoveSurfaceNodeFromDisplay(displayId_, surfaceNode_);
+ displayId_ = static_cast<Rosen::DisplayId>(displayId);
+ }
 Rosen::RSTransaction::FlushImplicitTransaction();
 MMI_HILOGD("Pointer window move success");
 if (lastMouseStyle_.id == mouseStyle) {
@@ -125,7 +132,7 @@ int32_t PointerDrawingManager::InitLayer(const MOUSE_ICON mouseStyle)
 sptr<OHOS::Surface> layer = GetLayer();
 if (layer == nullptr) {
 MMI_HILOGE("Init layer is failed, Layer is nullptr");
- surfaceNode_->DetachToDisplay(screenId_);
+ Rosen::DisplayManager::GetInstance().RemoveSurfaceNodeFromDisplay(displayId_, surfaceNode_);
 surfaceNode_ = nullptr;
 Rosen::RSTransaction::FlushImplicitTransaction();
 MMI_HILOGD("Pointer window destroy success");
@@ -135,7 +142,7 @@ int32_t PointerDrawingManager::InitLayer(const MOUSE_ICON mouseStyle)
 sptr<OHOS::SurfaceBuffer> buffer = GetSurfaceBuffer(layer);
 if (buffer == nullptr || buffer->GetVirAddr() == nullptr) {
 MMI_HILOGE("Init layer is failed, buffer or virAddr is nullptr");
- surfaceNode_->DetachToDisplay(screenId_);
+ Rosen::DisplayManager::GetInstance().RemoveSurfaceNodeFromDisplay(displayId_, surfaceNode_);
 surfaceNode_ = nullptr;
 Rosen::RSTransaction::FlushImplicitTransaction();
 MMI_HILOGD("Pointer window destroy success");
@@ -312,9 +319,10 @@ void PointerDrawingManager::CreatePointerWindow(int32_t displayId, int32_t physi
 surfaceNode_->SetPositionZ(Rosen::RSSurfaceNode::POINTER_WINDOW_POSITION_Z);
 surfaceNode_->SetBounds(physicalX, physicalY, IMAGE_WIDTH, IMAGE_HEIGHT);
 surfaceNode_->SetBackgroundColor(SK_ColorTRANSPARENT);
- screenId_ = static_cast<uint64_t>(displayId);
- std::cout << "ScreenId: " << screenId_ << std::endl;
- surfaceNode_->AttachToDisplay(screenId_);
+
+ displayId_ = static_cast<Rosen::DisplayId>(displayId);
+ MMI_HILOGD("DisplayId: %{public}" PRIu64 "", displayId_);
+ Rosen::DisplayManager::GetInstance().AddSurfaceNodeToDisplay(displayId_, surfaceNode_);
 surfaceNode_->SetRotation(0);
canvasNode_ = Rosen::RSCanvasNode::Create();
@@ -630,7 +638,7 @@ void PointerDrawingManager::OnDisplayInfo(const DisplayGroupInfo& displayGroupIn
 lastPhysicalY_ = displayGroupInfo.displaysInfo[0].height / CALCULATE_MIDDLE;
 MouseEventHdr->OnDisplayLost(displayInfo_.id);
 if (surfaceNode_ != nullptr) {
- surfaceNode_->DetachToDisplay(screenId_);
+ Rosen::DisplayManager::GetInstance().RemoveSurfaceNodeFromDisplay(displayId_, surfaceNode_);
 surfaceNode_ = nullptr;
 Rosen::RSTransaction::FlushImplicitTransaction();
 MMI_HILOGD("Pointer window destroy success");
@@ -681,7 +689,7 @@ void PointerDrawingManager::DrawManager()
 }
 if (!hasPointerDevice_ && surfaceNode_ != nullptr) {
 MMI_HILOGD("Pointer window destroy start");
- surfaceNode_->DetachToDisplay(screenId_);
+ Rosen::DisplayManager::GetInstance().RemoveSurfaceNodeFromDisplay(displayId_, surfaceNode_);
 surfaceNode_ = nullptr;
 Rosen::RSTransaction::FlushImplicitTransaction();
 MMI_HILOGD("Pointer window destroy success");
@@ -885,7 +893,7 @@ void PointerDrawingManager::DrawPointerStyle()
 CALL_DEBUG_ENTER;
 if (hasDisplay_ && hasPointerDevice_) {
 if (surfaceNode_ != nullptr) {
- surfaceNode_->AttachToDisplay(screenId_);
+ Rosen::DisplayManager::GetInstance().AddSurfaceNodeToDisplay(displayId_, surfaceNode_);
 Rosen::RSTransaction::FlushImplicitTransaction();
 }
 PointerStyle pointerStyle;
代码补丁文件:0001-rk3588-fixed-cursor-is-hided.patch
五、总结
至此,openharmony可正常显示光标,其根本原因是适配时,openharmony的surfaceNode实现的attach接口并不生效,可能和底层相关。但参照pr修改为windows manager的api即正常。此问题应属于系统本身问题
前言:根据ubuntu2004的chroot开发环境的内容我们已经具备ubuntu2004的chroot环境了,基于此我们从零搭建OH的开发环境步骤如下
一、chroot脚本
#!/bin/bash

CHROOT_DIR=/data/squashfs-root/

# 挂载dev/proc/sys
! mountpoint -q  /${CHROOT_DIR}/dev/ && mount -o bind /dev /${CHROOT_DIR}/dev/
! mountpoint -q  /${CHROOT_DIR}/dev/pts && mount -t devpts devpts /${CHROOT_DIR}/dev/pts
! mountpoint -q  /${CHROOT_DIR}/proc/ && mount -t proc proc /${CHROOT_DIR}/proc/
! mountpoint -q  /${CHROOT_DIR}/sys/ && mount -t sysfs sys /${CHROOT_DIR}/sys/
根据此脚本可以正常进入2004的chroot环境
二、安装包
根据OH官网的文档,需要安装如下包
apt install default-jdk genext2fs mtd-utils scons gcc-arm-none-eabi gcc-arm-linux-gnueabi ccache
apt install libxinerama-dev libxcursor-dev libxrandr-dev libxi-dev curl python3-pip
apt-get install git git-lfs
三、配置环境
配置repo,拉取代码,安装hb脚本如下
mkdir ~/bin
curl https://gitee.com/oschina/repo/raw/fork_flow/repo-py3 -o ~/bin/repo
chmod a+x ~/bin/repo
pip3 install -i https://repo.huaweicloud.com/repository/pypi/simple requests
vim ~/.bashrc # 编辑环境变量
export PATH=~/bin:$PATH # 在环境变量的最后添加一行repo路径信息
source ~/.bashrc # 应用环境变量
repo init -u git@gitee.com:openharmony/manifest.git -b master --no-repo-verify
repo sync -c
repo forall -c 'git lfs pull'
python3 -m pip install --user build/hb
export PATH=~/.local/bin:$PATH
build/prebuilts_download.sh
3.1 获取标准系统Openharmony4.0代码
repo init -u https://gitee.com/openharmony/manifest -b OpenHarmony-4.0-Release  --no-repo-verify -g ohos:standard
repo sync -c
repo forall -c 'git lfs pull'
四、编译代码
./build.sh --product-name rk3568 --ccache --no-prebuilt-sdk
4.1 编译rk3588
build/prebuilts_download.sh
./build.sh --product-name dayu210 --ccache
五、成果
out/rk3568/packages/phone/images/
最近在调试openharmony的显示问题上面受阻,原因是众达的硬件上是hdmi接的rk628转接,然后再接的lvds显示器,而openharmony实现的显示panel比较简单,直接dsi panel。所以针对于此,需要将众达的显示panel相关驱动好好梳理出来
一、概念
针对众达设备的场景,我们知道其重点在于drm panel和drm bridge。这里解释一下:
-
drm:内核drm显示框架,用于抽象
-
panel:屏的意思,在drm内抽象用于表示这是一个屏幕,例如hdmi,lvds,edp等
-
bridge:桥的意思,很多总线概念(pcie)都有,桥接显示器的意思,这里hdmi转lvds接的屏,肯定有bridge的概念
对于众达rk3568而言,我这里图示如下:
 对于我们而言,我们需要初始化hdmi驱动,并且把hdmi作为bridge使能,然后找到下一个bridge为rk628,然后在rk628上找到真正的panel。
二、代码梳理
2.1 drm_of_find_panel_or_bridge
对于实现此问题的场景,此函数应该重点讲解,它是内核提供的标准api,用于找到下一个panel或bridge。
函数的定义如下:
int drm_of_find_panel_or_bridge(struct device *dev, int port, int endpoint, struct drm_panel **panel, struct drm_bridge **bridge);
这里需要解释的是:
- 第一个参数是设备的指针
- 第二个参数是设备树port的编号
- 第三个参数是设备树endpoint的编号
- 第四个参数是找到的panel二级指针
- 第五个参数是找到的bridge二级指针
驱动通过此函数能够从设备树获得到下一个bridge或panel的节点,从而触发component_ops的bind回调
2.2 component
为了把事情说清楚,这里有必要简单介绍一下component,详细的介绍建议阅读代码学习,网上知识不多,我也是个人理解
component是组件框架,通常存在在比较大的内核框架中实现,component框架分master和component,两者没有明显区别,只是master会按照match来遍历所有组件,如果都注册了就触发bind。而组件是通过返回-517也就是-DPROBE_DEFER来延迟探测。
这里我们把显示框架"display-subsystem"作为了master,而其他的panel和bridge都以component来注册。示例如下:
ret = component_master_add_with_match(dev, &rockchip_drm_ops, match);
component_add(&pdev->dev, &dw_hdmi_rockchip_ops);
2.3 设备树
对于设备树,我们针对drm_of_find_panel_or_bridge的函数,需要按照实际硬件连接的方式准备port和endpoint,我整理如下:
hdmi:
   port@1 {
    reg = <1>;

    hdmi_out_hdmirx: endpoint {
     remote-endpoint = <&hdmirx_in_hdmi>;
     status = "okay";
    };
   };


rk628_hdmirx:
 ports {
  #address-cells = <1>;
  #size-cells = <0>;

  port@0 {
   reg = <0>;

   hdmirx_in_hdmi: endpoint {
    remote-endpoint = <&hdmi_out_hdmirx>;
   };
  };

  port@1 {
   reg = <1>;

   hdmirx_out_post_process: endpoint {
    remote-endpoint = <&post_process_in_hdmirx>;
   };
  };
 };

抽象rk628_post_process
 ports {
  #address-cells = <1>;
  #size-cells = <0>;

  port@0 {
   reg = <0>;

   post_process_in_hdmirx: endpoint {
    remote-endpoint = <&hdmirx_out_post_process>;
   };
  };
  port@1 {
   reg = <1>;

   post_process_out_lvds: endpoint {
    remote-endpoint = <&lvds_in_post_process>;
   };
  };
 };


rk628_lvds:
 ports {
  #address-cells = <1>;
  #size-cells = <0>;

  port@0 {
   reg = <0>;

   lvds_in_post_process: endpoint {
    remote-endpoint = <&post_process_out_lvds>;
   };
  };

  port@1 {
   reg = <1>;

   lvds_out_panel: endpoint {
    remote-endpoint = <&panel_in_lvds>;
   };
  };
 };


simple_panel:
  port {
   panel_in_lvds: endpoint {
    remote-endpoint = <&lvds_out_panel>;
   };
  };
上面代码我梳理一下如下:
hdmi---->hdmirx_in_hdmi---->post_process_in_hdmirx---->lvds_in_post_process---->panel_in_lvds
三、逻辑总结
根据上面的代码梳理,我们可以知道了其调用流程,这里总结一下如下:
3.1 对于hdmi的驱动:
component_add(&pdev->dev, &dw_hdmi_rockchip_ops);
添加了组件,等待调用bind
dw_hdmi_bind中drm_bridge_attach到drm中,并通过of_drm_find_bridge找下一个bridge,这里下一个设备是hdmirx_in_hdmi
3.2 对于rk628_hdmirx的驱动:
drm_bridge_add添加bridge设备,attach执行回调
在attach中,调用
drm_of_find_panel_or_bridge(dev->of_node, 1, -1, NULL, &hdmirx→bridge)
然后drm_bridge_attach上
这里1和-1是指的从port1上遍历找endpoint,这里是post_process_in_hdmirx
3.3 对于rk628_post_process的驱动:
同样的
drm_bridge_add添加bridge设备,attach执行回调
在attach中,调用
drm_of_find_panel_or_bridge(dev->of_node, 1, -1, NULL, &pp→bridge)
然后drm_bridge_attach上
这里1和-1是指的从port1上遍历找endpoint,这里是lvds_in_post_process
3.4 对于rk628_lvds驱动:
这里直接在probe函数中寻找panel设备
drm_of_find_panel_or_bridge(dev->of_node, 1, -1, &lvds->panel, NULL)
然后调用drm_bridge_add添加即可。
3.5 对于panel_simple驱动:
因为这个panel_simple驱动就是drm panel的驱动,所以它负责初始化panel drm_panel_init,添加panel drm_panel_add
四、Openharmony的做法
根据Openharmony的display的驱动来看,通过ili9881_st_5p5.c驱动直接初始化了dsi的硬件,然后通过hdf_drm_panel.c来进行drm_panel_init和drm_panel_add
可以知道,Openharmony没有涉及bridge的概念,所以根据众达的显示panel流程,我们理想中的Openharmony的hdf实现应该是如下:
- 根据hdmi设备树实现HDMI的hdf驱动
- 根据drm bridge的概念来寻找hdmi下的bridge设备
- 根据bridge设备来初始化rk628驱动
- 根据rk628驱动继续寻找panel设备
- 实现simple_panel驱动,初始化panel设备
我们可以跳过1,2,3,4四个步骤,我们只实现步骤5,让驱动在component的bind的时候能够将drm bridge or panel路径走通。此方法可以参考文章《Openharmony-rk3568 移植panel_simple_common》
五、个人建议
根据上面的分析解剖,我们知道,如果想要完全按照hdf的思想来设计hdf驱动,我们针对rk628需要写很多个驱动才能实现hdf的基本功能。
我们再基于一个原理:
drm是显示框架的抽象,它有crtc,plane,connector,encoder,frambuffer,panel和bridge。通常情况下,我们通过libdrm下发调用,不会涉及到panel和bridge,它与crtc是割裂开的。所以我们基于drm的panel和bridge也不是一定需要用hdf实现,可以借用linux的实现方式。
而crtc及其他,根据代码追踪,hdf_disp并没有去实现drm的一整套功能。
所以hdf_disp的驱动实际上是不完整的,它只实现了panel,bridge甚至都没有实现,所以我的建议是display驱动可以暂时使用linux标准。
关于hdf_disp调用drm的参考文章《Openharmony-RK3588-drm_plane设置》
针对上面的文章《Openharmony-RK3588-drm_plane设置》分析可以知道,hdf的display并不关键,所以可以完全使用linux的实现,方法如下:
5.1 基于drm的显示(非hdf)
基于drm的显示我们需要如下操作
5.1.1 修改defconfig
对于已经编译的内核,我们修改arch/arm64/configs/rockchip_linux_defconfig文件,对于未编译的内核,我们修改kernel/linux/config/linux-5.10/arch/arm64/configs/rk3568_standard_defconfig
我们在最底下添加如下:
# CONFIG_DRIVERS_HDF_DISP is not set
CONFIG_DRM_PANEL_SIMPLE=y
5.1.2 修改plane图层
对于设备树,我们参考《Openharmony RK3568图层设置》修改,添加如下:
&vp0 {
        rockchip,plane-mask = <(1 << ROCKCHIP_VOP2_CLUSTER0 | 1 << ROCKCHIP_VOP2_ESMART0 | 1 << ROCKCHIP_VOP2_SMART0)>;
        rockchip,primary-plane = <ROCKCHIP_VOP2_ESMART0>;
        cursor-win-id = <ROCKCHIP_VOP2_CLUSTER0>;
};
至此,相关修改全部完成。编译内核即可验证,这样情况下基于openharmony的内核的众达rk3568设备已经可以正常显示了。
在基于众达的rk3568板子上,使用非hdf的方式点亮了板卡之后,这里再提供一种办法,可以使用hdf的方式点亮众达rk3568的显示
一、移植hdf驱动
移植panel_simple_common的hdf驱动可以参考文档《Openharmony-rk3568 移植panel_simple_common》
二、声明plane
声明plane的方式可以参考文档《Openharmony RK3568图层设置》
三、存在问题
我们在做完上述的操作之后,根据panel代码逻辑的分析,应该是可以成功的,关于分析panel代码的参考文档《Openharmony之众达rk3568内核显示panel代码梳理》
但是发现内核一直死循环,无法继续往下走,日志如下:
[   23.289028] rockchip-vop2 fe040000.vop: [drm:vop2_bind] vp0 assign plane mask: 0x15, primary plane phy id: 2
[   23.289095] rockchip-vop2 fe040000.vop: [drm:vop2_bind] vp1 assign plane mask: 0x0, primary plane phy id: -1
[   23.289149] rockchip-vop2 fe040000.vop: [drm:vop2_bind] vp2 assign plane mask: 0x0, primary plane phy id: -1
[   23.289545] rockchip-vop2 fe040000.vop: [drm:vop2_create_crtc] Cluster0-win0 as cursor plane for vp0
[   23.289962] [drm] failed to init overlay plane Cluster0-win1
[   23.290154] [drm] failed to init overlay plane Cluster1-win1
[   23.290448] rockchip-drm display-subsystem: bound fe040000.vop (ops vop2_component_ops)
[   23.291207] dwhdmi-rockchip fe0a0000.hdmi: Detected HDMI TX controller v2.11a with HDCP (DWC HDMI 2.0 TX PHY)
[   23.294038] dwhdmi-rockchip fe0a0000.hdmi: registered DesignWare HDMI I2C bus driver
[   23.295241] [I/HDF_AUDIO_HDMI] [HdmiCodecProbe][line:33]: entry
[   23.299447] rk628-hdmirx rk628-hdmirx: failed to attach bridge ret=-517
[   23.299473] Failed to attach bridge with dw-hdmi ret=-517
这里可以看到,dw-hdmi的bridge初始化失败了,也就是component组件的bind失败了。而且返回的是-EPROBE_DEFER。根据component往上反馈来追溯代码,这里代码追溯到如下:
static int rockchip_drm_platform_probe(struct platform_device *pdev)
{
        struct device *dev = &pdev->dev;
        struct component_match *match = NULL;
        int ret;

        ret = rockchip_drm_platform_of_probe(dev);
        if (ret)
                return ret;

        match = rockchip_drm_match_add(dev);
        if (IS_ERR(match))
                return PTR_ERR(match);

        ret = component_master_add_with_match(dev, &rockchip_drm_ops, match);
        if (ret < 0) {
                rockchip_drm_match_remove(dev);
                return ret;
        }

        ret = dma_coerce_mask_and_coherent(dev, DMA_BIT_MASK(64));
        if (ret)
                return ret;

        return 0;
}
从上述代码可以知道, component_master_add_with_match会接收component的返回值,这里ret应该返回-EPROBE_DEFER。而rockchip_drm_platform_probe接收到-EPROBE_DEFER后会延迟探测,这就导致rockchip_drm_platform_probe会被重入。
另一个方面我们知道,linux的device driver的probe是在一个线程中完成的,如果rockchip display subsystem的驱动无法正常的probe,那它就阻塞了其他驱动的probe。
四、思路
根据上述代码的分析,基本问题也就定位到了,那就是rockchip drm platform的驱动导致内核进入死循环了,而进入死循环的原因是hdf编写的panel_simple_common驱动没有在它之前加载。
根据上述的推理,我们有如下的方式解决问题:
- 提前hdf的驱动加载时间
- 推迟rockchip drm platform driver的加载时间
- 将rockchip drm platform设计为kthread模式
下面逐一分析
4.1 提前hdf驱动加载时间
我们根据书籍《Openharmony架构、内核、驱动及应用开发全栈》的第七章第五节的内容可以知道如下:
hdf最开始是通过调用DeviceManagerInit来启动hdf框架,DeviceManagerInit的代码如下:
static int __init DeviceManagerInit(void)
{
    int ret;

    ret = DeviceManagerStart();
    if (ret < 0) {
        HDF_LOGE("%s start failed %d", __func__, ret);
    } else {
        HDF_LOGD("%s start success", __func__);
    }
    return ret;
}

late_initcall(DeviceManagerInit);
根据上述代码我们可以知道,hdf肯定是late_initcall,而rk的drm platform驱动是module_init,如下:
module_init(rockchip_drm_init);
module_exit(rockchip_drm_fini);
有过内核开发的基础都清楚,此时hdf肯定加载在module_init之后。
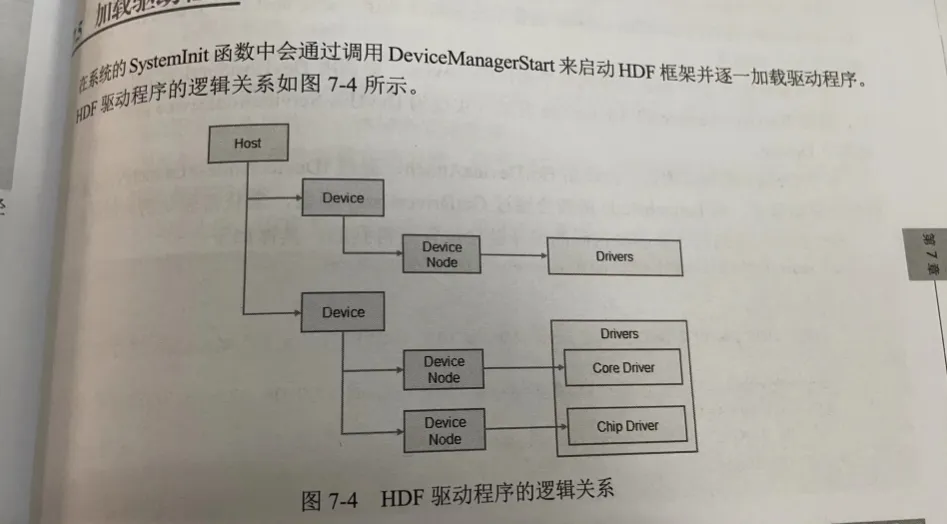
再根据《Openharmony架构、内核、驱动及应用开发全栈》中提到的加载驱动流程如下:
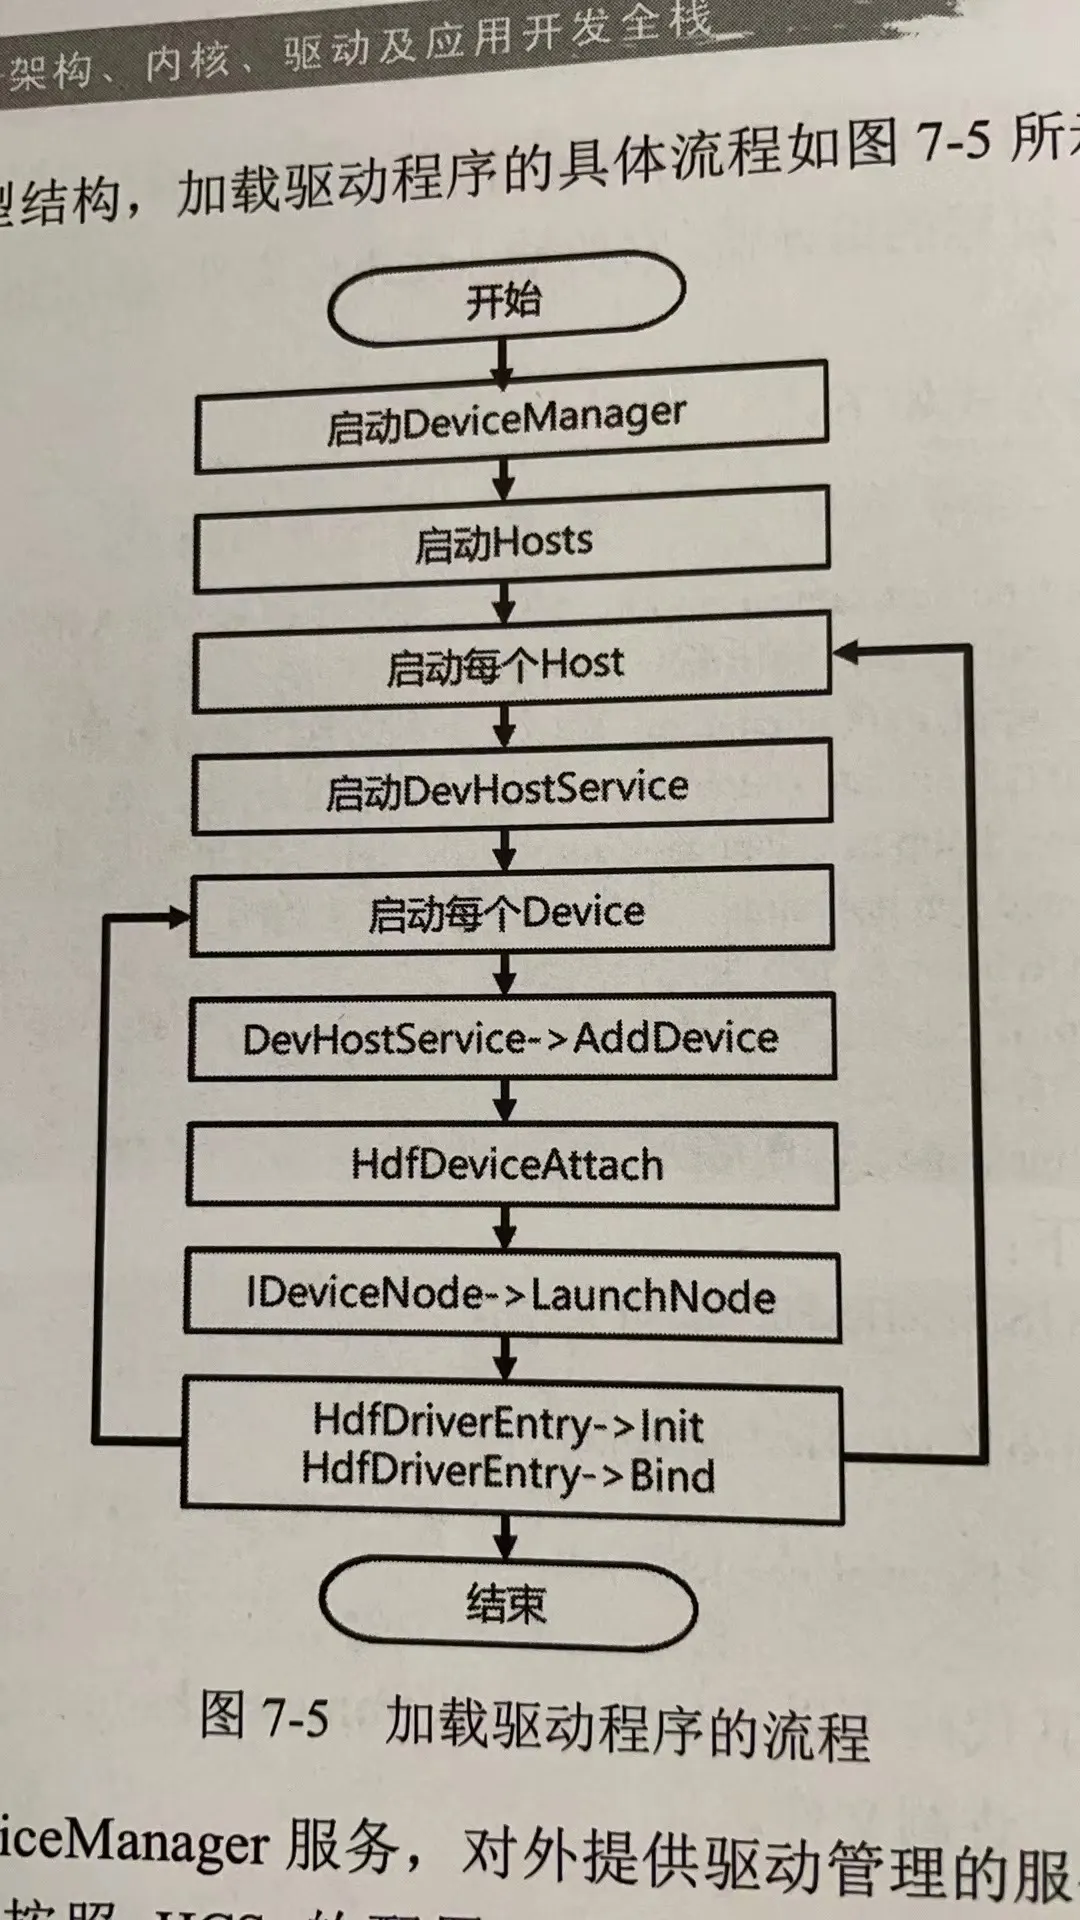 我们可以知道在DeviceManagerInit之后,hdf还有一段分发流程,我们根据hcs的描述如下:
display :: host {
    hostName = "display_host";
    device_hdf_drm_panel :: device {
        device0 :: deviceNode {
            policy = 0;
            priority = 197;
            preload = 0;
            moduleName = "HDF_DRM_PANEL_SIMPLE";
        }
    }
    device_lcd :: device {
        device3 :: deviceNode {
            policy = 0;
            priority = 100;
            preload = 0;
            moduleName = "PANEL_SIMPLE_COMMON";
        }
可以知道display先从host初始化"HDF_DRM_PANEL_SIMPLE",然后在从devicenode初始化"PANEL_SIMPLE_COMMON"。而这块的顺序我们不是很好控制了。
如果我们修改整个hdf的初始化流程,可能对hdf框架带来不好的影响,一方面是hdf本身不成熟,另一方面我们对hdf理解也不深刻。提前hdf是否带来问题心里没办法拍板。
4.1.1 为什么dayu200的设备是好的
这里我们需要明确的是,rockchip的drm platform驱动会绑定多个vp,在dayu200上,除了dsi还有hdmi设备,即使hdf编写的dsi的panel初始化比较晚,但是hdmi这块完全没有走hdf,所以是不会造成死循环的。
不会产生死循环,只要-EPROBE_DEFER能等得到驱动完成初始化,那就没问题。
4.2 推迟rockchip drm platform driver的加载时间
我们对内核框架代码是十分清楚的,drm platform驱动的推迟只不过是导致系统黑屏时间长而已,那我们可以推迟moduleinit吗?
结论是不建议
- 内核lateinit call是最后的加载
- moduleinit call没办法推迟到比lateinit call更后
- 动hdf的初始化流程,本人技术浅薄,不敢动
- 都是lateinit call,但是hdf要走一段服务逻辑,比驱动要晚。因为我们没办法计算出来hdf到host到device node的加载时间
根据上述问题,推迟rockchip drm驱动的方法也不可行,主要原因和4.1同理,怕对hdf带来不好的影响
4.3 将rockchip drm platform设计为kthread模式
既然上面两个方法都不建议处理,再鉴于咱们对内核比较熟悉,我们可以对rockchip drm platform driver进行简单改造。让其component match过程放在kthread中,如下
--- a/rockchip_drm_drv.c        2024-05-28 20:38:23.259111826 +0800
+++ b/rockchip_drm_drv.c        2024-06-04 17:18:50.965436190 +0800
@@ -35,6 +35,7 @@
 #include "rockchip_drm_fbdev.h"
 #include "rockchip_drm_gem.h"
 #include "rockchip_drm_logo.h"
+#include <linux/kthread.h>

 #include "../drm_crtc_internal.h"

@@ -46,6 +47,7 @@

 static bool is_support_iommu = true;
 static struct drm_driver rockchip_drm_driver;
+struct task_struct *match_thread = NULL;

 void drm_mode_convert_to_split_mode(struct drm_display_mode *mode)
 {
@@ -1773,30 +1775,42 @@
        return 0;
 }

-static int rockchip_drm_platform_probe(struct platform_device *pdev)
+static int thread_component_match(void *data)
 {
-       struct device *dev = &pdev->dev;
-       struct component_match *match = NULL;
-       int ret;
-
-       ret = rockchip_drm_platform_of_probe(dev);
-       if (ret)
-               return ret;
-
-       match = rockchip_drm_match_add(dev);
-       if (IS_ERR(match))
-               return PTR_ERR(match);
+       struct platform_device *pdev = data;
+        struct device *dev = &pdev->dev;
+        struct component_match *match = NULL;
+        int ret;
+
+       while (!kthread_should_stop()) {
+               ret = rockchip_drm_platform_of_probe(dev);
+               if (ret)
+                       return ret;
+
+               match = rockchip_drm_match_add(dev);
+               if (IS_ERR(match))
+                       return PTR_ERR(match);
+
+               ret = component_master_add_with_match(dev, &rockchip_drm_ops, match);
+               if (ret < 0) {
+                       rockchip_drm_match_remove(dev);
+                       msleep(2000);
+                       }else if(ret == 0){
+                       break;
+               }

-       ret = component_master_add_with_match(dev, &rockchip_drm_ops, match);
-       if (ret < 0) {
-               rockchip_drm_match_remove(dev);
-               return ret;
+               ret = dma_coerce_mask_and_coherent(dev, DMA_BIT_MASK(64));
+               if (ret)
+                       return ret;
        }
+       return 0;
+}

-       ret = dma_coerce_mask_and_coherent(dev, DMA_BIT_MASK(64));
-       if (ret)
-               return ret;
-
+static int rockchip_drm_platform_probe(struct platform_device *pdev)
+{
+       match_thread = kthread_run(thread_component_match, pdev, "tangfeng");
+       if (IS_ERR(match_thread))
+               return PTR_ERR(match_thread);
        return 0;
 }

@@ -1806,6 +1820,9 @@

        rockchip_drm_match_remove(&pdev->dev);

+       if (match_thread)
+               kthread_stop(match_thread);
+
        return 0;
 }
上面代码比较仓促,这里match_thread应该放驱动私有结构体。
根据上面的改造,我们可以确保如果panel未准备好,thread会sleep 2秒,直到panel准备好之后,thread正常退出。这能够有效的解决死循环的问题
五、总结
根据上述的分析,我们可以通过线程化来解决此问题,在内核中,很多事情都可以线程化,只是取决于驱动的使用场景。从实际意义上来说,将rockchip drm platform驱动线程化没有多大的影响,如果sleep那里调教的比较好,对实际显示的影响(黑屏时间)几乎不会多大(会有影响,但不大)。
而且,根据文章《Openharmony之众达rk3568内核显示panel代码梳理》的第四章可以知道,单独写panel_simple驱动在hdf的设计上来说实际上是一种偷懒的行为,所以我们不必要较真此方法的实用性。
根据众达3568的panel流程,完整的实现hdf 驱动才是这个问题的正解:如下
- 根据hdmi设备树实现HDMI的hdf驱动
- 根据drm bridge的概念来寻找hdmi下的bridge设备
- 根据bridge设备来初始化rk628驱动
- 根据rk628驱动继续寻找panel设备
- 实现simple_panel驱动,初始化panel设备
我们基于Openharmony开发,需要针对repo做一个周编译脚本,这样能够在每周固化系统版本。如下是脚本的使用方法
一、仓库地址
可以通过git获取此仓库如下:
git clone https://gitlab2.kylin.com/sh-product-Embedded/openharmony/weekly_build_script.git
阶段性版本固化
git clone git@gitlab2.kylin.com:sh-product-Embedded/openharmony/weekly_build_script.git -b B01-kylin-ZD-3568
二、运行
当获取到此仓库之后,仅需要在仓库目录下运行run.sh即可,如下
cd weekly_build_script && ./run.sh
三、成果
等待大概2小时后,可以获取到update.img,在如下目录:
out/kylin/update-xxxxxxxx.img
四、步骤解析
此脚本主要完成如下四个动作
- 通过repo同步代码
- 拉取openharmony的prebuilts
- 通过build.sh脚本编译openharmony
- 制作fit格式的boot.img
- 制作update镜像
其中同步代码和拉取prebuilts可能因为网络而失败,所以是通过while1来循环
而编译openharmony可能会失败,所以重编译次数为5次,如下:
if ((c>5)) ;then break ; fi
