有客户需要在不接任何显示器的前提下能够正常启动图形服务器。但是linux drm框架下,drm是建立在connector上。所以需要内核打开虚拟显示屏,这样能够将图形启动在虚拟显示器上,下面介绍主要操作方法
一:内核配置
配置文件打开
CONFIG_ROCKCHIP_VCONN=y
这个配置依赖于
HAS_IOMEN[=y]
与
DRM_ROCKCHIP[=y]
一般都是打开的
二:设备树配置
virtual_con {

compatible = "rockchip,virtual-connector";
};
三:驱动简析
static int rockchip_virtual_connector_probe(struct platform_device *pdev)
{
 return component_add(&pdev->dev, &rockchip_virtual_connector_ops);
}
因为rk的drm驱动走的component框架,这里只需要为其添加组件即可
static const struct component_ops rockchip_virtual_connector_ops = {
 .bind = rockchip_virtual_connector_bind,
 .unbind = rockchip_virtual_connector_unbind,
};
drm驱动会逐个绑定drm的connector,然后根据具体的connector紧张逐个绑定encoder
rockchip_virtual_connector_register(vconn);
list_for_each_entry_safe(vconn_dev, n, &vconn->list_head, list) {
drm_simple_encoder_init(vconn->drm_dev, encoder, vconn_dev→encoder_type);
drm_connector_init(vconn->drm_dev, connector, &rockchip_virtual_connector_funcs, vconn_dev→output_type);
drm_connector_attach_encoder(connector, encoder);
在绑定的时候会注册connector,然后根据之前创建的设备逐个绑定connector和decoder
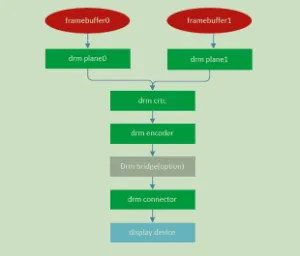
三:框图
四:效果
root@kylin:~# xrandr
Screen 0: minimum 320 x 200, current 1024 x 768, maximum 16384 x 16384
Virtual-1 connected primary 1024x768+0+0 (normal left inverted right x axis y axis) 0mm x 0mm
1024x768 60.00*+
4096x2160 60.00 59.94
2560x1600 59.99 59.97
1920x1440 60.00
1856x1392 60.00
1792x1344 60.00
2048x1152 60.00
1920x1200 59.88 59.95
1920x1080 60.00
1600x1200 60.00
1680x1050 59.95 59.88
1400x1050 59.98 59.95
1600x900 60.00
1280x1024 60.02
1440x900 59.89 59.90
1280x960 60.00
1366x768 59.79 60.00
1360x768 60.02
1280x800 59.81 59.91
1280x768 59.87 59.99
1280x720 60.00
800x600 60.32 56.25
848x480 60.00
640x480 59.94
五:结果
至此,即使机器没有任何的实际connector,也可以虚拟一个假的connector,也就是虚拟显示屏来执行图形APP的运行
为了丰富版本的调试功能,这里提供了web ssh来支持浏览器打开ssh。只需要四步即可完成,只要实施步骤如下
一:安装shellinabox
apt install shellinabox
二:配网
根据自身机器环境配置网络即可
三:更改端口
为了更加安全,这里使用9999端口,如下
sed -i 's/SHELLINABOX_PORT=4200/SHELLINABOX_PORT=9999/g' /etc/default/shellinabox
四:重启服务
systemctl restart shellinabox
五:检查是否成功开启
netstat -ntp | grep shellinabox
如果一切正常,则看到出现9999端口的shellinaboxd
项目中有客户需要将设备当作纯U盘来使用,已知Linux的gadget本身就支持U盘设备,这里描述一下如何将Linux系统作为U盘使用。
一:内核配置
对于usb gadget功能,需要打开内核默认设置,主要配置如下:
CONFIG_USB_F_MASS_STORAGE=y
CONFIG_USB_LIBCOMPOSITE=y
CONFIG_USB_CONFIGFS_MASS_STORAGE=y
CONFIG_USB_MASS_STORAGE=m
将CONFIG_USB_MASS_STORAGE作为ko的原因是需要加载时传参,如果希望固化,则可以将传参写到cmdline中。
二:制作分区
对于U盘功能,则需要单独划一块分区给U盘使用,这里可以是单独的分区,也可以是一个img文件。
如果是单独的分区,则如下:
mkfs.vfat /dev/mmc0blk1p5

insmod g_mass_stroage.ko file=/dev/mmc0blk1p5 removable=1
如果需要系统内也能看到文件修改,这里增加一个fstab即可。如下
/dev/mmc0blk1p5 /data1 vfat defaults,user,rw,codepage=936,iocharset=utf8 0 0
如果是单独的文件,则如下:
dd if=/dev/zero of=/media/usb_stroage.img bs=512 count=2097152   # (1G大小)

mkfs.vfat /media/usb_stroage.img
这里可以利用fstab的挂载
/media/usb_stroage.img /data1 vfat defaults,user,rw,codepage=936,iocharset=utf8 0 0
然后加载驱动
insmod g_mass_stroage.ko file=/dev/loop0 removable=1
如果不确定loop0是否为自己的img,可以指定挂载如下
losetup /dev/loop0 /media/usb_stroage.img
三: 使用
使用就非常简单了,将otg的功能的USB接上电脑,电脑会按照U盘的方式弹出一个已经格式化好的文件。此时正常使用U盘即可。
客户有一个4K的屏幕,放在两个显示器上面显示,现在需要将其对半分割为两个正常的显示器。这么说不好理解,转换需求可以这样理解,一个4K的显示分辨率的显示器,需要系统将其认为两个2K的显示器显示。通过前期调研,发现了两种方法实现。分别如下
一:多个Monitor
此方案是为X增加了两个monitor,然后根据窗管的识别,将其认定为两个单独的屏幕,此方法需要修改系统代码。主要如下
1.1 修改xorg
--- xorg-server-21.1.4/randr/rrmonitor.c.orig 2022-09-30 00:09:40.458561832 +0200
+++ xorg-server-21.1.4/randr/rrmonitor.c 2022-09-30 00:09:46.298529786 +0200
@@ -528,27 +528,6 @@
 continue;
 }

- /* For each output in 'info.outputs', each one is removed from all
- * pre-existing Monitors. If removing the output causes the list
- * of outputs for that Monitor to become empty, then that
- * Monitor will be deleted as if RRDeleteMonitor were called.
- */
-
- for (eo = 0; eo < existing->numOutputs; eo++) {
- for (o = 0; o < monitor->numOutputs; o++) {
- if (monitor->outputs[o] == existing->outputs[eo]) {
- memmove(existing->outputs + eo, existing->outputs + eo + 1,
- (existing->numOutputs - (eo + 1)) * sizeof (RROutput));
- --existing->numOutputs;
- --eo;
- break;
- }
- }
- if (existing->numOutputs == 0) {
- (void) RRMonitorDelete(client, screen, existing->name);
- break;
- }
- }
 if (monitor->primary)
 existing->primary = FALSE;
 }
这里屏蔽了Xorg本身将存在的output的monitor删除的代码
1.2 修改gtk3
--- src/gtk/gdk/x11/gdkscreen-x11.c.orig 2022-09-30 16:24:00.181850959 +0200
+++ src/gtk/gdk/x11/gdkscreen-x11.c 2022-09-30 21:32:47.288912422 +0200
@@ -644,21 +644,14 @@
 #undef EDID_LENGTH
 }

- monitor = find_monitor_by_output (x11_display, output);
- if (monitor)
- monitor->remove = FALSE;
- else
- {
- monitor = g_object_new (GDK_TYPE_X11_MONITOR,
- "display", display,
- NULL);
- monitor->output = output;
- monitor->add = TRUE;
- g_ptr_array_add (x11_display->monitors, monitor);
- }
+ monitor = g_object_new (GDK_TYPE_X11_MONITOR,
+ "display", display,
+ NULL);
+ monitor->add = TRUE;
+ g_ptr_array_add (x11_display->monitors, monitor);

 gdk_monitor_get_geometry (GDK_MONITOR (monitor), &geometry);
- name = g_strndup (output_info->name, output_info->nameLen);
+ name = gdk_x11_get_xatom_name_for_display(display, rr_monitors[i].name);

 newgeo.x = rr_monitors[i].x / x11_screen->window_scale;
 newgeo.y = rr_monitors[i].y / x11_screen->window_scale;
@@ -687,7 +680,6 @@
 gdk_monitor_set_connector (GDK_MONITOR (monitor), name);
 gdk_monitor_set_manufacturer (GDK_MONITOR (monitor), manufacturer);
 g_free (manufacturer);
- g_free (name);

 if (rr_monitors[i].primary)
 primary_output = monitor->output;
这里找到monitor不是通过output寻找,而是直接增加monitor,这就避免了同一个显示器上不能输出两块屏幕的问题
1.3 使用xfce4
这边尝试了metacity和mutter,均没办法正常识别,但是基于gtk3的xfce是能够正常识别到两个屏幕的。
apt install -y xfce4
1.4 其他窗管
根据如上理解,我们后续要做的工作是,将例如kwin这类的窗管,在创建屏幕的过程中,不应该绑定一个output就一个monitor的方式。而是根据所有的monitor来都创建显示display
1.5 使用方法
xrandr --delmonitor VIRTUAL-LEFT
xrandr --delmonitor VIRTUAL-RIGHT
xrandr --setmonitor VIRTUAL-LEFT 960/0x1200/1+0+0 DSI-1
xrandr --setmonitor VIRTUAL-RIGHT 960/1x1200/1+960+0 none
xrandr --listmonitors
xrandr --fb 1921x1200
xrandr --fb 1920x1200
1.6 相关补丁
https://github.com/micw/xorg-split-screen-archlinux/blob/packages/gtk3/trunk/multiple_monitors_per_output.patch
https://gitlab.freedesktop.org/xorg/xserver/-/merge_requests/981/diffs?commit_id=21e569ef1e87e4dfcedbdac99216e7147e2b05ff
1.7 相关博客
https://gitlab.gnome.org/GNOME/gtk/-/issues/2013#note_1280968
二:虚假的Xrandr
通过修改xrandr的api,可以实现将x划分为多个显示接口,也就是xrandr显示的是自己设置的虚假的显示器
参考仓库地址
https://github.com/phillipberndt/fakexrandr
参考测试示例
https://gist.github.com/phillipberndt/7688785#file-fake-xinerama-L50
相应论坛信息
https://unix.stackexchange.com/questions/605755/use-xrandr-to-split-display-in-two-virtual-screens
DWM窗管支持全屏补丁
https://dwm.suckless.org/patches/fakefullscreen/dwm-fakefullscreen-20210714-138b405.diff
fakeXinerama仓库
https://github.com/Xpra-org/libfakeXinerama
xrdp补丁
https://github.com/asafge/xrdp_dualmon/blob/master/fakexinerama/Xinerama.c
参考论坛
https://gitlab.gnome.org/GNOME/gtk/-/issues/2013#note_1280968
测试例子
fakexrandr-manage.py gui
三:实验结果
通过上述两种办法试验,均可以在X86上正常切换屏幕。当前在麒麟系统上的kwin不能直接使用,需要修改代码
bluetoothctl是bluez协议的调试工具,用于前期的蓝牙基本功能的验证和测试。本文基于bluetoothctl工具,介绍了如何使用其进行蓝牙的基本通讯
一:确保系统蓝牙正常存在并工作
1.1 确定蓝牙bluez协议正常安装,并高于5.0
root@kylin:/home/kylin# dpkg -l | grep bluez
ii bluez 5.53-0kylin3k4 arm64 Bluetooth tools and daemons
ii bluez-obexd 5.53-0kylin3k4 arm64 bluez obex daemon
1.2 查看蓝牙控制器是否正常启动
root@kylin:/home/kylin# hciconfig
hci0: Type: Primary Bus: UART
 BD Address: 9C:71:D9:BC:DD:BF ACL MTU: 1021:8 SCO MTU: 64:1
 UP RUNNING PSCAN
 RX bytes:441417 acl:200 sco:0 events:10560 errors:0
 TX bytes:12117 acl:184 sco:0 commands:173 errors:0
如果蓝牙状态不是 “UP RUNNING PSCAN” 则需要手动启动蓝牙
hciconfig hci0 up
1.3 确定蓝牙功能是否被rfkill block
root@kylin:/home/kylin# rfkill list
0: bt_default: Bluetooth
 Soft blocked: no
 Hard blocked: no
1: phy0: Wireless LAN
 Soft blocked: no
 Hard blocked: no
2: brcmfmac-wifi: Wireless LAN
 Soft blocked: no
 Hard blocked: no
3: hci0: Bluetooth
 Soft blocked: no
 Hard blocked: no
如果蓝牙被rfkill block,则需要通过rfkill命令unblock,否则蓝牙功能仍是被系统关闭的
rfkill unblock hci0
1.4 测试并验证低功耗蓝牙是否正常
hcitool lescan
LE Scan ...
21:0E:38:14:CE:18 (unknown)
5F:5A:FC:85:1C:05 (unknown)
如果能够探测到低功耗蓝牙设备,代表蓝牙的基本功能正常
1.5 确定蓝牙正常可以ping通
root@kylin:/home/kylin# l2ping 54:09:10:38:28:97
Ping: 54:09:10:38:28:97 from 9C:71:D9:BC:DD:BF (data size 44) ...
0 bytes from 54:09:10:38:28:97 id 0 time 9.91ms
0 bytes from 54:09:10:38:28:97 id 1 time 8.55ms
0 bytes from 54:09:10:38:28:97 id 2 time 8.48ms
二:使用bluetoothctl工具
2.1 进入交互终端
root@kylin:/home/kylin# bluetoothctl
Agent registered
[bluetooth]#
2.2 开启扫描
[bluetooth]# scan on
等到扫到自己的蓝牙设备之后,可以关闭蓝牙扫描
[bluetooth]# scan off
2.3 查看已经扫到的设备
[bluetooth]# devices
Device 54:09:10:38:28:97 iPhone
由上可以发现,设备已经搜到蓝牙名字为iPhone,MAC为 54:09:10:38:28:97 的设备
2.4 开启代理
[bluetooth]# agent on
Agent is already registered
[bluetooth]# default-agent
Default agent request successful
2.5 信任和配对
[bluetooth]# trust 54:09:10:38:28:97
[CHG] Device 54:09:10:38:28:97 Trusted: yes
Changing 54:09:10:38:28:97 trust succeeded
[bluetooth]# pair 54:09:10:38:28:97
Attempting to pair with 54:09:10:38:28:97
[CHG] Device 54:09:10:38:28:97 Connected: yes
Request confirmation
[agent] Confirm passkey 886360 (yes/no): yes
如果之前之前配对过,就无需配对,如果仍选择配对,会报如下错误,但不影响使用
[bluetooth]# pair 54:09:10:38:28:97
Attempting to pair with 54:09:10:38:28:97
Failed to pair: org.bluez.Error.AlreadyExists
查看已经配对过的设备
[iPhone]# paired-devices
Device 54:09:10:38:28:97 iPhone
2.6 连接蓝牙
[bluetooth]# connect 54:09:10:38:28:97
Attempting to connect to 54:09:10:38:28:97
[CHG] Device 54:09:10:38:28:97 Connected: yes
[iPhone]#
如果蓝牙正常连接成功,会出现蓝牙名字的终端,如 [iPhone]
2.7 查看属性协议
menu gatt
[Blank]# list-attributes
Characteristic (Handle 0x9240)
 /org/bluez/hci0/dev_60_B7_4C_51_AC_D7/service0014/char0015
 00002222-0000-1000-8000-00805f9b34fb
 Unknown
2.8 选择自定义的属性
select-attribute /org/bluez/hci0/dev_60_B7_4C_51_AC_D7/service0023/char0024
[iPhone:/service0014/char0015]# attribute-info
Characteristic - Unknown
 UUID: 00002222-0000-1000-8000-00805f9b34fb
 Service: /org/bluez/hci0/dev_60_B7_4C_51_AC_D7/service0014
 Flags: read
 Flags: write
 Flags: extended-properties
 Flags: reliable-write
2.9 读和写
[iPhone:/service0023/char0024]# write 1
Attempting to write /org/bluez/hci0/dev_60_B7_4C_51_AC_D7/service0023/char0024
[iPhone:/service0023/char0024]# read
Attempting to read /org/bluez/hci0/dev_60_B7_4C_51_AC_D7/service0023/char0024
[CHG] Attribute /org/bluez/hci0/dev_60_B7_4C_51_AC_D7/service0023/char0024 Value:
 01 .
 01 .
三 使用手机LightBlue测试蓝牙
1.下载LightBlue

2.选择Virtual Devices

3.点击+

4.选择默认的profile,这里默认可以是blank

5.点击Blank,进去服务

6.进入默认的uuid 2222

7.修改uuid,修改描述,修改属性

8.利用bluetoothctl进行读写操作验证
