对于eulermaker的使用方法,推荐可以参考:https://docs.openeuler.org/zh/docs/24.03_LTS/docs/EulerMaker/EulerMaker%E7%94%A8%E6%88%B7%E6%8C%87%E5%8D%97.html,本文根据官方文章,对eulermaker进行了使用,提供使用说明
一、注册
对于第一次使用eulermaker的同学,需要先进行注册,如下:
- 进入地址
https://eulermaker.compass-ci.openeuler.openatom.cn - 点击登录
- 绑定eulermaker账号/注册eulermaker账号
最后会得到界面如下:
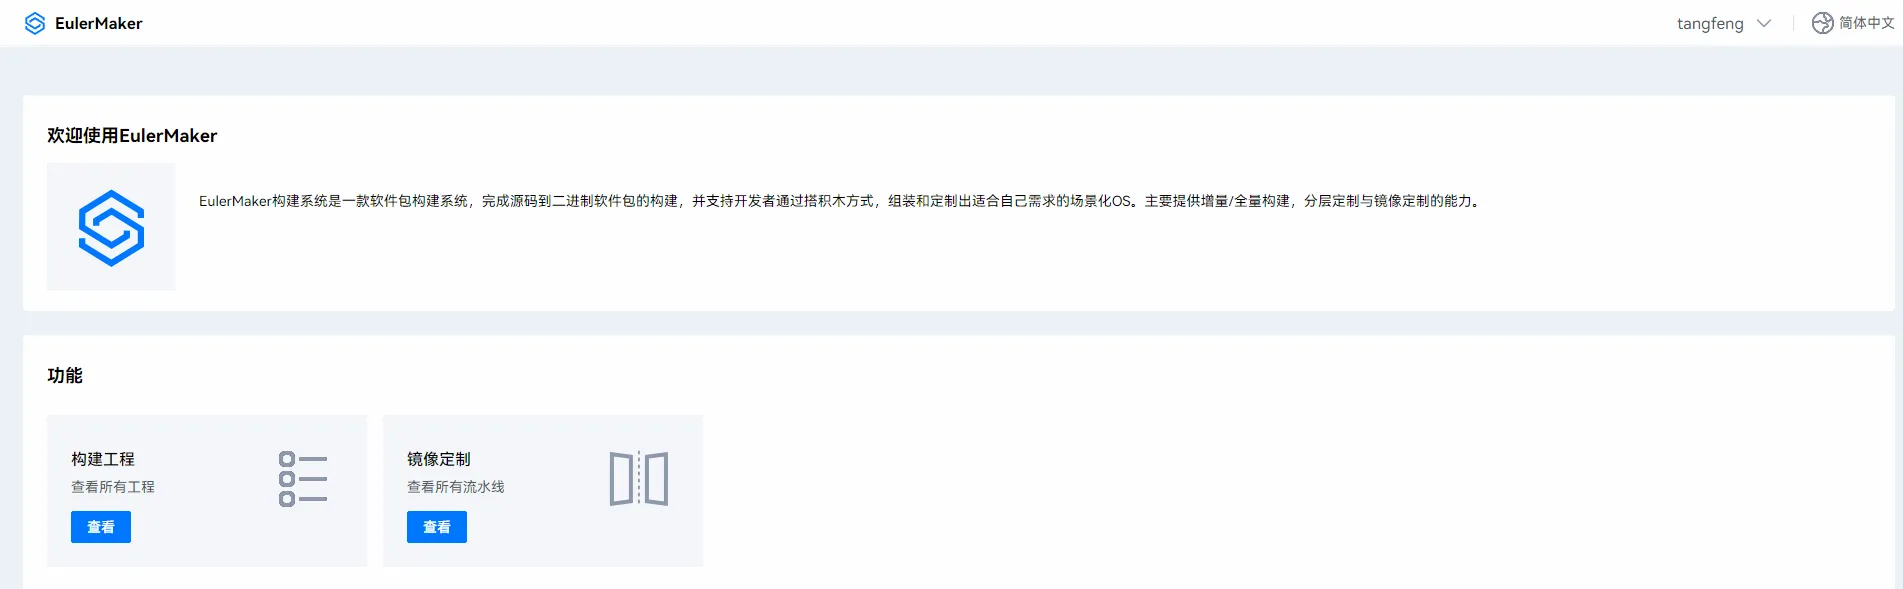 这里可以看到,右上角有名字是tangfeng的账号已经登录,而下面存在构建工程/镜像定制两大功能
二、 构建工程
2.1 点击构建工程

2.2 点击私有工程

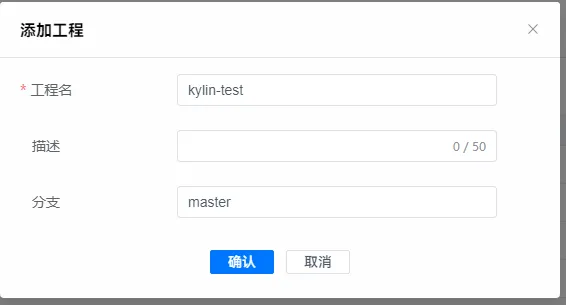
2.3 点击添加工程
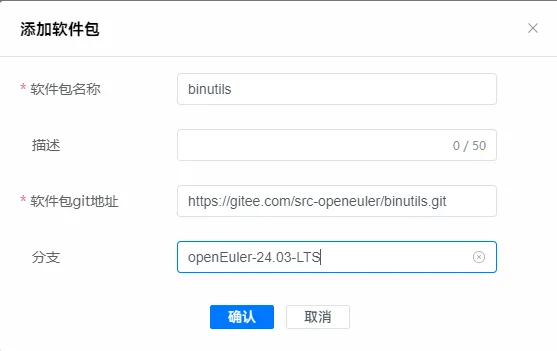
2.4 点击添加软件包
这里需要设置软件包名字,描述,git地址,分支。这里注意的是,需要与https://gitee.com/organizations/src-openeuler/projects 的工程名字匹配,如下为示例
2.5 点击工程配置
这里需要配置构建目标,软件源,分层url.


2.6 点击软件包名字
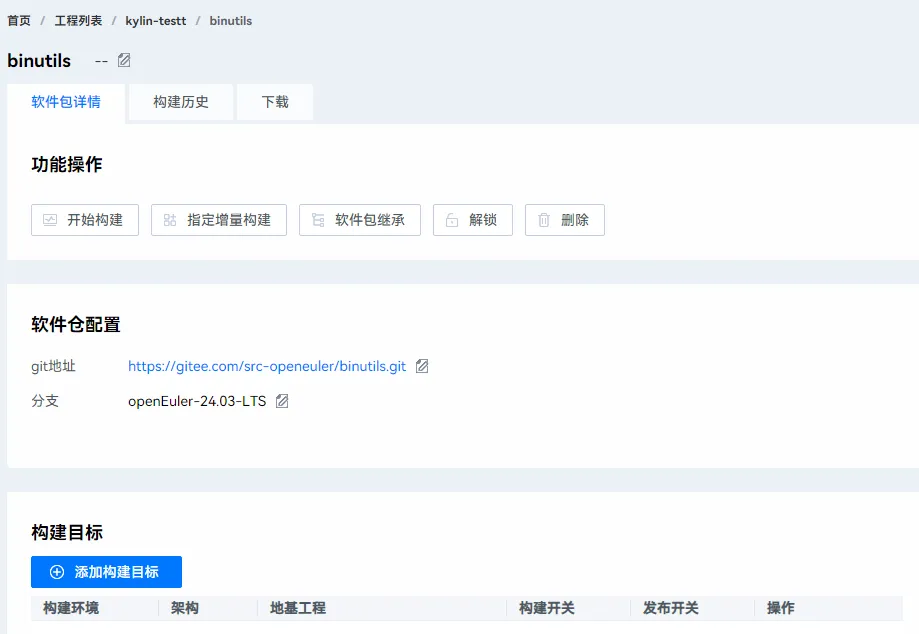
2.7 添加构建目标


2.8 点击开始构建

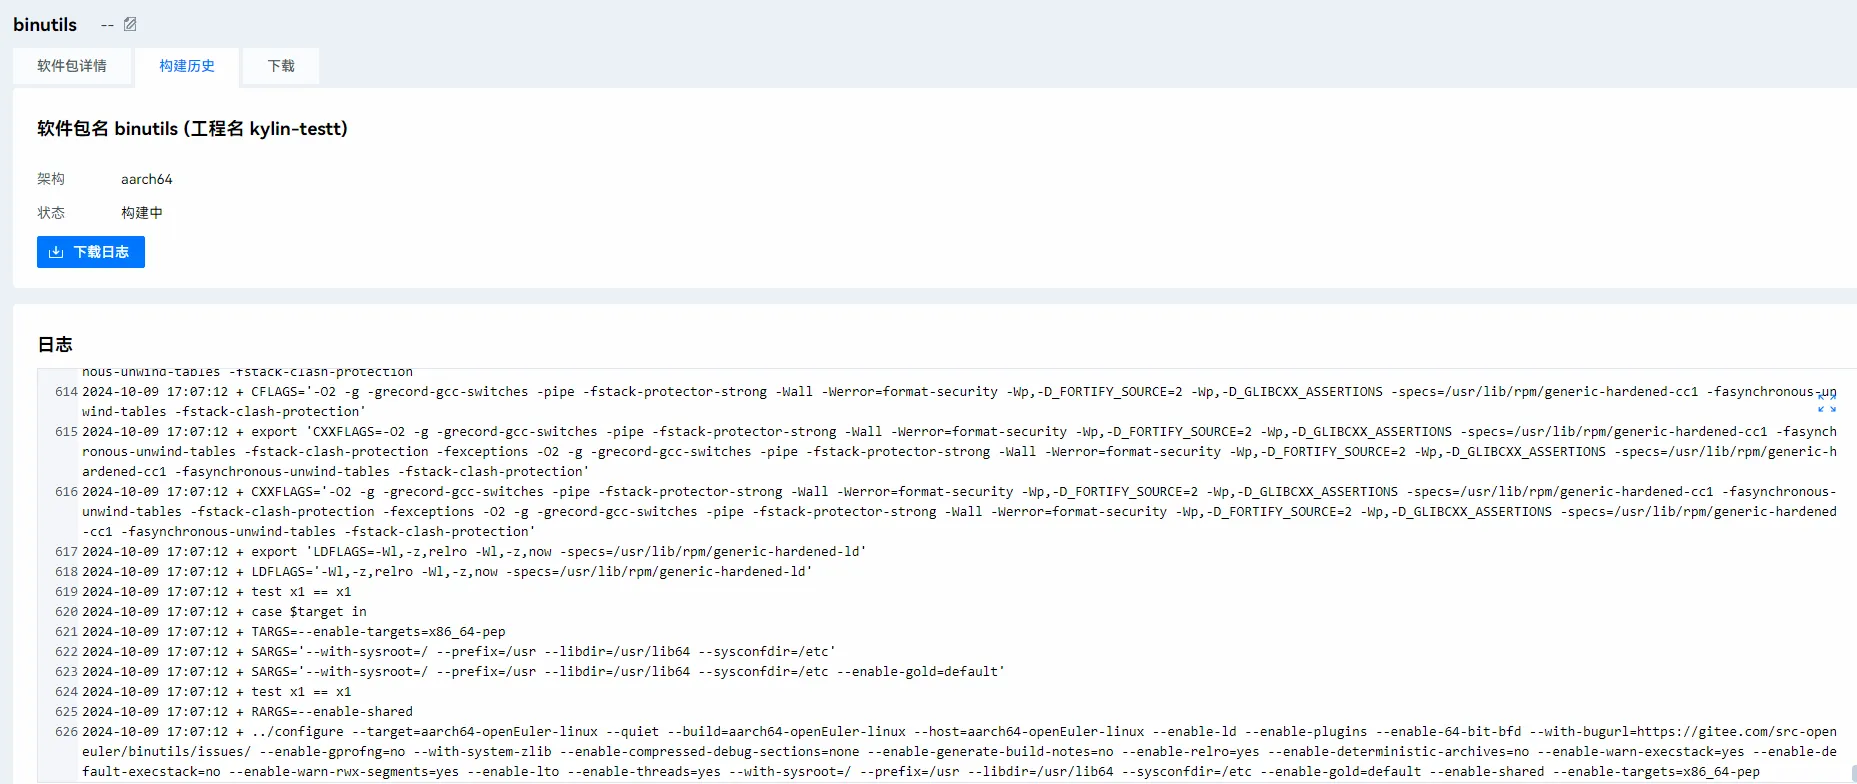
2.9 查看日志
先进入软件包详情,点击构建历史
 此时我们点击jobID 可以看到任务日志
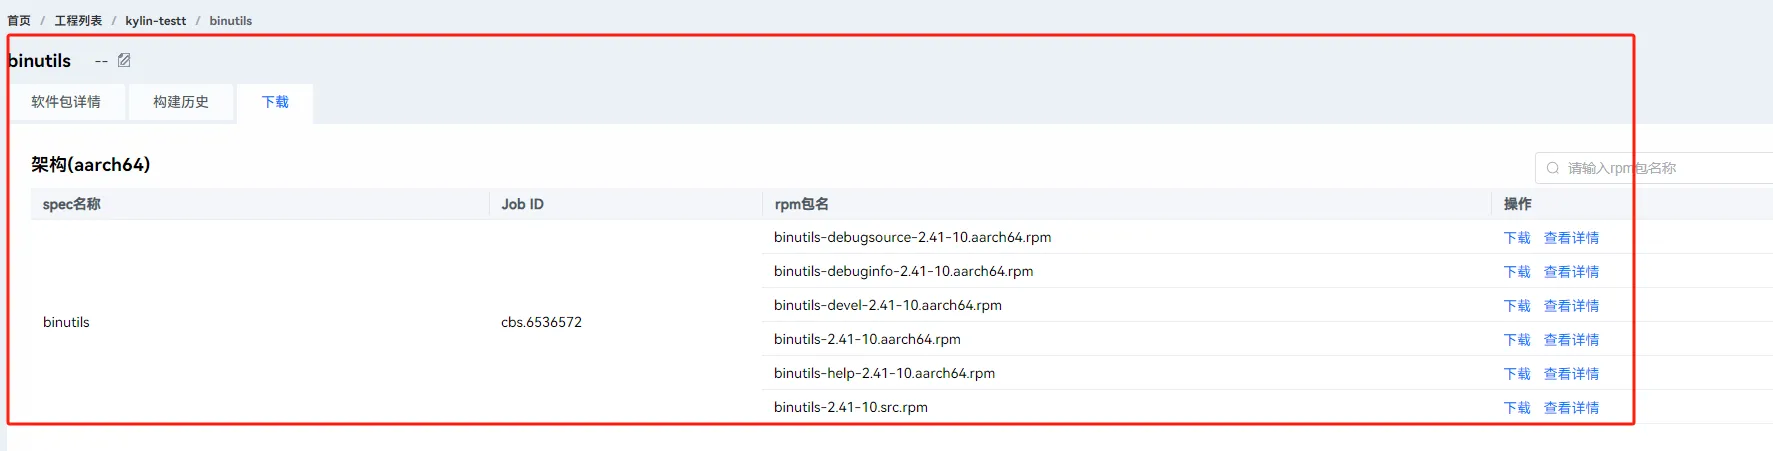
2.10 下载
等待构建完成之后,可以点击下载看到生成的rpm包
三、镜像定制
3.1 点击镜像定制

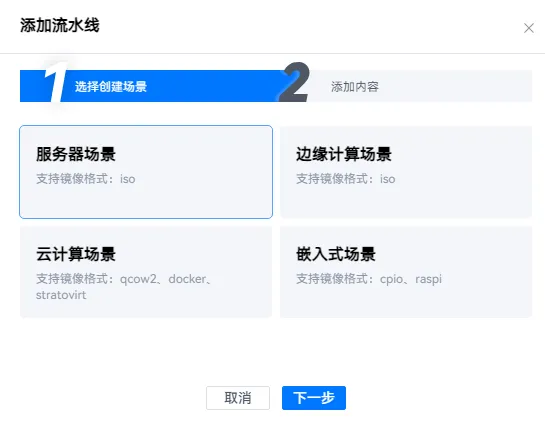
3.2 点击添加流水线
此时选择嵌入式场景
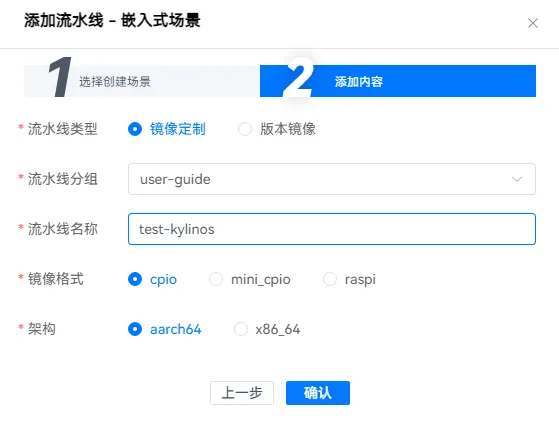
3.3 设置添加内容
设置镜像定制,流水线,格式,架构,如下:
3.4 点击流水线名称
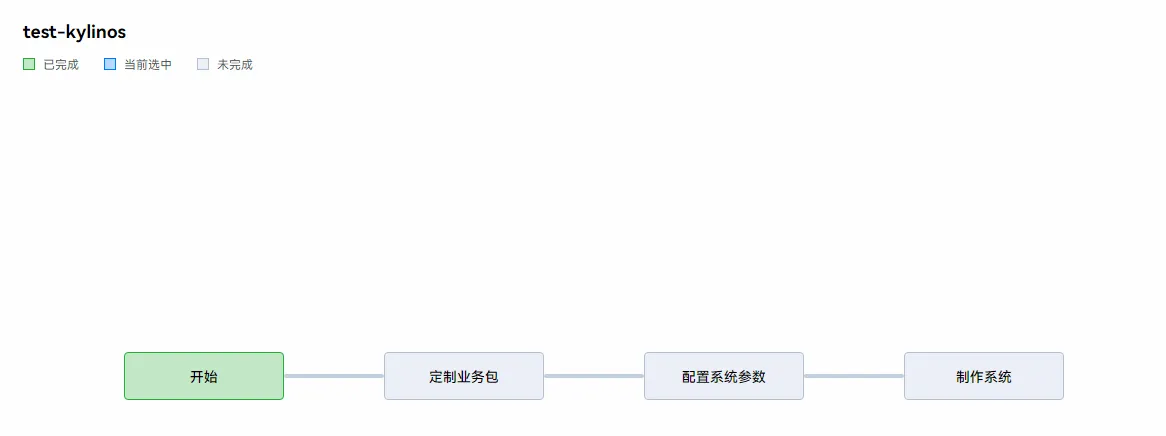
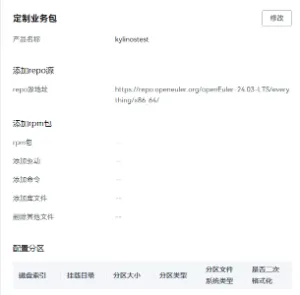
3.5 设置定制业务包
点击定制业务包,设置repo地址,rpm,驱动,命令,库,分区,参数等等
3.6 点击镜像构建

3.7 查看日志
点击构建历史,点击查看日志

3.8 点击下载镜像
等等系统构建完成之后,点击下载镜像

四、总结
至此,我们通过openeuler发布的eulermaker网页端完成了其构建工程和镜像定制的两大功能项。可以发现,相比于任何的livebuild/koji工具还是yocto,这种方式操作简单,只要用户懂得操作系统构建的基本知识就可以完成一个操作系统的构建,一个软件包工程的编译。
openeuler推出了一个支持全场景的操作系统构建方案,这个方案名字为EulerMaker,鉴于最近对yocto的研究,发现yocto能够良好的实现全场景操作系统,故本文开始研究EulerMaker
一、介绍
EulerMaker是一款软件包构建平台,完成源码到二进制软件包及系统镜像的构建,支持开发者通过搭积木方式,组装和定制出适合自己需求的场景化OS。主要提供增量/全量构建,软件包分层定制与镜像定制的能力。对于EulerMaker的意义,如下图可以图示
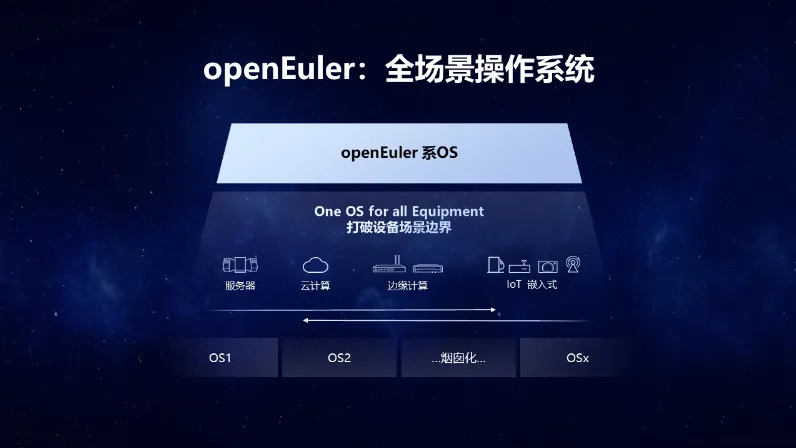 根据图片我们可以知道,EulerMaker旨在通过一个构建平台,完成基于OpenEuler系列的所有形态的操作系统构建,包括服务器,桌面,嵌入式等。
二、为什么需要新的构建系统
我们可以知道,对于标准的发行版系统,都具备其自身的构建方式,例如debian系列,可以通过livebuild来进行构建。但是这样的工具并不灵活,我们需要一个类似于yocto一样灵活的构建工具。对此,吴峰光博士有如下言论
“服务器领域的 OBS 主打能力是什么?几大主流的 Linux 发行版它都支持,比如可以给 Redhat 打包,也可以给 Debian 打包。兼容并包是它的核心设计目标,适应了 Linux 多样化的现状。
  但我们认为,多样化在早期对 Linux 发展有利,但长期而言,Linux 生态的碎片化是一个需要被解决的问题。”
“嵌入式领域的 Bitbake 采用了面向任务和过程的 DSL 描述语言,这使得它非常灵活强大,但自由度和复杂性过高,以学习曲线陡峭知名。
  现在流行的理念是如 YAML、JSON 等通用、声明式的配置语言,和函数式编程,以实现低门槛、易理解、可控可重复的构建过程。”
根据上述言论,我们可以知道,EulerMaker是基于类似于livebuild和yocto中间形态的构建工具,它引入了yocto分层的设计思想,解决了livebuild/koji这种构建工具的不灵活的问题,对于仍采用livebuild/koji这种二进制构建机制,其所以也避免了yocto默认只能源码编译的缺点。
至于为什么要重新设计一个构建系统,其原因可能如下:
livebuild/koji默认没有分层的思想,无法实现操作系统的定制化需求,只能集成全功能的操作系统
yocto具备分层的思想,但其学习曲线陡峭,难度高
EulerMaker在livebuild/koji的基础上,实现分层思想,集大家之所长
而实际上,个人观点是,如果抛开yocto所谓的学习曲线陡峭的缺点,如果我们直接使用yocto实现二进制的包构建,其实无需重新开发一个EulerMaker也能良好的达到目的。
三、关于镜像定制
根据上面我们知道,为了优化livebuild/koji这类构建平台无法实现定制化需求的问题,从而推出了EulerMaker,那就意味着,EulerMaker的核心优势在于镜像的定制。如下:
镜像定制支持自定义软件包,配置等,输出服务器,虚拟机,docker等各类镜像,针对不同的场景,开发者对于不同的镜像源有着不同的定制化需求,
例如:减少冗余的软件包、网络参数配置等等,为了满足不同领域的各个开发者的定制化需求,EulerMaker提供了针对镜像源的定制化能力,用户可以线性化,模块化定制自身需要的镜像源,满足自己的定制需求。
根据上面的说法,我们可以知道,不同的服务器,不同的环境,不同的场景(docker/虚拟机/实机系统)其配置是不一样的。哪怕一个ip地址不一样,最后形成的操作系统镜像,也是不一样的。所以EulerMaker实现如下功能:
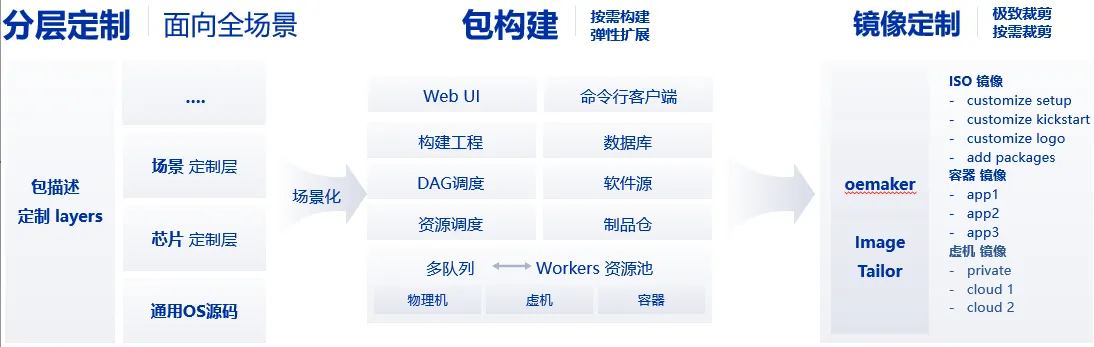
3.1 分层定制
对于不同的定制系统,定义layers来区分,这里借鉴了yocto的思想
3.2 按包构建
对于不同的定制系统,通过包来进行按需构建,这里延申了livebuild/koji的优势,对于单独的包编译,可以通过rpmbuild/dh_make来单独编译,同时也不丢失yocto的从源码编译的优势
3.3 镜像定制
按需裁剪,极致裁剪,这里通过封装了mkiso之类的工具,推出了oemaker来实现输出镜像的定制,这里无论是koji/livebuild/yocto都是具备的
四、总结
根据EulerMaker的调研情况来看,我们可以知道EulerMaker是一个优秀的构建工具,它确实能够提供操作系统的全场景定制构建能力,随着操作系统的不断发展,定制性越来越强,功能全的操作系统和更适合业务的操作系统,往往需要更适合业务的操作系统。所以EulerMaker的存在能够在国内操作系统环境上作为一个优秀的先行者,为操作系统的优秀落地带来很好的领头作用。从而更好的发展国内操作系统行业。
我们从kprobe到perf到bpf都提到了调试,这里eBPF是必不可少的一个内容,本文以一个hello world程序为例,以kprobe和kretprobe中观测的do_sys_openat2为例,实践一个最简单的eBPF程序
一、eBPF的介绍
我们知道eBPF是由BPF演进而来,随着内核可观测的逐渐发展,eBPF逐渐火热,已经成为当前最热门的内核技术之一了,我们调试内核的研发,或多或少都有了解eBPF程序。eBPF的主要框图如下:
 关于eBPF的核心原理介绍,用不着我解释,如果想要了解的,可以查看文档如下:
https://ebpf.io/what-is-ebpf/
二、编写eBPF程序
为了编写eBPF,我们需要两个步骤
为eBPF编写c程序来映射一个event 使用python打印这个event的内容 关于bpf map,可以参考
https://github.com/iovisor/bcc/blob/master/docs/reference_guide.md
我以https://github.com/iovisor/bcc/blob/master/examples/tracing/hello_perf_output.py为例,使用了BPF_PERF_OUTPUT定义
为了能够获取pid,time,进程名等信息,这里需要使用bpf的接口,如下参考
https://docs.ebpf.io/linux/helper-function/
故实现代码如下:
#include <uapi/linux/openat2.h>
#include <linux/sched.h>

struct data_t {
        u32 pid;
        u64 ts;
        char comm[TASK_COMM_LEN];
};
BPF_PERF_OUTPUT(events);

int kylin(struct pt_regs *ctx)
{
        struct data_t data = { };

        data.pid = bpf_get_current_pid_tgid();
        data.ts = bpf_ktime_get_ns();
        bpf_get_current_comm(&data.comm, sizeof(data.comm));

        events.perf_submit(ctx, &data, sizeof(data));
        return 0;
}
这里构造了结构体data_t,其内容通过bpf的api填充,并将event映射出去。
c写好了之后,需要编写python,其目的是获取event的结构,然后打印出来,如下:
#!/usr/bin/env python3

from bcc import BPF
from bcc.utils import printb

b = BPF(src_file="kylin.c")
b.attach_kprobe(event="do_sys_openat2", fn_name="kylin")

print("%-18s %-16s %-6s" % ("TIME(s)", "COMM", "PID"))

start = 0
def print_event(cpu, data, size):
    global start
    event = b["events"].event(data)
    if start == 0:
        start = event.ts
    time_s = (float(event.ts - start)) / 1000000000
    printb(b"%-18.9f %-16s %-6d" % (time_s, event.comm, event.pid))

b["events"].open_perf_buffer(print_event)
while 1:
    try:
        b.perf_buffer_poll()
    except KeyboardInterrupt:
        exit()
值得注意的是,我这里借助的还是kprobe,因为kprobe和kretprobe我也是观测的"do_sys_openat2",代码借鉴examples/tracing/hello_perf_output.py
至此,代码编写完成,我们直接试验
# python3 kylin.py
TIME(s) COMM PID
0.000000000 systemd-journal 313
0.000131833 systemd-journal 313
0.000204458 systemd-journal 313
可以发现,我们正确的抓到了time,comm和pid
# pidof systemd-journald
313
三、总结
根据上面的例子,我们可以初步的了解了eBPF的程序如何编写。
在linux中,内核提供了lxc功能,这个功能是实现容器的基础,在容器中,有namespace和cgroups,这里我们先介绍一下cgroups,用于简单了解cgroups。
一、cgroups介绍
控制组(cgroups)是Linux内核提供的物理资源隔离机制,用来限制CPU,内存,IO等资源。今天只说V1,不说V2 Linux中CGROUPS如下所示
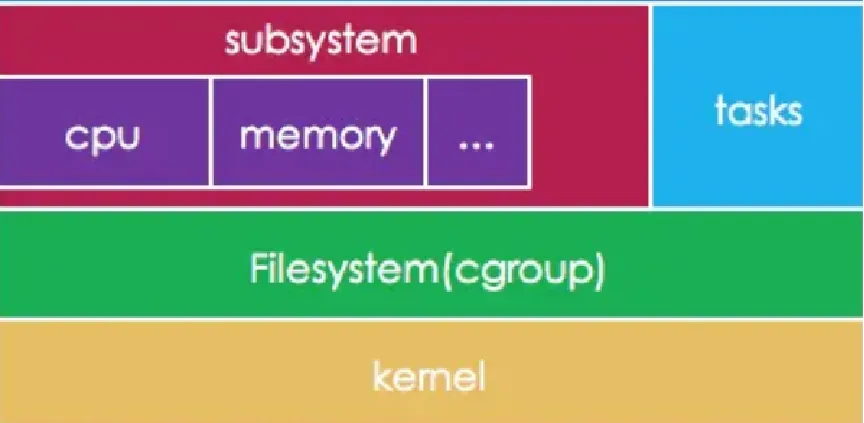 控制组有多个子系统,通过其子系统可以控制系统的功能。主要如下:
cpuset - 为 cgroup 内的任务分配独立的处理器和内存节点;
cpu - 使用调度程序对 cgroup 内的任务提供 CPU 资源的访问;
cpuacct - 生成 cgroup 中所有任务的处理器使用情况报告;
io - 限制对块设备的读写操作;
memory - 限制 cgroup 中的一组任务的内存使用;
devices - 限制 cgroup 中的一组任务访问设备;
freezer - 允许 cgroup 中的一组任务挂起/恢复;
net_cls - 允许对 cgroup 中的任务产生的网络数据包进行标记;
net_prio - 针对 cgroup 中的每个网络接口提供一种动态修改网络流量优先级的方法;
perf_event - 支持访问 cgroup 中的性能事件);
hugetlb - 为 cgroup 开启对大页内存的支持;
pid - 限制 cgroup 中的进程数量。
二、命令演示
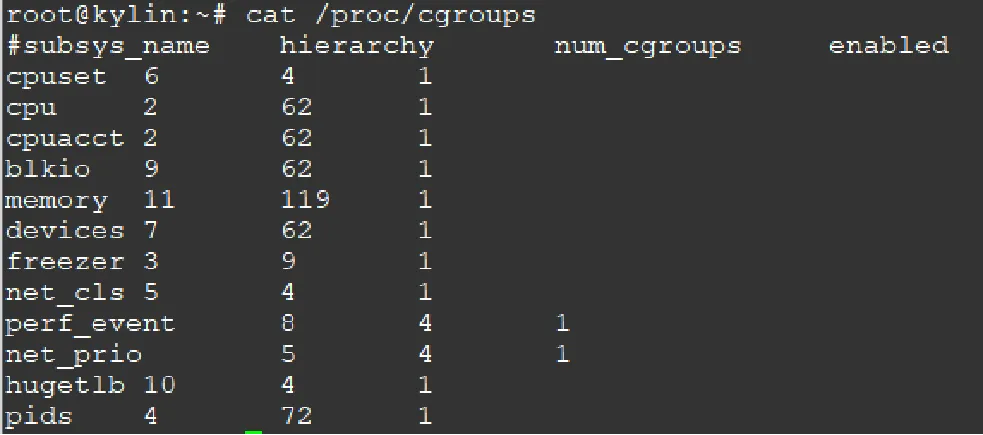
2.1 查看linux使用的cgroups
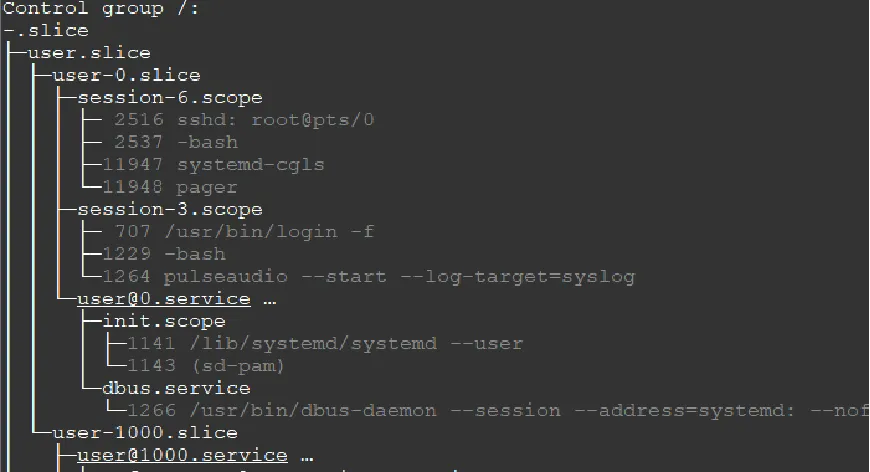
2.2 查看当前cgroups层级
2.3 查看当前cgroups服务占用情况

三、测试示例
为了测试验证,这里需要在cpu,内存,io上进行验证
3.1 限制CPU
限制CPU主要两种
- 限制核心
- 限制使用百分比
测试代码如下:
int main(void) {
  for (; ;);
  return 0;
}
gcc /root/test_cpu.c -o /root/test_cpu
对于限制核心,如下
设置cpuset
mkdir  /sys/fs/cgroup/cpuset/test/
echo 7 > /sys/fs/cgroup/cpuset/test/cpuset.cpus
/root/test_cpu  &
5233
echo 5233 > /sys/fs/cgroup/cpuset/test/tasks
taskset -p 5233
对于设置cpu,cpuacct,如下
cpu.cfs_quota_us / cpu.cfs_period_us 可作为CPU的百分比
mkdir /sys/fs/cgroup/cpu,cpuacct/test
echo 20000 > /sys/fs/cgroup/cpu,cpuacct/test/cpu.cfs_quota_us
echo 100000 > /sys/fs/cgroup/cpu,cpuacct/test/cpu.cfs_period_us
/root/test_cpu &
8359
echo 8359 > /sys/fs/cgroup/cpu,cpuacct/test/tasks
如果通过systemd,则是
systemd-run --unit=test --scope --slice=test /root/test_cpu &
systemd-run --unit=test --scope --slice=test -p CPUQuota=20% /root/test_cpu
3.2 限制内存
测试代码如下:
#include <unistd.h>
#include <stdio.h>
#include <string.h>
#include <stdlib.h>

int main(void) {
  unsigned total = 0, alloc_size = 1024 * 1024 * 100 /* MiB */;
  int *p = NULL;
  while (1) {
    if (NULL == (p = (int *)malloc(alloc_size))) {
      printf("malloc failed!\n");
      return 0;
    }
    memset(p, 0xff, alloc_size);
    total += alloc_size;
    printf("malloc size: %uM\n", total/1024/1024);
    sleep(1);
  }
  return 0;
}

gcc /root/test_mem.c -o /root/test_mem
验证如下:
mkdir /sys/fs/cgroup/memory/test/
echo $(expr 1024 '*' 1024 '*' 500) > /sys/fs/cgroup/memory/test/memory.limit_in_bytes
cgexec  -g memory:test /root/test_mem
malloc size: 100M,
malloc size: 200M,
malloc size: 300M,
malloc size: 400M,
已杀死
如果通过systemd
systemd-run --unit=test --scope --slice=test /root/test_mem
systemctl set-property test.scope MemoryLimit=500M
结果
memory: usage 512000kB, limit 512000kB, failcnt 156
memory+swap: usage 512000kB, limit 9007199254740988kB, failcnt 0
Memory cgroup out of memory: Killed process 3330 (test_mem) total-vm:563012kB, anon-rss:510700kB, file-rss:14808kB, shmem-rss:0kB, UID:0 pgtables:1112kB oom_score_adj:0
3.3 限制IO
对于IO,这里演示限制写的速度,如下:
mkdir /sys/fs/cgroup/blkio/test
echo "179:0 `expr 1000 '*' 1000`" > /sys/fs/cgroup/blkio/test/blkio.throttle.write_bps_device
cgexec -g blkio:test time dd if=/dev/zero count=1 bs=10M of=/root/test.img conv=fdatasync
记录了1+0 的读入
记录了1+0 的写出
10485760 bytes (10 MB, 10 MiB) copied, 10.0687 s, 1.0 MB/s
使用systemd
systemd-run --unit=test --scope --slice=test -p "IOWriteBandwidthMax=/dev/mmcblk0p6 1M" time dd if=/dev/zero count=1 bs=10M of=/root/test.img conv=fdatasync
Running scope as unit: test.scope
记录了1+0 的读入
记录了1+0 的写出
10485760 bytes (10 MB, 10 MiB) copied, 10.4876 s, 1000 kB/s
四、调用分析
对于上面的示例,主要根据如下分析调用关系
- sysfs
- cpuset
- cpuacct
- memory
- io
4.1 sysfs创建
这里从start_kernel如下
start_kernel----init/main.c
    cgroup_init_early
        cgroup_init_subsys
    cgroup_init---init/main.c
        cgroup_init_subsys
        WARN_ON(sysfs_create_mount_point(fs_kobj, "cgroup"));
        WARN_ON(cgroup_add_legacy_cftypes(ss, ss->legacy_cftypes));
            cgroup_add_cftypes
                cgroup_init_cftypes
                cgroup_apply_cftypes
                    cgroup_addrm_files
                        cgroup_add_file
                            __kernfs_create_file(创建sysfs文件)
4.2 cgroups文件系统结构
struct cgroup_subsys {
    struct cgroup_subsys_state *(*css_alloc)(struct cgroup_subsys_state *parent_css);
    int (*css_online)(struct cgroup_subsys_state *css);
    void (*css_offline)(struct cgroup_subsys_state *css);
    void (*css_released)(struct cgroup_subsys_state *css);
    void (*css_free)(struct cgroup_subsys_state *css);
    void (*css_reset)(struct cgroup_subsys_state *css);
    void (*css_rstat_flush)(struct cgroup_subsys_state *css, int cpu);
    int (*css_extra_stat_show)(struct seq_file *seq,
                   struct cgroup_subsys_state *css);

    int (*can_attach)(struct cgroup_taskset *tset);
    void (*cancel_attach)(struct cgroup_taskset *tset);
    void (*attach)(struct cgroup_taskset *tset);
    void (*post_attach)(void);
    int (*can_fork)(struct task_struct *task,
            struct css_set *cset);
    void (*cancel_fork)(struct task_struct *task, struct css_set *cset);
    void (*fork)(struct task_struct *task);
    void (*exit)(struct task_struct *task);
    void (*release)(struct task_struct *task);
    void (*bind)(struct cgroup_subsys_state *root_css);
};
4.3 sysfs的文件操作结构
cgroup_init_cftypes
cgroup_kf_ops
static struct kernfs_ops cgroup_kf_ops = {
    .atomic_write_len   = PAGE_SIZE,
    .open           = cgroup_file_open,
    .release        = cgroup_file_release,
    .write          = cgroup_file_write,
    .poll           = cgroup_file_poll,
    .seq_start      = cgroup_seqfile_start,
    .seq_next       = cgroup_seqfile_next,
    .seq_stop       = cgroup_seqfile_stop,
    .seq_show       = cgroup_seqfile_show,
};
4.4 cpuset流程
cpuset_cgrp_subsys
    struct cftype legacy_files[]
        .name = "cpus",
        .write = cpuset_write_resmask,
            update_cpumask
                cpumask_and
这里cpumask_and是对CPU掩码信息与的函数
4.5 cpuset结构体
struct cgroup_subsys cpuset_cgrp_subsys = {
    .css_alloc  = cpuset_css_alloc,
    .css_online = cpuset_css_online,
    .css_offline    = cpuset_css_offline,
    .css_free   = cpuset_css_free,
    .can_attach = cpuset_can_attach,
    .cancel_attach  = cpuset_cancel_attach,
    .attach     = cpuset_attach,
    .post_attach    = cpuset_post_attach,
    .bind       = cpuset_bind,
    .fork       = cpuset_fork,
    .legacy_cftypes = legacy_files,
    .dfl_cftypes    = dfl_files,
    .early_init = true,
    .threaded   = true,
};
4.6 cpuacct流程
cpuacct_cgrp_subsys
    struct cftype cpu_legacy_files[]
        .name = "cfs_quota_us",
        .write_s64 = cpu_cfs_quota_write_s64,
            tg_set_cfs_quota
                tg_set_cfs_bandwidth
                    unthrottle_cfs_rq
        .name = "cfs_period_us",
        .write_u64 = cpu_cfs_period_write_u64,
            tg_set_cfs_period
                tg_set_cfs_bandwidth
                    unthrottle_cfs_rq
这里unthrottle_cfs_rq 控制CPU带宽(给定周期时间内消耗CPU的时间)的具体函数
4.7 cpuacct结构
struct cgroup_subsys cpuacct_cgrp_subsys = {
    .css_alloc  = cpuacct_css_alloc,
    .css_free   = cpuacct_css_free,
    .legacy_cftypes = files,
    .early_init = true,
};
4.8 memory流程
memory_cgrp_subsys
    struct cftype mem_cgroup_legacy_files[]
        .name = "limit_in_bytes",
        .write = mem_cgroup_write,
            mem_cgroup_resize_max
                page_counter_set_max
这里page_counter_set_max是设置系统允许使用的最大页数
4.9 memory cgroup结构
struct cgroup_subsys memory_cgrp_subsys = {
    .css_alloc = mem_cgroup_css_alloc,
    .css_online = mem_cgroup_css_online,
    .css_offline = mem_cgroup_css_offline,
    .css_released = mem_cgroup_css_released,
    .css_free = mem_cgroup_css_free,
    .css_reset = mem_cgroup_css_reset,
    .can_attach = mem_cgroup_can_attach,
    .cancel_attach = mem_cgroup_cancel_attach,
    .post_attach = mem_cgroup_move_task,
    .bind = mem_cgroup_bind,
    .dfl_cftypes = memory_files,
    .legacy_cftypes = mem_cgroup_legacy_files,
    .early_init = 0,
};
4.10 io流程
blkcg_policy_register
    if (pol->legacy_cftypes)
        WARN_ON(cgroup_add_legacy_cftypes(&io_cgrp_subsys, pol->legacy_cftypes));

module_init(throtl_init);
    blkcg_policy_register(&blkcg_policy_throtl);
        static struct blkcg_policy blkcg_policy_throtl = {
            .dfl_cftypes        = throtl_files,
            .legacy_cftypes     = throtl_legacy_files,
            .pd_alloc_fn        = throtl_pd_alloc,
            .pd_init_fn     = throtl_pd_init,
            .pd_online_fn       = throtl_pd_online,
            .pd_offline_fn      = throtl_pd_offline,
            .pd_free_fn     = throtl_pd_free,
        };
        struct cftype throtl_legacy_files[]
            .name = "throttle.write_bps_device",
            .write = tg_set_conf_u64,
                tg_set_conf
                    tg_conf_updated
                        tg_bps_limit
                            tg->bps[rw][td->limit_index];
这里throtl_grp是用来控制IO参数的结构体,对tg->bps写值可以控制其bps大小
4.11 io cgroup 结构
struct cgroup_subsys io_cgrp_subsys = {
    .css_alloc = blkcg_css_alloc,
    .css_online = blkcg_css_online,
    .css_offline = blkcg_css_offline,
    .css_free = blkcg_css_free,
    .can_attach = blkcg_can_attach,
    .css_rstat_flush = blkcg_rstat_flush,
    .bind = blkcg_bind,
    .dfl_cftypes = blkcg_files,
    .legacy_cftypes = blkcg_legacy_files,
    .legacy_name = "blkio",
    .exit = blkcg_exit,
#ifdef CONFIG_MEMCG
    /*
     * This ensures that, if available, memcg is automatically enabled
     * together on the default hierarchy so that the owner cgroup can
     * be retrieved from writeback pages.
     */
    .depends_on = 1 << memory_cgrp_id,
#endif
};
struct throtl_grp {
    /* internally used bytes per second rate limits */
    uint64_t bps[2][LIMIT_CNT];
......
}
五、总结
至此,我们能够简单了解了cgroups,cgroups是在linux 容器中的对资源隔离的必要手段。
bpftrace是eBPF的高级调试语言,它能够简单的直接运行eBPF程序,本文基于eBPF的介绍上,以bpftrace为例,实践bpftrace的基本命令。
一、了解bpftrace
为了能够全面的了解bpftrace,建议大家了解如下仓库:
https://github.com/bpftrace/bpftrace
为了了解框架,可以查看如下图
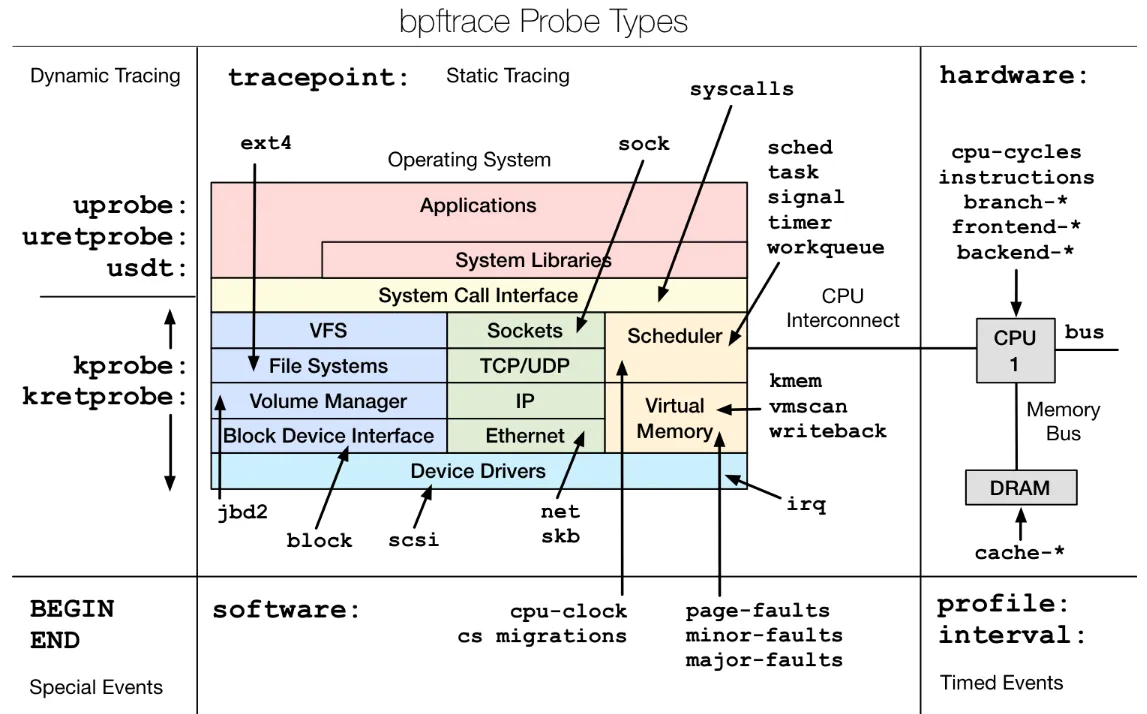 如果看到这个图片,也不用慌,它主要介绍如下两点:
图中带颜色的框图是linux系统的主要功能模块 图中带箭头的,如果指向框图的,那么对应probe的类型 根据这些类型,我们可以通过bpftrace来引用从而调试内核。
如果进入这个仓库的,可以看到仓库的README.md,这里有bpftrace的示例,本文不基于这些事例来进行演示,而是自己测试一个示例do_sys_openat2,readme的示例大家可以自己瞧一瞧。
二、命令演示
为了文档延续性,这里还是以do_sys_openat2为例,首先需要查看bpftrace支持的跟踪点,如下
# bpftrace -l '*do_sys_openat2'
kprobe:do_sys_openat2
可以看到,bpftrace支持kprobe类型的do_sys_openat2观测
# bpftrace -e 'kprobe:do_sys_openat2 { printf("PID=%d COMM=%s\n", pid, comm )}'
Attaching 1 probe...
PID=313 COMM=systemd-journal
PID=313 COMM=systemd-journal
PID=313 COMM=systemd-journal
PID=313 COMM=systemd-journal
PID=313 COMM=systemd-journal
这里和kprobe达到效果一致。
