之前我们可以通过waydroid的官方image来实现通过软件渲染的方式运行waydroid,参考Waydroid预研,从而实现在linux上运行安卓程序,这次我们通过移植了panthor,可以通过官方的mesa进行渲染,这样我们根据外网社区的相关文章,同步验证waydroid在panthor的运行效果。可想而知的是,如果最新的waydroid想要运行在panthor上,安卓内部的mesa需要更新到24以上,这样waydroid是纯硬件渲染了。移植安卓mesa这个动作有人完成了,我们只需要拿到对应的固件即可,关于rk3588上使用panthor的文章可以参考RK3588关于panthor驱动的移植
一、在系统上安装waydroid
我们可以参照waydroid的官网,安装waydroid二进制,这样我们就不需要重编译waydroid源码,如下:
sudo apt install curl ca-certificates -y
curl https://repo.waydro.id | sudo bash
sudo apt install waydroid
此时我们的系统内可以安装好waydroid
二、根据lxc的要求构建内核
我们上层安装好waydroid后,需要根据lxc的配置打开对应的内核配置,我们需要运行命令lxc-checkconfig,如下
LXC version 5.0.0
--- Namespaces ---
Namespaces: enabled
Utsname namespace: enabled
Ipc namespace: enabled
Pid namespace: enabled
User namespace: enabled
newuidmap is not installed
newgidmap is not installed
Network namespace: enabled

--- Control groups ---
Cgroups: enabled
Cgroup namespace: enabled

Cgroup v1 mount points:


Cgroup v2 mount points:
/sys/fs/cgroup

Cgroup v1 systemd controller: missing
Cgroup v1 freezer controller: missing
Cgroup ns_cgroup: required
Cgroup device: enabled
Cgroup sched: enabled
Cgroup cpu account: enabled
Cgroup memory controller: enabled
Cgroup cpuset: enabled

--- Misc ---
Veth pair device: enabled, not loaded
Macvlan: enabled, not loaded
Vlan: enabled, not loaded
Bridges: enabled, loaded
Advanced netfilter: enabled, loaded
CONFIG_IP_NF_TARGET_MASQUERADE: enabled, not loaded
CONFIG_IP6_NF_TARGET_MASQUERADE: enabled, not loaded
CONFIG_NETFILTER_XT_TARGET_CHECKSUM: enabled, loaded
CONFIG_NETFILTER_XT_MATCH_COMMENT: enabled, not loaded
FUSE (for use with lxcfs): enabled, not loaded

--- Checkpoint/Restore ---
checkpoint restore: enabled
CONFIG_FHANDLE: enabled
CONFIG_EVENTFD: enabled
CONFIG_EPOLL: enabled
CONFIG_UNIX_DIAG: enabled
CONFIG_INET_DIAG: enabled
CONFIG_PACKET_DIAG: enabled
CONFIG_NETLINK_DIAG: enabled
File capabilities:

Note : Before booting a new kernel, you can check its configuration
usage : CONFIG=/path/to/config /usr/bin/lxc-checkconfig
这里如果我们发现一些配置没打开,那么需要在内核中将配置打开。我们需要将其所有的特性功能打开。这里需要留意以下配置:
CONFIG_IPV6=y
CONFIG_NF_CT_NETLINK=y
CONFIG_PSI=y
CONFIG_BLK_DEV_LOOP=y
CONFIG_ANDROID=y
CONFIG_ANDROID_BINDER_IPC=y
CONFIG_ANDROID_BINDERFS=y
CONFIG_ANDROID_BINDER_DEVICES="binder,hwbinder,vndbinder"
我们可以关闭RK的特性配置如下:
# CONFIG_DRM_IGNORE_IOTCL_PERMIT is not set
至此,相关内核配置可以正常打开,我们编译内核即可
三、waydroid的安卓固件
我们要运行基于panthor的安卓固件,那么我们需要升级安卓的mesa包,我们可以自己编译mesa,也可以利用别人移植好的mesa仓库,替换编译,如下:
https://github.com/WillzenZou/android_external_mesa3d
如果我们只需要二进制,这里我是直接用二进制了,所以可以直接如下获取:
https://github.com/WillzenZou/armbian_fork_build/releases/download/willzen-armbian-24.5.0/2.waydroid-panthorv10-240416-v1.img.tar.gz
此时我们解压镜像如下:
tar xvzf 2.waydroid-panthorv10-240416-v1.img.tar.gz
然后将其拷贝到固件加载目录
cp -rf 2.waydroid-panthorv10-240416-v1.img/* /usr/share/waydroid-extra/images
最后初始化waydroid即可
waydroid init -f -i /usr/share/waydroid-extra/images
四、启动waydroid
我们根据官网的说明直接启动waydroid即可,如下
waydroid show-full-ui
如果启动存在问题,则可以如下查看日志
waydroid logcat
具体cmdline配置可以参考官网:
https://docs.waydro.id/usage/waydroid-command-line-options
至此,我们等一会儿就正常通过panthor启动waydroid,如下:

五、扩展
根据上面的信息,我们正常的通过panthor在linux设备上运行了安卓设备,这个不是我做这个事情的主要目的,因为如Waydroid预研,waydroid已经可以正常的通过软件渲染运行在麒麟系统上了,这次这个事情是通过硬件渲染的方式来试试waydroid。
这个事情的主要目的是,如果waydroid启动的openharmony,而linux是麒麟系统,那么我们可以使得openharmony通过容器的方式运行,基于麒麟v10上。要完成这个事情,我们还需要如下:
openharmony的gpu支持panthor,(目前仅支持panfrost) 麒麟系统支持的gpu支持panthor,(目前仅支持panfrost/legacy mali) openharmony的hdf和linux内核相互兼容 当然,也有疑问,为什么不直接通过panfrost来运行麒麟系统呢,这里主要原因是,openharmony的panfrost对应的mesa版本在22,而mesa在22上并不完善支持panfrost,我们的机器目前使用的是基于mesa23的panfrost,这个并不兼容,而且,openharmony的mesa的panfrost并不支持rk3588,所以panfrost只能作为openharmony的老旧方案,对应的panfrost版本在Linux上可能并不能工作(waydroid要求显卡显示方案和主机显示方案相同)。
我们编译鸿蒙是通过服务器,那么有没有一种办法,让我们qemu能够直接通过服务器启动openharmony呢,而不是需要将image拷贝到外面,然后通过windows/linux的qemu来启动openharmony,实际上,这是有办法的。本文基于XMing来实现在windows上启动Linux的Xserver,或者Linux下直接启动openharmony
一、启动X11 Forward
为了使得服务器能够接收远程的X11程序启动,我们需要打开sshd 服务的配置选项如下:
vim /etc/ssh/sshd_config
X11Forwarding yes
此时,我们重启ssh服务即可
systemctl restart sshd
二、.Xauthority
我们需要知道的是,X11转发的功能是在服务端提供了.Xauthority来识别,如果我们是直接在服务器上运行,则每次登录.Xauthority会在登录的账户上更新,如果我们是root登录,则位置为
/root/.Xauthority
但是我们通常情况下,代码是在chroot中构建,这样的话我们需要利用chroot中的.Xauthority,则如下:
cp .Xauthority /path/to/chroot/root/.Xauthority
假设我们的chroot环境目录是/root/work/kb/squashfs-root/,则如下
cp .Xauthority /root/work/kb/squashfs-root/root/.Xauthority
三、qemu-run.sh
为了让qemu正常运行,我们需要编写qemu脚本,这里参考qemu启动openharmony镜像(二) 在arm64的机器上编译和运行qemu即可
四、Linux主机上通过服务器的qemu启动openharmony
对于Linux主机,我们可以通过ssh 加上X/Y的配置打开X11 Forward功能,这里以131为例
ssh -XY root@172.25.130.131
此时我们进入openharmony的镜像输出路径
cd out/arm64_virt/packages/phone/images
直接运行脚本即可
./qemu-run.sh
五、Windows主机上通过XMing实现
我们知道,Windows不能直接启动X11的程序,我们需要借助XMing开源程序,这里有两种办法
5.1 MobaXterm
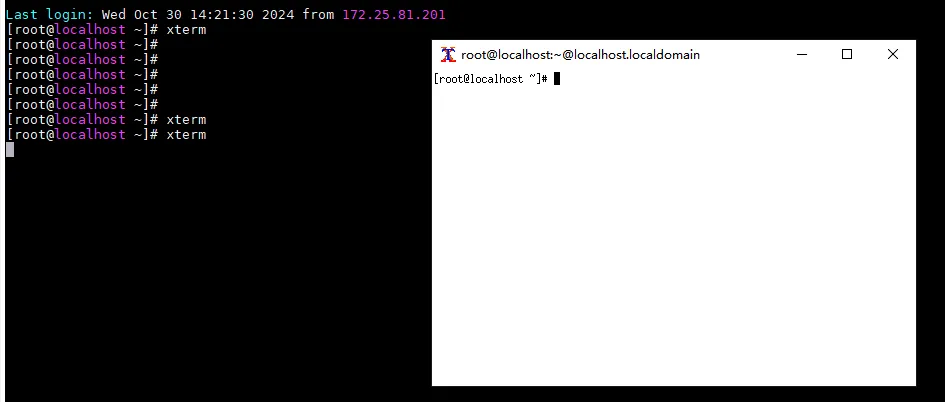
我们借助MobaXterm程序,它默认集成了XMing二进制,我们通过其ssh登录的服务器,可以直接启动X11的程序,这里以xterm为例,如下:
5.2 Putty
我们知道Putty是很好用的开源ssh client,如果我们使用Putty登录ssh,则我们需要启用一个XMing后台,如下可以下载:
http://www.straightrunning.com/XmingNotes/
我们可以通过sourceforge网站来直接下载二进制安装
https://sourceforge.net/projects/xming/
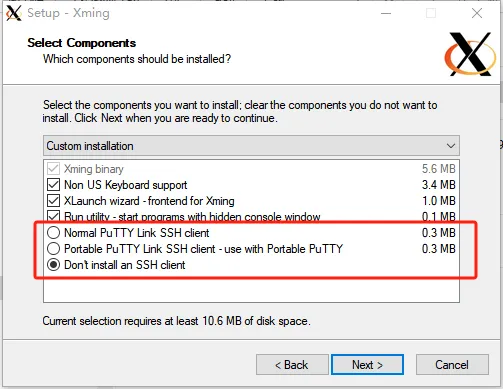
此时我们如果没有putty,则可以预装一个,如果存在putty,则在Xming中不安装putty,如下
 此时,我们可以发现Putty内部多了如下选项
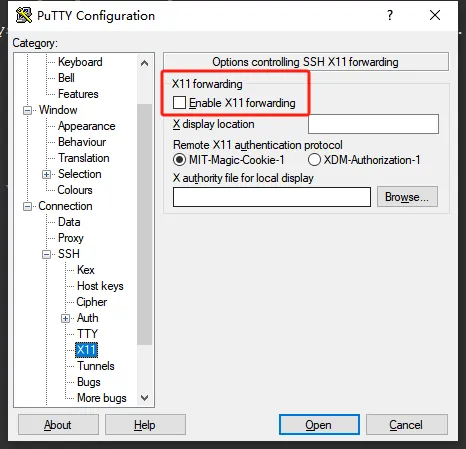 此时我们通过putty打开一个ssh时,默认打开"Enable X11 forwarding"即可。
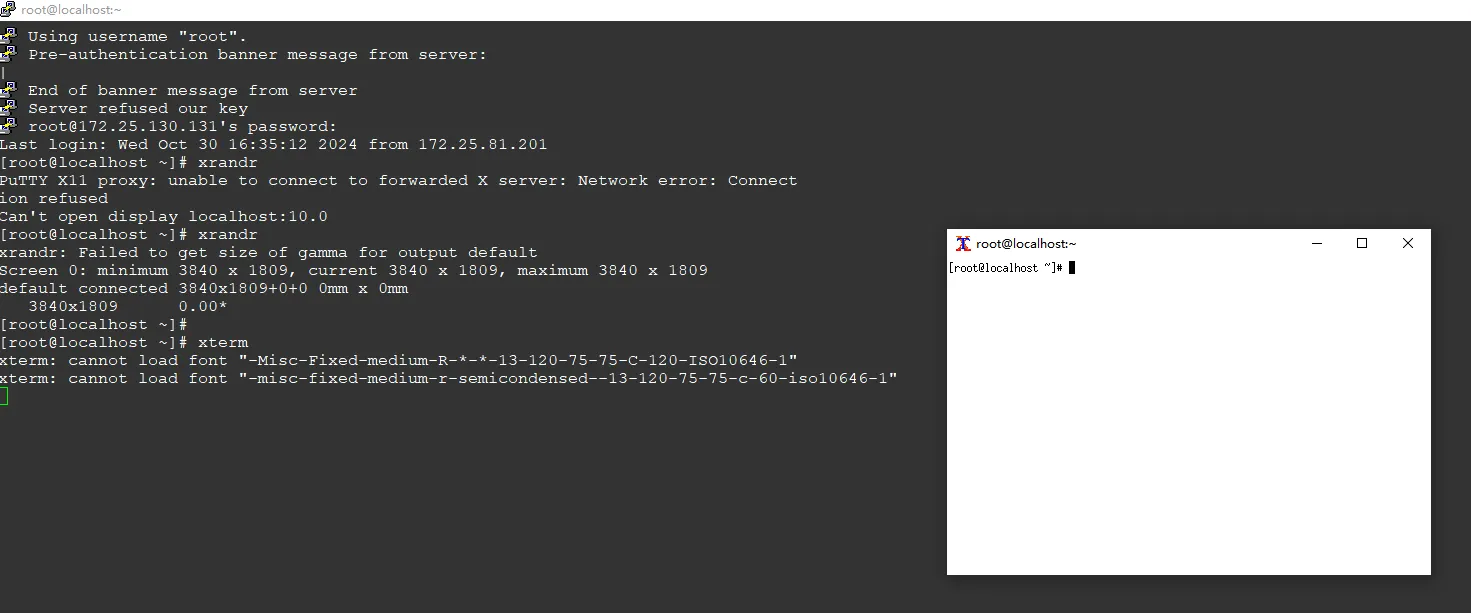
此时我们打开窗口如下:
5.3 启动qemu
此时我们直接进入环境中,启动脚本即可
./qemu-run.sh
六、启动效果
至此,Openharmony启动效果如下:
七、总结
我们知道,这样的方式是通过X11转发,在Windows/Linux以X11的服务器来运行一个X11程序,而我们这里服务器是qemu启动的窗口,所以这里可能存在兼容性问题,比较明显的是,无法使用鼠标。这和qemu启动的openharmony的兼容性相关。
所以,此方法只可以用作定位系统开机启动中存在的通用性问题,或学习鸿蒙操作系统的一种方式
根据qemu启动openharmony镜像(一) 下载或编译qemu(基于X86-64)的文章,可以发现都是基于x86-64平台的的qemu编译和运行,为了支持aarch64,这里提供一个方法来支持aarch64的qemu源码编译和启动
一、编译qemu
这里与上一个文章选用一致得qemu版本8.2.7,如下
wget https://download.qemu.org/qemu-8.2.7.tar.xz
解压后我们需要安装一些包,如下:
apt install libsdl2-image-dev libvirglrenderer-dev libslirp-dev libvde-dev
这样机器qemu支持了sdl2-image和virgl,这样我们开始编译
./configure && make -j123 && make install DESTDIR=out
等编译完成之后,我们打包qemu二进制
tar cvzf out.tar.gz build/out/
此时我们配置PATH即可正常使用
export PATH=$PATH:/home/kylin/out/usr/local/bin
此时显示如下则大功告成
root@kylin:/home/kylin# qemu-system-aarch64 --version
QEMU emulator version 8.2.7
Copyright (c) 2003-2023 Fabrice Bellard and the QEMU Project developers
二、运行OH
为了运行OH,我们需要拷贝一下image到arm64的机器上,如下:
scp -r vendor/qemu/arm64_virt/images/ kylin@172.25.82.210:~/
此时我们需要一个qemu-run.sh的脚本,内容如下:
#!/bin/bash
qemu-system-aarch64 \
-M virt \
-cpu cortex-a53 \
-smp 4 \
-m 8192 \
-nographic \
-drive if=none,file=./userdata.img,format=raw,id=userdata,index=3 \
-device virtio-blk-device,drive=userdata \
-drive if=none,file=./vendor.img,format=raw,id=vendor,index=2 \
-device virtio-blk-device,drive=vendor \
-drive if=none,file=./system.img,format=raw,id=system,index=1 \
-device virtio-blk-device,drive=system \
-drive if=none,file=./updater.img,format=raw,id=updater,index=0 \
-device virtio-blk-device,drive=updater \
-kernel ./Image \
-initrd ./ramdisk.img \
-vnc :20 \
-k en-us \
-net nic \
-net user,hostfwd=tcp::6666-:6666 \
-device virtio-gpu-pci,xres=486,yres=864 \
-display sdl,gl=on \
-append "loglevel=7 ip=192.168.137.2:192.168.137.1:192.168.137.1:255.255.255.0::eth0:off LIBGL_ALWAYS_SOFTWARE=true LIBGL_DEBUG=verbose EGL_LOG_LEVEL=debug sn=0023456789 console=ttyAMA0,115200 init=/bin/init ohos.boot.hardware=arm64_virt default_boot_device=a003e00.virtio_mmio root=/dev/ram0 rw ohos.required_mount.system=/dev/block/vdb@/usr@ext4@ro,barrier=1@wait,required ohos.required_mount.vendor=/dev/block/vdc@/vendor@ext4@ro,barrier=1@wait,required ohos.required_mount.misc=/dev/block/vda@/misc@none@none=@wait,required ohos.required_mount.data=/dev/block/vdd@/data/@ext4@nosuid,nodev,noatime,barrier=1,data=ordered,noauto_da_alloc@wait,reservedsize=104857600 sn=0023456789"
值得注意的是,这里指定gpu如果是virtio-gpu-gl,则会崩溃,所以需要指定为virtio-gpu-pci。(但是目前都是软渲染,非GPU实现)。
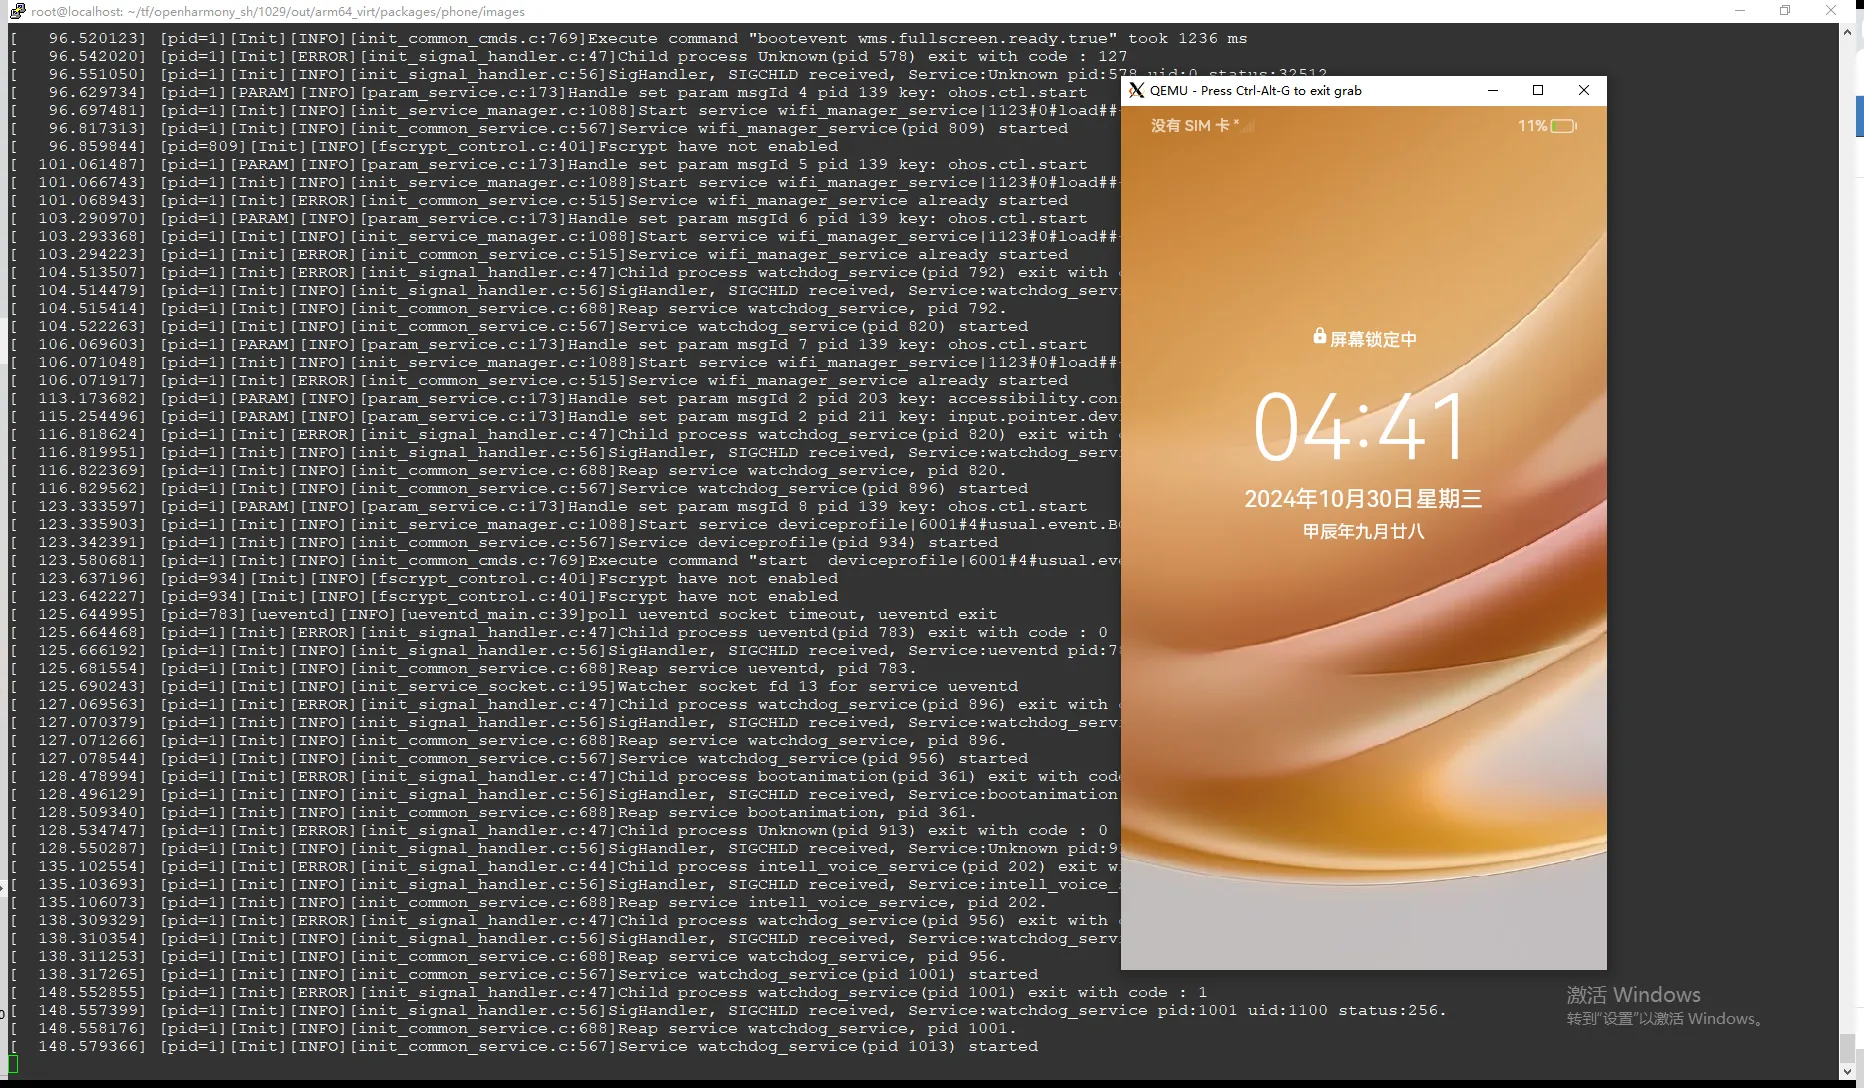
等待一会儿,鸿蒙系统正常运行如下:

为了使得openharmony能够通过qemu启动,我们需要在设备上具备一个qemu的环境,这里仅针对x86-64,arm-linux类似x86-64,但是这里没有验证,对于windows,这里直接下载安装即可,对于linux,这里推荐使用qemu来源码构建。本文指定qemu的版本在8.2.7(2024/09/18)和windows的8.2.0
一、windows下的qemu安装
1.1 下载qemu版本
为了下载qemu,我们需要Stefan Weil给我们预编译的windows二进制:
https://www.qemu.org/download/#windows
我们找2023-12-24为我们预编译的qemu版本8.2.0版本,如下链接
https://qemu.weilnetz.de/w64/2023/
https://qemu.weilnetz.de/w64/2023/qemu-w64-setup-20231224.exe
下载可获得二进制qemu-w64-setup-20231224.exe
1.2 安装
这里安装直接一路通过即可,我们需要注意的是,安装完需要设置windows的系统path变量,设置之后,我们如下能够看到命令即完成
qemu-system-aarch64.exe --version
QEMU emulator version 8.0.90 (v8.1.0-rc0-12027-g6fd99fb6ae)
Copyright (c) 2003-2023 Fabrice Bellard and the QEMU Project developers
二、linux下的qemu编译
在linux下使用qemu,我们更倾向于重新编译构建,这里介绍方法
2.1 下载qemu源码
我们可以wget获取,如下
wget https://download.qemu.org/qemu-8.2.7.tar.xz
下载后,解压即可
xz -d qemu-8.2.7.tar.xz && tar xvf qemu-8.2.7.tar
2.2 配置qemu
qemu源码内部可以直接configure,我们事先不清楚qemu功能是否齐全,我们可以先配置一下,如果没有包含自己想要的功能,那就需要安装对于的开发包,因为configure是根据系统环境来判断功能是否开启的,如下:
qemu 8.2.7 Build environment Build directory : /root/tf/qemu/qemu-8.2.7/build Source path : /root/tf/qemu/qemu-8.2.7 Download dependencies : YES Directories Build directory : /root/tf/qemu/qemu-8.2.7/build Source path : /root/tf/qemu/qemu-8.2.7 Download dependencies : YES Install prefix : /usr/local BIOS directory : share/qemu firmware path : share/qemu-firmware binary directory : /usr/local/bin library directory : /usr/local/lib/x86_64-linux-gnu module directory : lib/x86_64-linux-gnu/qemu libexec directory : /usr/local/libexec include directory : /usr/local/include config directory : /usr/local/etc local state directory : /var/local Manual directory : /usr/local/share/man Doc directory : /usr/local/share/doc Host binaries python : /root/tf/qemu/qemu-8.2.7/build/pyvenv/bin/python3 (version: 3.8) sphinx-build : NO gdb : /usr/bin/gdb iasl : NO genisoimage : /usr/bin/genisoimage smbd : /usr/sbin/smbd Configurable features Documentation : NO system-mode emulation : YES user-mode emulation : YES block layer : YES Install blobs : YES module support : NO fuzzing support : NO Audio drivers : pa oss Trace backends : log D-Bus display : YES QOM debugging : YES Relocatable install : YES vhost-kernel support : YES vhost-net support : YES vhost-user support : YES vhost-user-crypto support : YES vhost-user-blk server support : YES vhost-vdpa support : YES build guest agent : YES Compilation host CPU : x86_64 host endianness : little C compiler : cc -m64 -mcx16 Host C compiler : cc -m64 -mcx16 C++ compiler : NO Objective-C compiler : NO CFLAGS : -g -O2 QEMU_CFLAGS : -D_GNU_SOURCE -D_FILE_OFFSET_BITS=64 -D_LARGEFILE_SOURCE -fno-strict-aliasing -fno-common -fwrapv -fstack-protector-strong QEMU_LDFLAGS : -fstack-protector-strong -Wl,-z,relro -Wl,-z,now -Wl,--warn-common link-time optimization (LTO) : NO PIE : YES static build : NO malloc trim support : YES membarrier : NO debug graph lock : NO debug stack usage : NO mutex debugging : NO memory allocator : system avx2 optimization : YES avx512bw optimization : YES avx512f optimization : NO gcov : NO thread sanitizer : NO CFI support : NO strip binaries : NO sparse : NO mingw32 support : NO Cross compilers aarch64 : aarch64-linux-gnu-gcc x86_64 : cc i386 : cc Targets and accelerators KVM support : YES HVF support : NO WHPX support : NO NVMM support : NO Xen support : NO Xen emulation : YES TCG support : YES TCG backend : native (x86_64) TCG plugins : YES TCG debug enabled : NO target list : aarch64_be-linux-user aarch64-linux-user alpha-linux-user armeb-linux-user arm-linux-user cris-linux-user hexagon-linux-user hppa-linux-user i386-linux-user loongarch64-linux-user m68k-linux-user microblazeel-linux-user microblaze-linux-user mips64el-linux-user mips64-linux-user mipsel-linux-user mips-linux-user mipsn32el-linux-user mipsn32-linux-user nios2-linux-user or1k-linux-user ppc64le-linux-user ppc64-linux-user ppc-linux-user riscv32-linux-user riscv64-linux-user s390x-linux-user sh4eb-linux-user sh4-linux-user sparc32plus-linux-user sparc64-linux-user sparc-linux-user x86_64-linux-user xtensaeb-linux-user xtensa-linux-user aarch64-softmmu alpha-softmmu arm-softmmu avr-softmmu cris-softmmu hppa-softmmu i386-softmmu loongarch64-softmmu m68k-softmmu microblazeel-softmmu microblaze-softmmu mips64el-softmmu mips64-softmmu mipsel-softmmu mips-softmmu nios2-softmmu or1k-softmmu ppc64-softmmu ppc-softmmu riscv32-softmmu riscv64-softmmu rx-softmmu s390x-softmmu sh4eb-softmmu sh4-softmmu sparc64-softmmu sparc-softmmu tricore-softmmu x86_64-softmmu xtensaeb-softmmu xtensa-softmmu default devices : YES out of process emulation : YES vfio-user server : NO Block layer support coroutine backend : ucontext coroutine pool : YES Block whitelist (rw) : Block whitelist (ro) : Use block whitelist in tools : NO VirtFS (9P) support : YES VirtFS (9P) Proxy Helper support (deprecated): NO Live block migration : YES replication support : YES bochs support : YES cloop support : YES dmg support : YES qcow v1 support : YES vdi support : YES vhdx support : YES vmdk support : YES vpc support : YES vvfat support : YES qed support : YES parallels support : YES FUSE exports : NO VDUSE block exports : YES Crypto TLS priority : NORMAL GNUTLS support : NO libgcrypt : NO nettle : NO AF_ALG support : NO rng-none : NO Linux keyring : YES Linux keyutils : NO User interface SDL support : YES 2.0.10 SDL image support : YES 2.0.5 GTK support : YES pixman : YES 0.38.4 VTE support : NO PNG support : YES 1.6.37 VNC support : YES VNC SASL support : NO VNC JPEG support : YES 2.0.3 spice protocol support : NO curses support : YES brlapi support : NO Audio backends OSS support : YES sndio support : NO ALSA support : YES 1.2.2 PulseAudio support : YES 13.99.1 PipeWire support : NO JACK support : NO Network backends AF_XDP support : NO slirp support : YES 4.1.0 vde support : YES netmap support : NO l2tpv3 support : YES Dependencies libtasn1 : NO PAM : NO iconv support : YES virgl support : YES 0.8.2 rutabaga support : NO blkio support : NO curl support : NO Multipath support : NO Linux AIO support : NO Linux io_uring support : NO ATTR/XATTR support : YES RDMA support : NO PVRDMA support : NO fdt support : system libcap-ng support : NO bpf support : NO rbd support : NO smartcard support : NO U2F support : NO libusb : NO usb net redir : NO OpenGL support (epoxy) : YES 1.5.4 GBM : YES 21.2.6 libiscsi support : NO libnfs support : NO seccomp support : NO GlusterFS support : NO hv-balloon support : NO TPM support : YES libssh support : NO lzo support : NO snappy support : YES bzip2 support : NO lzfse support : NO zstd support : NO NUMA host support : NO capstone : NO libpmem support : YES 1.8 libdaxctl support : YES 67+ libudev : YES 245 FUSE lseek : NO selinux : YES 3.0 libdw : NO Subprojects berkeley-softfloat-3 : YES berkeley-testfloat-3 : YES keycodemapdb : YES libvduse : YES libvhost-user : YES User defined options Native files : config-meson.cross docs : disabled plugins : true
如果有一些功能没支持,我们需要通过pip/apt安装对于的开发包即可,这里就不详细说明了。
2.3 编译qemu
执行编译非常简单,我们直接make即可
make -j$(cat /proc/cpuinfo | grep processor | wc -l)
等待一会儿,qemu就完整编译好啦
2.4 安装
为了正常安装,我们执行make install即可,这里指定了destdir为out,如下
make install DESTDIR=out
为了使得qemu默认启用,我们需要定义PATH变量,如下:
export PATH=$PATH:$(pwd)/build/out/usr/local/bin/
此时,我们检查一下是否正常,如下:
qemu-system-aarch64 --version
QEMU emulator version 8.2.7
Copyright (c) 2003-2023 Fabrice Bellard and the QEMU Project developers
至此,qemu正常运行
三、运行
对于windows,我们需要写一个powershell脚本,如下:
qemu-system-aarch64.exe `
-M virt `
-cpu cortex-a53 `
-smp 4 `
-m 8192 `
-nographic `
-drive if=none,file=./userdata.img,format=raw,id=userdata,index=0 `
-device virtio-blk-device,drive=userdata `
-drive if=none,file=./vendor.img,format=raw,id=vendor,index=2 `
-device virtio-blk-device,drive=vendor `
-drive if=none,file=./system.img,format=raw,id=system,index=1 `
-device virtio-blk-device,drive=system `
-drive if=none,file=./Image,format=raw,id=empty,index=3 `
-device virtio-blk-device,drive=empty `
-kernel ./Image `
-initrd ./ramdisk.img `
-vnc :20 `
-k en-us `
-net nic `
-net user,hostfwd=tcp::6666-:6666 `
-device virtio-gpu,xres=486,yres=864,max_outputs=1,addr=08.0 `
-display sdl,gl=on `
-device virtio-mouse-pci `
-device virtio-keyboard-pci `
-append "loglevel=7 ip=192.168.137.2:192.168.137.1:192.168.137.1:255.255.255.0::eth0:off LIBGL_ALWAYS_SOFTWARE=true LIBGL_DEBUG=verbose EGL_LOG_LEVEL=debug sn=0023456789 console=ttyAMA0,115200 init=/bin/init ohos.boot.hardware=arm64_virt default_boot_device=a003e00.virtio_mmio root=/dev/ram0 rw ohos.required_mount.system=/dev/block/vdb@/usr@ext4@ro,barrier=1@wait,required ohos.required_mount.vendor=/dev/block/vdc@/vendor@ext4@ro,barrier=1@wait,required   ohos.required_mount.misc=/dev/block/vdd@/misc@none@none=@wait,required  ohos.required_mount.data=/dev/block/vda@/data/@ext4@nosuid,nodev,noatime,barrier=1,data=ordered,noauto_da_alloc@wait,reservedsize=104857600 sn=0023456789"
对于Linux,我们直接复用openharmony的qemu-run脚本
./qemu-run
board: arm64_virt

Enter to start qemu[y/n]:
为了方便,也可以编写一个qemu脚本,如下内容
#!/bin/bash
qemu-system-aarch64 \
-M virt \
-cpu cortex-a53 \
-smp 4 \
-m 8192 \
-nographic \
-drive if=none,file=out/arm64_virt/packages/phone/images/userdata.img,format=raw,id=userdata,index=3 \
-device virtio-blk-device,drive=userdata \
-drive if=none,file=out/arm64_virt/packages/phone/images/vendor.img,format=raw,id=vendor,index=2 \
-device virtio-blk-device,drive=vendor \
-drive if=none,file=out/arm64_virt/packages/phone/images/system.img,format=raw,id=system,index=1 \
-device virtio-blk-device,drive=system \
-drive if=none,file=out/arm64_virt/packages/phone/images/updater.img,format=raw,id=updater,index=0 \
-device virtio-blk-device,drive=updater \
-kernel out/arm64_virt/packages/phone/images/Image \
-initrd out/arm64_virt/packages/phone/images/ramdisk.img \
-vnc :20 \
-k en-us \
-net nic \
-net user,hostfwd=tcp::6666-:6666 \
-device virtio-gpu-gl,xres=486,yres=864 \
-display sdl,gl=on \
-append "loglevel=7 ip=192.168.137.2:192.168.137.1:192.168.137.1:255.255.255.0::eth0:off LIBGL_ALWAYS_SOFTWARE=true LIBGL_DEBUG=verbose EGL_LOG_LEVEL=debug sn=0023456789 console=ttyAMA0,115200 init=/bin/init ohos.boot.hardware=arm64_virt default_boot_device=a003e00.virtio_mmio root=/dev/ram0 rw ohos.required_mount.system=/dev/block/vdb@/usr@ext4@ro,barrier=1@wait,required ohos.required_mount.vendor=/dev/block/vdc@/vendor@ext4@ro,barrier=1@wait,required ohos.required_mount.misc=/dev/block/vda@/misc@none@none=@wait,required ohos.required_mount.data=/dev/block/vdd@/data/@ext4@nosuid,nodev,noatime,barrier=1,data=ordered,noauto_da_alloc@wait,reservedsize=104857600 sn=0023456789"
此时,我们可以看到qemu启动的鸿蒙界面如下:

最近在调研ota的基本功能,之前根据安卓的文章可以知道安卓基于dm框架实现了virtual ab system,这里在linux也能实现,所以调研了一下dmsetup的基本功能,为ota升级做准备。
一、安卓的虚拟ab功能
如果需要了解安卓的ab功能,可以如下链接:
https://source.android.com/docs/core/ota/virtual_ab
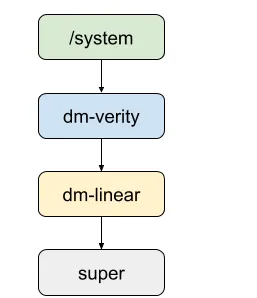
1.1 dm-linear
这里先将system分区抽象成dm-linear,这样system分区是super分区的多个块,如下
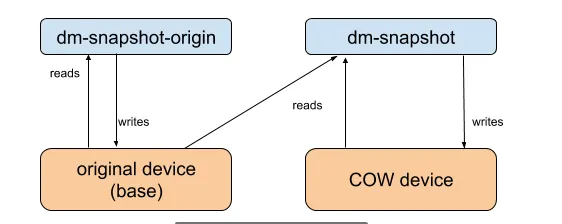
1.2 dm-snapshot
通过snapshot的基本功能,将系统分为origin和snapshot,这里origin是源设备分区,cow是写时复制分区,整个系统的快照由origin+COW组成,如下
二、Linux的调研
为了能够基于安卓的理念实现ota,这里需要借助工具dm-setup,如下是测试上述功能的基本命令
# create all device
dmsetup create origin_device --table "0 $(blockdev --getsz /dev/mmcblk0p6) linear /dev/mmcblk0p6 0"
dmsetup create cow_device --table "0 $(blockdev --getsz /dev/mmcblk0p4) linear /dev/mmcblk0p4 0"

dmsetup create origin --table "0 $(blockdev --getsz /dev/mmcblk0p6) snapshot-origin /dev/mapper/origin_device"
dmsetup create cow --table "0 $(blockdev --getsz /dev/mmcblk0p6) snapshot /dev/mapper/origin_device /dev/mapper/cow_device P 8"

# merge
dmsetup suspend origin
dmsetup remove cow
# merge cow_device--->origin_device
dmsetup reload origin --table "0 $(blockdev --getsz /dev/mmcblk0p6) snapshot-merge /dev/mapper/origin_device /dev/mapper/cow_device P 8"
dmsetup resume origin

# merge to origin
dmsetup suspend origin
dmsetup reload origin --table "0 $(blockdev --getsz /dev/mmcblk0p6) snapshot-origin /dev/mapper/origin_device"
dmsetup resume origin

# create cow for snapshot
dmsetup create cow --table "0 $(blockdev --getsz /dev/mmcblk0p6) snapshot /dev/mapper/origin_device /dev/mapper/cow_device P 8"
至此,一个基本基于dmsetup的快照功能调研完成,快照,合并的基本功能均正常
