rtems系统的程序通过Init开始默认执行,本文基于此现象,分享Init函数的原理
一、Init函数声明
Init函数声明如下:
#ifndef CONFIGURE_INIT_TASK_ENTRY_POINT
  rtems_task Init( rtems_task_argument );
  #define CONFIGURE_INIT_TASK_ENTRY_POINT Init

  #ifndef CONFIGURE_INIT_TASK_ARGUMENTS
    extern const char *bsp_boot_cmdline;
    #define CONFIGURE_INIT_TASK_ARGUMENTS \
      ( (rtems_task_argument) &bsp_boot_cmdline )
  #endif
#endif
这里可以知道,默认情况下,Entry是Init函数,形参是全局变量bsp_boot_cmdline,对于bsp_boot_cmdline我们可以在bootcard看到如下:
void boot_card(
  const char *cmdline
)
{
  bsp_boot_cmdline = cmdline;
}
二、Init如何初始化
对于Init函数如何来的,我们首先关注如下全局变量
const rtems_initialization_tasks_table _RTEMS_tasks_User_task_table = {
  CONFIGURE_INIT_TASK_NAME,
  CONFIGURE_INIT_TASK_STACK_SIZE,
  CONFIGURE_INIT_TASK_PRIORITY,
  CONFIGURE_INIT_TASK_ATTRIBUTES,
  _CONFIGURE_ASSERT_NOT_NULL(
    rtems_task_entry,
    CONFIGURE_INIT_TASK_ENTRY_POINT
  ),
  CONFIGURE_INIT_TASK_INITIAL_MODES,
  CONFIGURE_INIT_TASK_ARGUMENTS
};
其结构体如下:
typedef struct {
  rtems_name name;
  size_t stack_size;
  rtems_task_priority initial_priority;
  rtems_attribute attribute_set;
  rtems_task_entry entry_point;
  rtems_mode mode_set;
  rtems_task_argument argument;
} rtems_initialization_tasks_table;
我们打印实际的值如下:
(gdb) p/x _RTEMS_tasks_User_task_table
$36 = {
  name = 0x55493120,
  stack_size = 0x2000,
  initial_priority = 0x1,
  attribute_set = 0x1,
  entry_point = 0x19100,
  mode_set = 0x0,
  argument = 0x1028a0
}
对于此,解析如下:
name: “'U', 'I', '1', ' '”
staci_size:8192
task_priority: 1
attr: 1
entry: Init函数地址
mode_set: 设置调度模式是asr
argument:这里指向 bsp_boot_cmdline
然后,我们关心rtems_task_start函数,这里构造了Thread_Entry_information如下
Thread_Entry_information entry = {
  .adaptor = _Thread_Entry_adaptor_numeric,
  .Kinds = {
    .Numeric = {
      .entry = entry_point,
      .argument = argument
    }
  }
};
我们留意这个information的如下成员
adaptor
Kinds.Numeric.entry
对于adaptor的实现如下:
void _Thread_Entry_adaptor_numeric( Thread_Control *executing )
{
  const Thread_Entry_numeric *numeric = &executing->Start.Entry.Kinds.Numeric;

  ( *numeric->entry )( numeric->argument );
}
这里可以发现,通过adaptor的封装,直接调用的实际上是rtems_task_start的形参entry_point函数指针。
此时我们留意Thread_Entry_information entry,它被_Thread_Start( the_thread, &entry, &lock_context );调用,然后直接赋值给Entry成员
the_thread->Start.Entry = *entry;
根据上面的代码分析,我们找到了Entry指针是Init函数。但是如何初始化的问题并没有解析到,所以继续查看
这里我们需要额外注意the_thread,在_Thread_Load_environment中会构造线程的上下文,如下:
_Context_Initialize(
  &the_thread->Registers,
  the_thread->Start.Initial_stack.area,
  the_thread->Start.Initial_stack.size,
  the_thread->Start.isr_level,
  _Thread_Handler,
  the_thread->is_fp,
  the_thread->Start.tls_area
);
这里上下文初始化的实现如下:
void _CPU_Context_Initialize(
  Context_Control *the_context,
  void *stack_area_begin,
  size_t stack_area_size,
  uint64_t new_level,
  void (*entry_point)( void ),
  bool is_fp,
  void *tls_area
)
{
  (void) new_level;

  the_context->register_sp = (uintptr_t) stack_area_begin + stack_area_size;
  the_context->register_lr = (uintptr_t) entry_point;
  the_context->isr_dispatch_disable = 0;

  the_context->thread_id = (uintptr_t) tls_area;

  if ( tls_area != NULL ) {
    the_context->thread_id = (uintptr_t) _TLS_Initialize_area( tls_area );
  }
}
可以发现lr寄存器的值就是entry_point,这里就是_Thread_Handler函数,也就是线程完全初始化完成之后,默认的第一个x30寄存器就是_Thread_Handler函数
根据上面的函数,我们关注两个重点,1是the_thread的地址,2是the_context的地址。gdb如下:
(gdb) p the_thread
$2 = (Thread_Control *) 0x1056e8 <_RTEMS_tasks_Objects>

(gdb) p &the_thread->Registers
$4 = (Context_Control *) 0x105920 <_RTEMS_tasks_Objects+568>
此时我们回到_Thread_Start_multitasking函数,这里开始执行除idle线程外的第一个线程。如下
void _Thread_Start_multitasking( void )
{
  Per_CPU_Control *cpu_self = _Per_CPU_Get();
  Thread_Control  *heir;
  heir = _Thread_Get_heir_and_make_it_executing( cpu_self );
  _CPU_Start_multitasking( &heir->Registers );
}
这里对于aarch64,实际上是_AArch64_Start_multitasking的实现在cpu_asm.S
DEFINE_FUNCTION_AARCH64(_AArch64_Start_multitasking)
    mov x1, x0
    GET_SELF_CPU_CONTROL    reg_2

    /* Switch the stack to the temporary interrupt stack of this processor */
    add sp, x2, #(PER_CPU_INTERRUPT_FRAME_AREA + CPU_INTERRUPT_FRAME_SIZE)

    /* Enable interrupts */
    msr DAIFClr, #0x2

    b   .L_check_is_executing
这里GET_SELF_CPU_CONTROL是获取TPIDR_EL1的值,也就是当前cpu的per cpu information。如下
.macro GET_SELF_CPU_CONTROL REG
#ifdef RTEMS_SMP
    /* Use Thread ID Register (TPIDR_EL1) */
    mrs \REG, TPIDR_EL1
#else
    ldr \REG, =_Per_CPU_Information
#endif
.endm
这里_AArch64_Start_multitasking读取了per cpu值,然后设置了sp,并打开终端,然后跳转到L_check_is_executing。L_check_is_executing的实现如下:
.L_check_is_executing:

    /* Check the is executing indicator of the heir context */
    add x3, x1, #AARCH64_CONTEXT_CONTROL_IS_EXECUTING_OFFSET
    ldaxrb  w4, [x3]
    cmp x4, #0
    bne .L_get_potential_new_heir

    /* Try to update the is executing indicator of the heir context */
    mov x4, #1
    stlxrb  w5, w4, [x3]
    cmp x5, #0
    bne .L_get_potential_new_heir
    dmb SY
#endif

/* Start restoring context */
.L_restore:
    ldr x3, [x1, #AARCH64_CONTEXT_CONTROL_THREAD_ID_OFFSET]

    ldr x4, [x1, #AARCH64_CONTEXT_CONTROL_ISR_DISPATCH_DISABLE]

#ifdef AARCH64_MULTILIB_VFP
    add x5, x1, #AARCH64_CONTEXT_CONTROL_D8_OFFSET
    ldp d8,  d9,  [x5]
    ldp d10, d11, [x5, #0x10]
    ldp d12, d13, [x5, #0x20]
    ldp d14, d15, [x5, #0x30]
#endif

    msr TPIDR_EL0, x3

    str w4, [x2, #PER_CPU_ISR_DISPATCH_DISABLE]

    ldp x19, x20, [x1]
    ldp x21, x22, [x1, #0x10]
    ldp x23, x24, [x1, #0x20]
    ldp x25, x26, [x1, #0x30]
    ldp x27, x28, [x1, #0x40]
    ldp fp,  lr,  [x1, #0x50]
    ldr x4,  [x1, #0x60]
    mov sp,  x4
    ret
上述汇编我们先看L_check_is_executing的含义
add x3, x1, #AARCH64_CONTEXT_CONTROL_IS_EXECUTING_OFFSET  # 将x1的值+0xb8给x3
ldaxrb  w4, [x3] # 将x3存放地址计算值给w4,这时候w4应该是0。 ldaxrb是load acquire(ldr) 和 exclusive (xrb)
cmp x4, #0 # 比较x4的值和0
bne .L_get_potential_new_heir # 如果x4的值不为0,则说明说明本线程已经被人置1.避免重复激活已经运行的线程

/* Try to update the is executing indicator of the heir context */
mov x4, #1 # 将x4设置为1
stlxrb  w5, w4, [x3] # 将x4的值存放在x3指向的地址上,如果存放成功则w5为0,如果存放失败则w5为1.
cmp x5, #0 # 比较x5是否为0
bne .L_get_potential_new_heir # 如果不为0,则store release失败
dmb SY # 设置内存屏障,禁止乱序执行

通过上面可以发现,这里通过原子设置一个内存地址的值,从而确定当前线程激活运行。
接下来查看上下文的保存代码:
/* Start restoring context */
.L_restore:
    ldr x3, [x1, #AARCH64_CONTEXT_CONTROL_THREAD_ID_OFFSET] # 将x1的值+0x70的地址的值读给x3

    ldr x4, [x1, #AARCH64_CONTEXT_CONTROL_ISR_DISPATCH_DISABLE] # x1的值+0x68的地址的值读给x4

#ifdef AARCH64_MULTILIB_VFP
    add x5, x1, #AARCH64_CONTEXT_CONTROL_D8_OFFSET  # 将x1的值+0x78后赋值给x5
    ldp d8,  d9,  [x5]
    ldp d10, d11, [x5, #0x10]
    ldp d12, d13, [x5, #0x20]
    ldp d14, d15, [x5, #0x30]
#endif

    msr TPIDR_EL0, x3 # 将x3给 tpidr_el0

    str w4, [x2, #PER_CPU_ISR_DISPATCH_DISABLE] # 将w4的值存放在 x2+PER_CPU_ISR_DISPATCH_DISABLE 的位置上

    ldp x19, x20, [x1] # 将x1和下一个值 赋值给x19和x20
    ldp x21, x22, [x1, #0x10] # 以此类推
    ldp x23, x24, [x1, #0x20] # 以此类推
    ldp x25, x26, [x1, #0x30] # 以此类推
    ldp x27, x28, [x1, #0x40] # 以此类推
    ldp fp,  lr,  [x1, #0x50] # 以此类推
    ldr x4,  [x1, #0x60] # 以此类推
    mov sp,  x4 # 将x4的值给sp寄存器
    ret # 返回
上述这段的ldp指令,对应结构体如下:
typedef struct {
  uint64_t register_x19;
  uint64_t register_x20;
  uint64_t register_x21;
  uint64_t register_x22;
  uint64_t register_x23;
  uint64_t register_x24;
  uint64_t register_x25;
  uint64_t register_x26;
  uint64_t register_x27;
  uint64_t register_x28;
  uint64_t register_fp;
  uint64_t register_lr;
  uint64_t register_sp;
  uint64_t isr_dispatch_disable;
  uint64_t thread_id;
#ifdef AARCH64_MULTILIB_VFP
  uint64_t register_d8;
  uint64_t register_d9;
  uint64_t register_d10;
  uint64_t register_d11;
  uint64_t register_d12;
  uint64_t register_d13;
  uint64_t register_d14;
  uint64_t register_d15;
#endif
#ifdef RTEMS_SMP
  volatile bool is_executing;
#endif
故,这里是加载线程上下文的寄存器到系统寄存器上。这里我们需要注意lr寄存器,之前提到是entry_point,如下:
the_context->register_lr = (uintptr_t) entry_point;
所以我们接下来关注函数:
void _Thread_Handler( void )
这里调用了adaptor回调,如下:
( *executing->Start.Entry.adaptor )( executing );
根据上面的分析,这里adaptor是 _Thread_Entry_adaptor_numeric,然后函数调用entry,这里是entry_point,也就是Init函数指针
至此,这个Init函数的初始化介绍完全完整
gdb工具可以调试RTEMS操作系统,本文介绍如何使用gdb开展调试
一、设置saft-path
总共三种方法设置safe-path,分别如下
1.1 指定路径
我们可以设置自己想要的路径作为saft-path,如下
# vim ~/.gdbinit
add-auto-load-safe-path /home/user
1.2 设置所有的路径
也可也将所有路径作为saft-path,如下
# vim ~/.gdbinit
set auto-load safe-path /
1.3 启动参数设置
可以通过启动参数来设置,如下
# aarch64-rtems6-gdb -iex "set auto-load safe-path /" build/aarch64/zynqmp_qemu/testsuites/samples/ticker.exe
二、运行RTEMS
我们可以通过-s来运行RTEMS,这样默认情况下,qemu会启动gdb,远程可以连接RTEMS来进行调试,如下
# qemu-system-aarch64 -no-reboot -nographic -s -serial mon:stdio -machine xlnx-zcu102 -m 4096 -kernel build/aarch64/zynqmp_qemu/testsuites/samples/ticker.exe
三、gdb连接
在qemu启动rtems之后,可以通过127.0.0.1连接,如下
# aarch64-rtems6-gdb build/aarch64/zynqmp_qemu/testsuites/samples/ticker.exe
# target extended-remote 127.0.0.1:1234
当连接成功之后,出现如下信息
Remote debugging using 127.0.0.1:1234
_CPU_Thread_Idle_body (ignored=0) at ../../../cpukit/score/cpu/aarch64/aarch64-thread-idle.c:46
46        while ( true ) {
(gdb) bt
#0  _CPU_Thread_Idle_body (ignored=0) at ../../../cpukit/score/cpu/aarch64/aarch64-thread-idle.c:46
#1  0x000000000001edd0 in _Thread_Handler () at ../../../cpukit/score/src/threadhandler.c:164
#2  0x000000000001ece0 in ?? ()
至此,gdb远程加载成功
四、设置pretty-printing
为了支持pretty-printing,可以导出.debug信息如下
# aarch64-rtems6-objdump -s -j .debug_gdb_scripts build/aarch64/zynqmp_qemu/testsuites/samples/ticke
r.exe

build/aarch64/zynqmp_qemu/testsuites/samples/ticker.exe:     file format elf64-littleaarch64

Contents of section .debug_gdb_scripts:
 0000 04676462 2e696e6c 696e6564 2d736372  .gdb.inlined-scr
 0010 6970740a 696d706f 72742073 79730a69  ipt.import sys.i
 0020 6d706f72 74206f73 2e706174 680a7379  mport os.path.sy
 0030 732e7061 74682e61 7070656e 64286f73  s.path.append(os
 0040 2e706174 682e6a6f 696e2867 64622e50  .path.join(gdb.P
 0050 5954484f 4e444952 2c202772 74656d73  YTHONDIR, 'rtems
 0060 2729290a 696d706f 72742072 74656d73  ')).import rtems
 0070 2e707072 696e7465 72206173 20707072  .pprinter as ppr
 0080 696e7465 720a00                      inter..
然后通过pprint.py来加载,如下即可
(gdb) source ../out/share/gdb/python/rtems/pprinter.py
DeepSeek-R1 是由杭州深度求索公司开发, 该模型完全开源了所有训练技术和模型权重,性能对齐闭源的 OpenAI-o1, deepseek 通过 DeepSeek-R1 的输出,蒸馏了 6 个小模型给开源社区,包括 Qwen2.5 和 Llama3.1。 本文档将讲述如何使用 RKLLM 将 DeepSeek-R1 蒸馏模型 DeepSeek-R1-Distill-Qwen-1.5B 大语言模型部署到 RK3588 上利用 NPU 进行硬件加速推理。本文介绍DeepSeek-R1在麒麟系统上的部署步骤
一、下载链接
为了支持RK3588上升级DeepSeek,需要如下下载安装包。
git clone https://www.modelscope.cn/radxa/DeepSeek-R1-Distill-Qwen-1.5B_RKLLM.git
通过克隆之后,获得如下文件列表
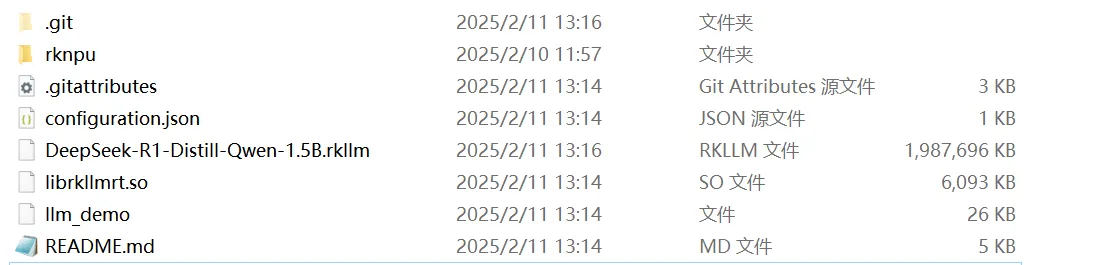
此时我们将安装包文件放置到RK3588的麒麟操作系统上
二、安装DeepSeek
安装DeepSeek非常简单,如下:
export LD_LIBRARY_PATH=$LD_LIBRARY_PATH:~/DeepSeek-R1-Distill-Qwen-1.5B_RKLLM
cd ~/DeepSeek-R1-Distill-Qwen-1.5B_RKLLM
chmod +x llm_demo
三、使用DeepSeek
使用DeepSeek仅需运行如下命令即可:
./llm_demo DeepSeek-R1-Distill-Qwen-1.5B.rkllm 10000 10000
然后我们得到如下信息:
rkllm init start
I rkllm: rkllm-runtime version: 1.1.4, rknpu driver version: 0.9.3, platform: RK3588
rkllm init success
user:
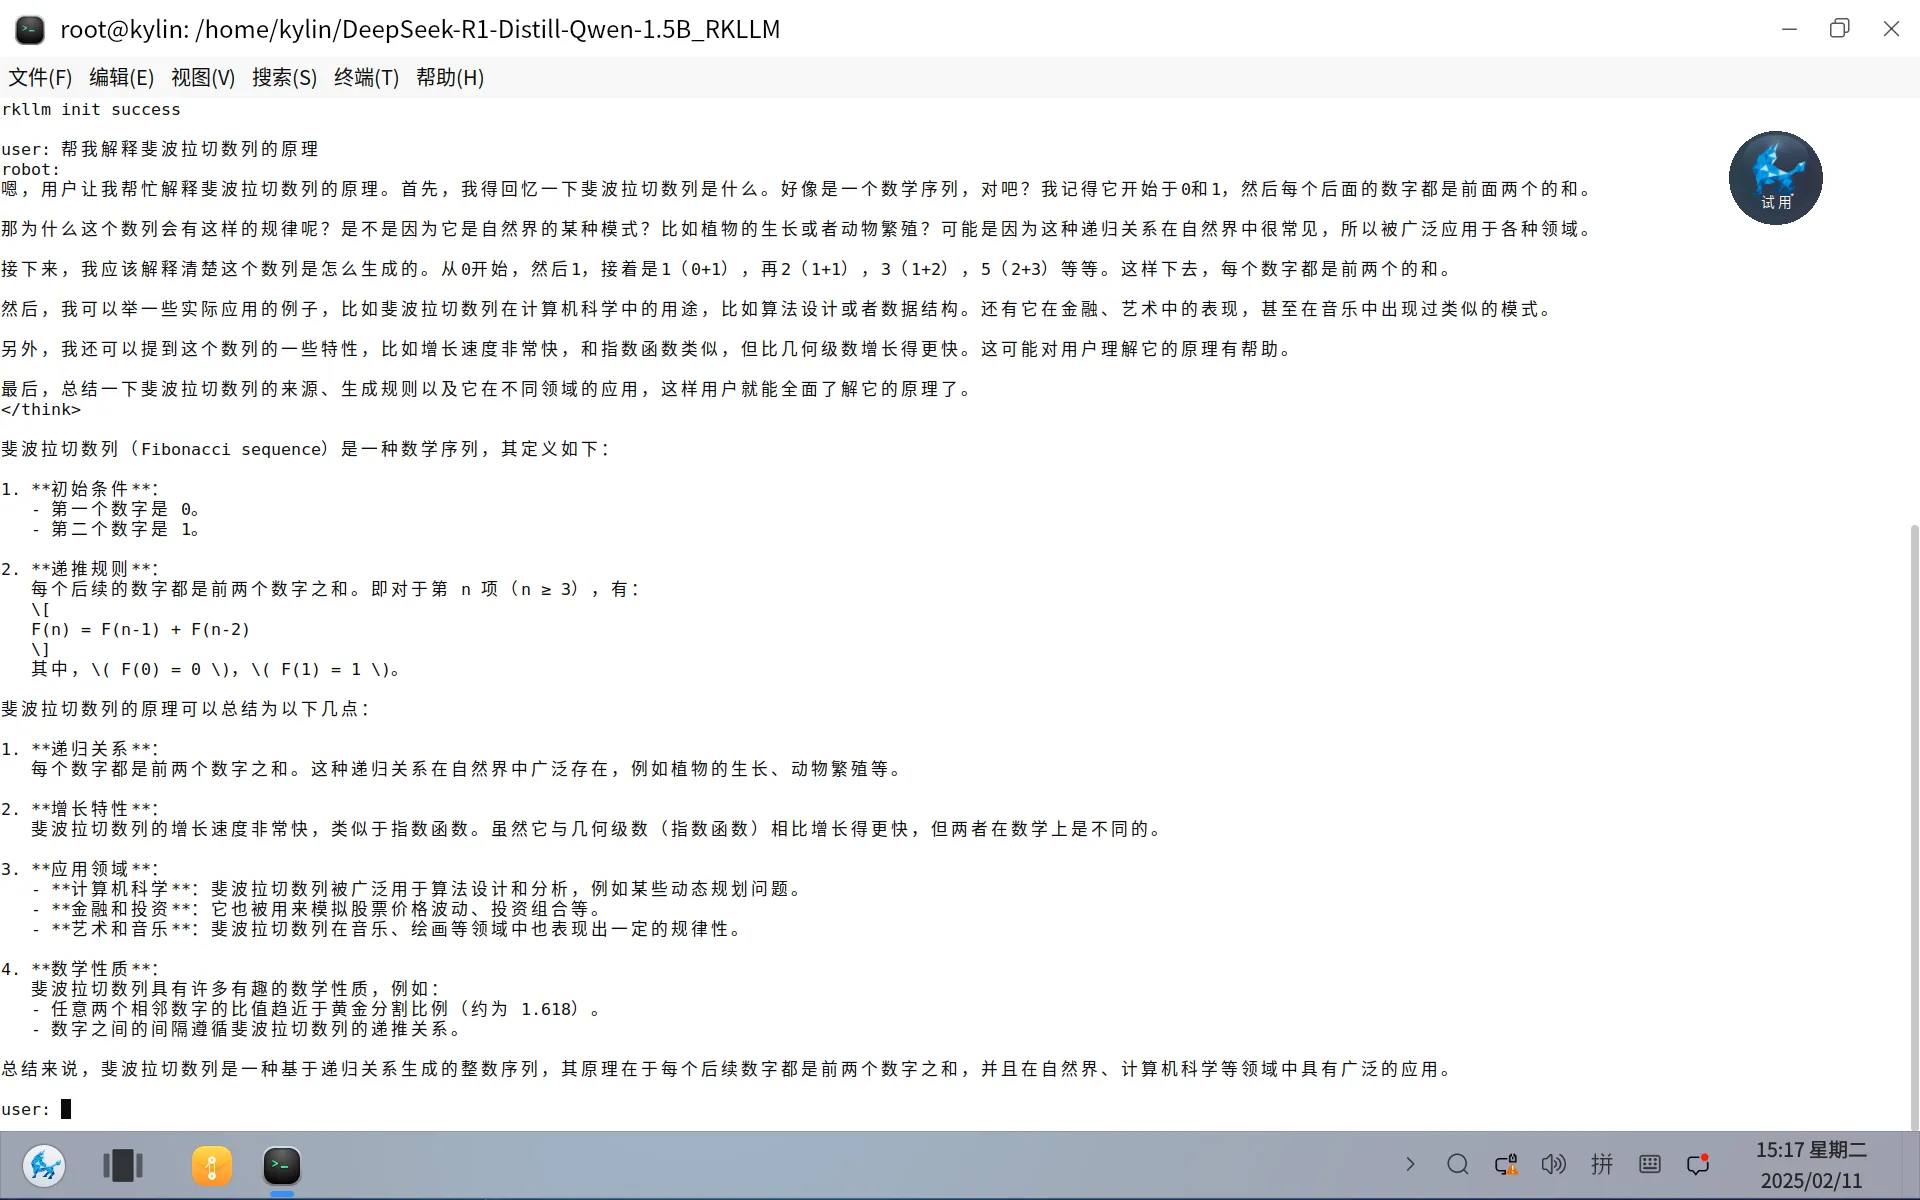
至此我们可以开始使用DeepSeek
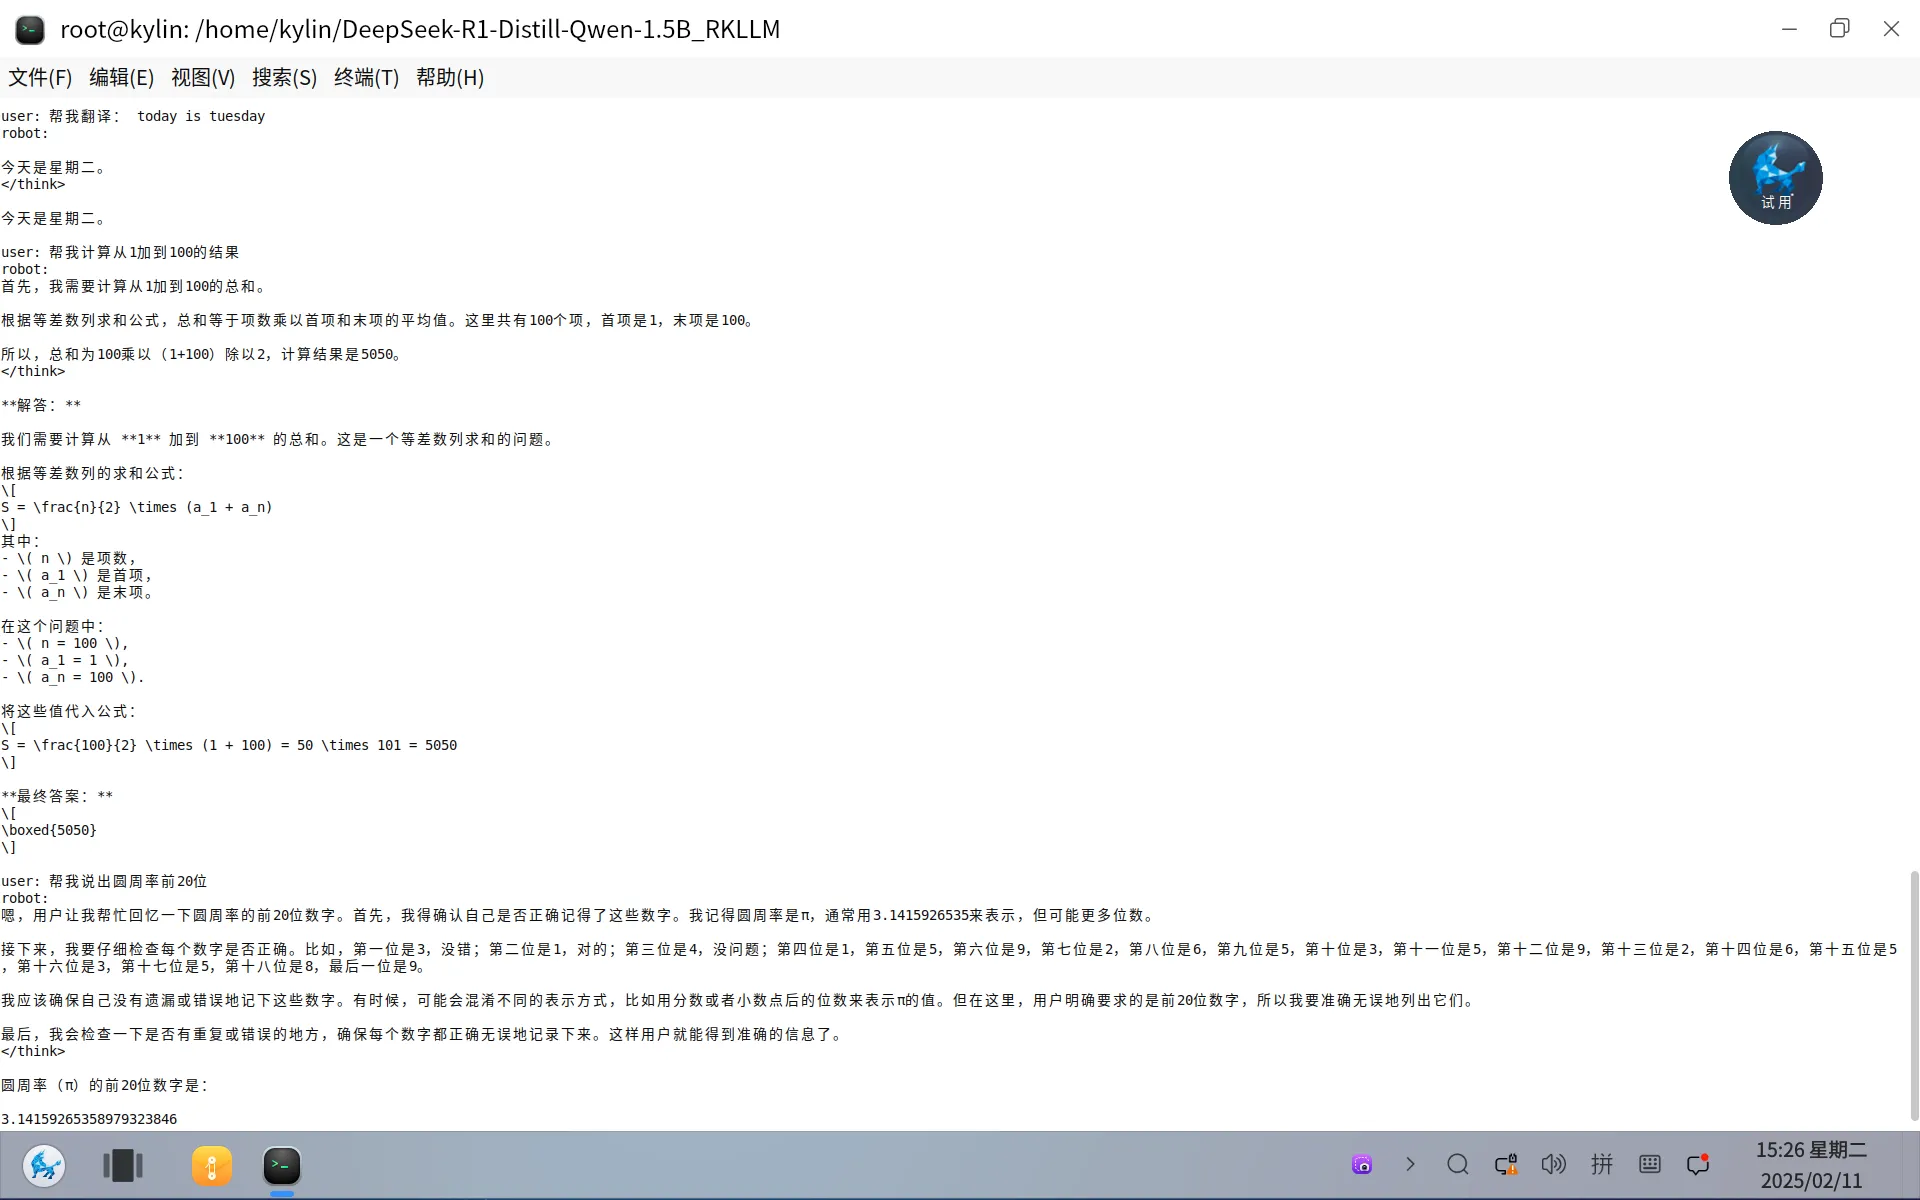
例如询问斐波那契数列如下:
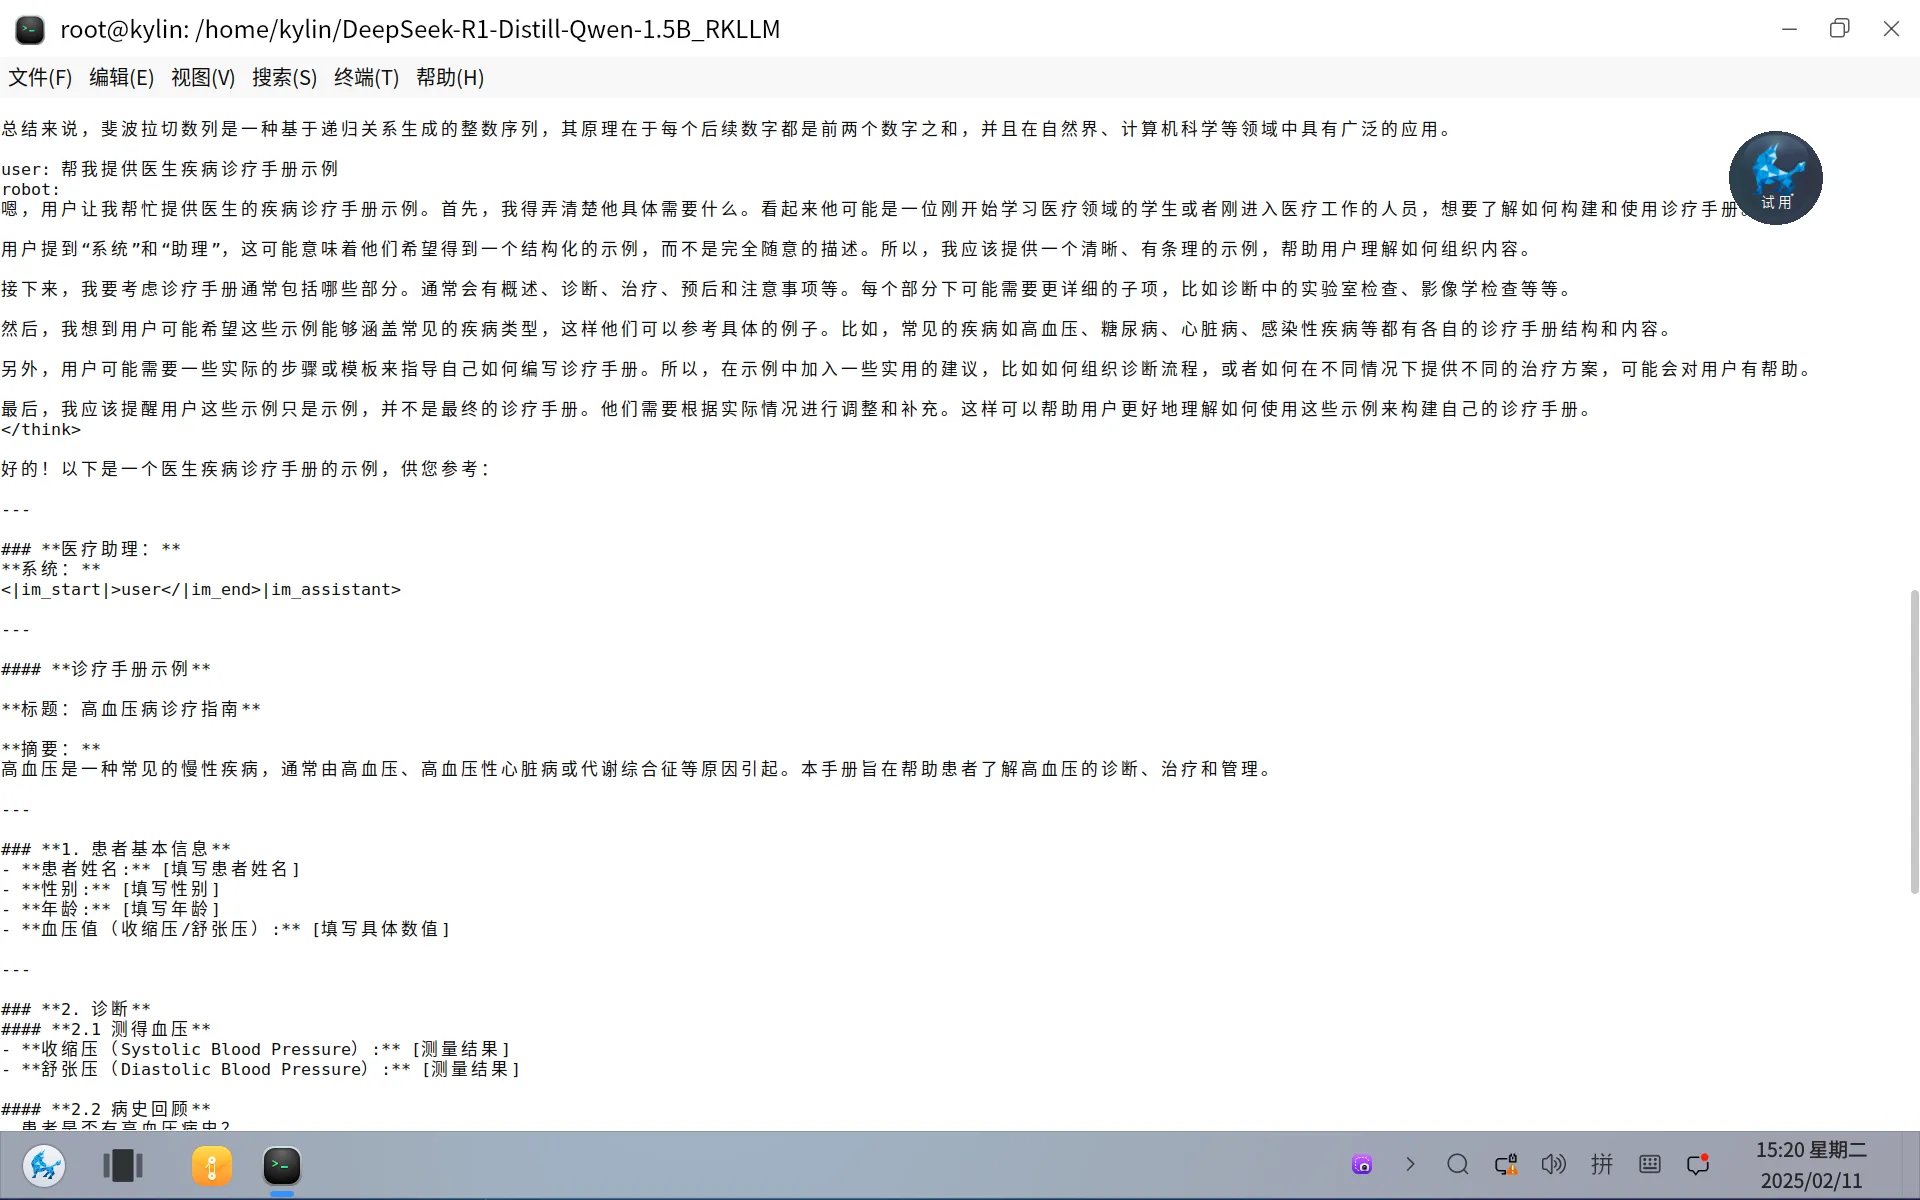
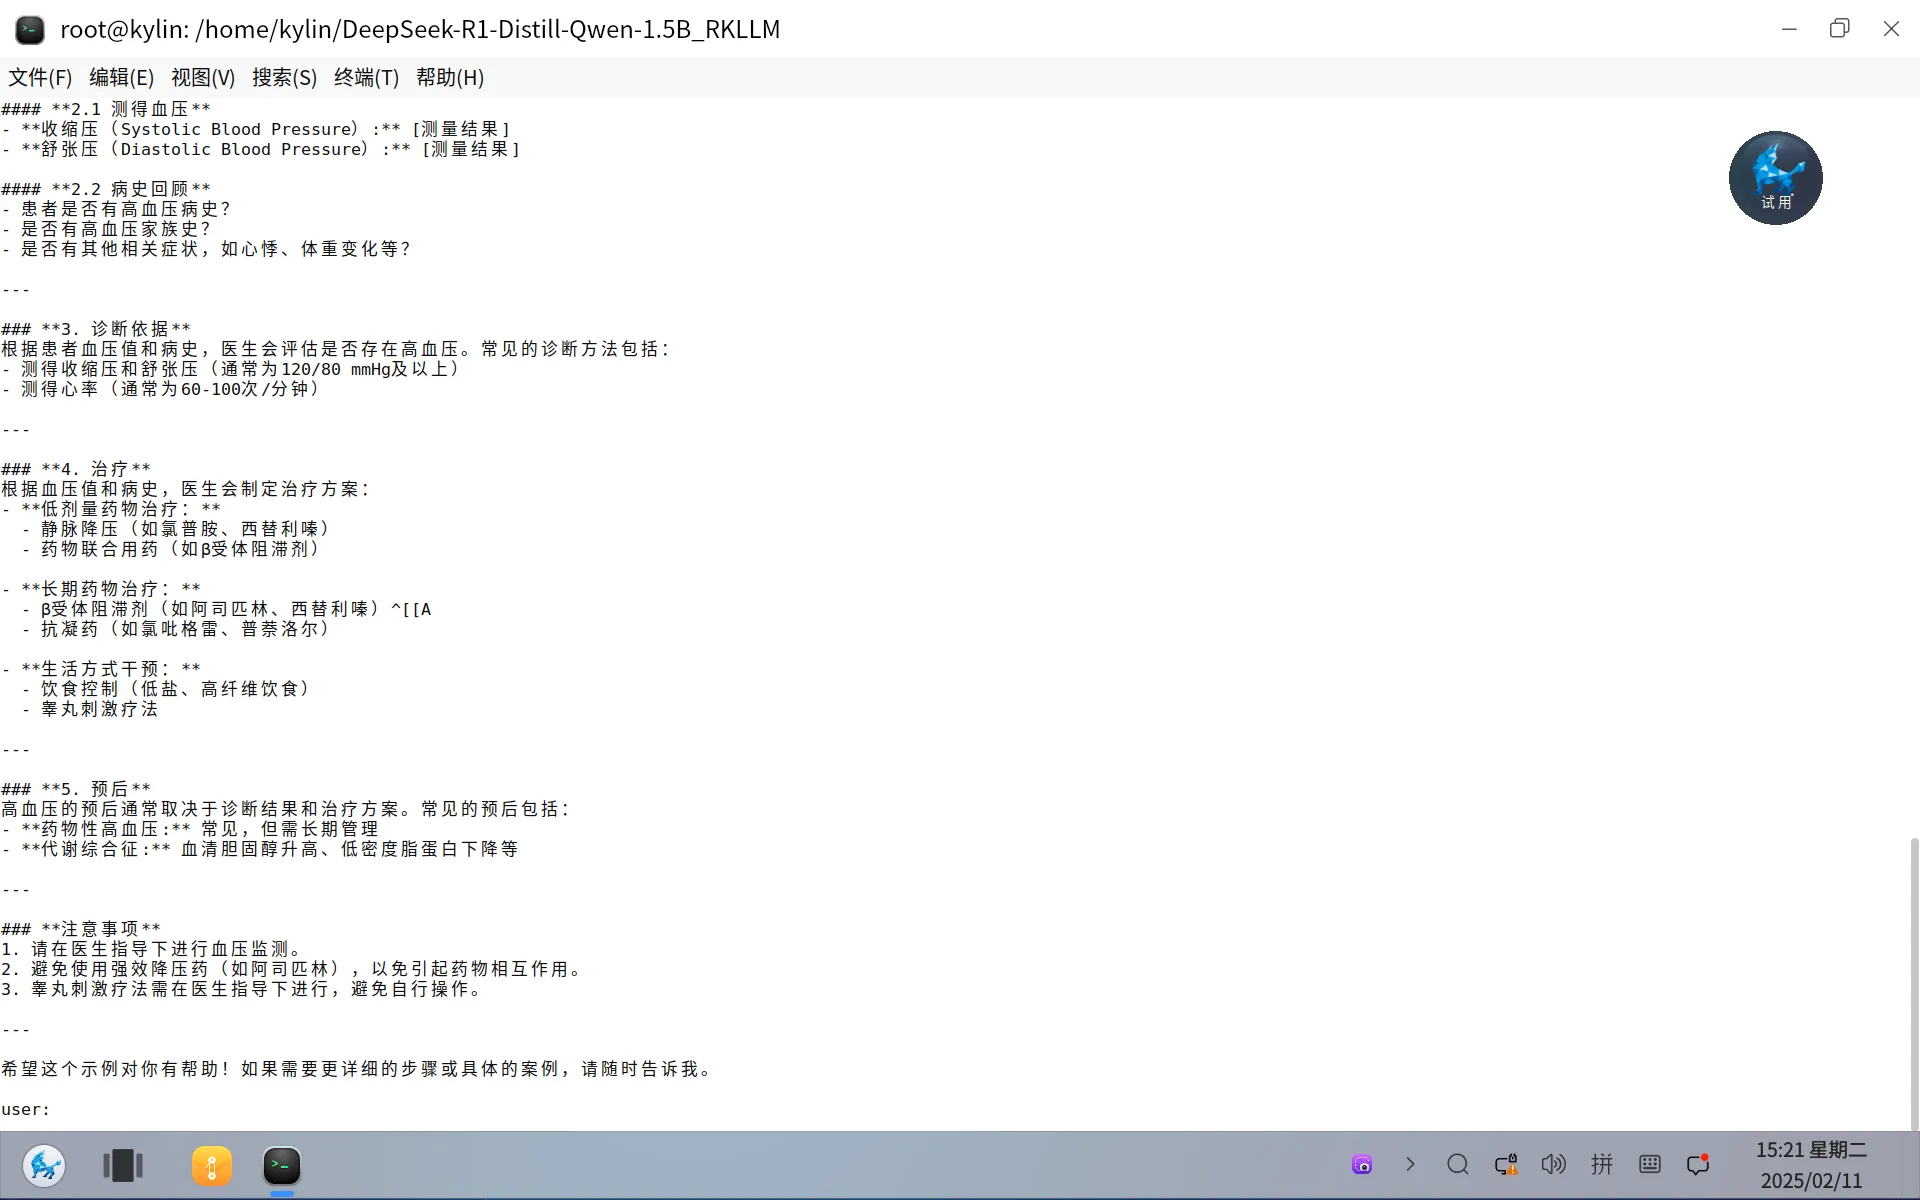
例如询问提供医生疾病诊疗手册
其他三个小问题:
- 翻译
- 计算
- 数学
四、注意事项
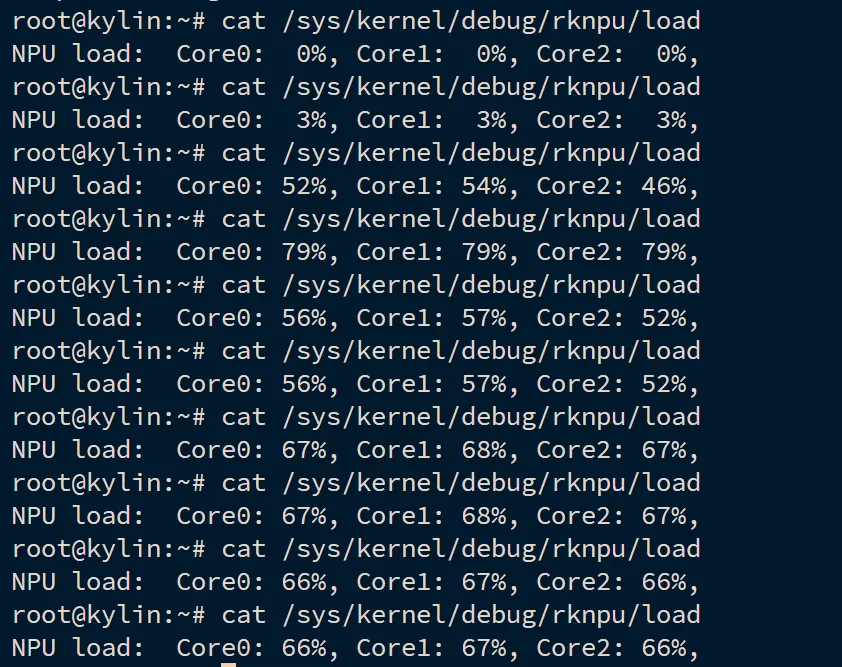
4.1 请确认当前机器是否支持RK3588NPU
如支持,则我们运行时可以看到NPU的负载如下:
4.2 请确认内存剩余空间
如内存紧张,可以开启swap如下:
sudo mkdir -p /swap/
# 设置分区的大小
dd if=/dev/zero of=/swap/swap0 bs=1024 count=8388616
# 设置该目录权限
sudo chmod 0600 /swap/swap0
# 创建SWAP文件
sudo mkswap /swap/swap0
# 激活SWAP文件
sudo swapon /swap/swap0
RTEMS是一种开源的的基于GPLv2的实时操作系统,用作导弹弹载的实时操作系统。广泛运用在各类J事领域。本文基于RTEMS介绍如何构建运行RTEMS操作系统
一、获取源码
为了获取源码,可以如下操作:
git clone https://gitlab.rtems.org/rtems/tools/rtems-source-builder.git
git clone https://gitlab.rtems.org/rtems/rtos/rtems.git
二、配置环境
代码拉下来之后,我们配置编译环境即可,如下:
# ./rtems-source-builder/source-builder/sb-set-builder --list-bsets | grep aarch64
    6/rtems-aarch64.bset
我们基于aarch64进行构建,上述命令会拉取所有开发环境,需要等一会儿即可
# ./rtems-source-builder/source-builder/sb-set-builder --prefix=~/work/rtems/out/
结束后,我们验证gcc是否正常,如下:
# export PATH=$PATH:~/work/rtems/out/bin/
# aarch64-rtems6-gcc --version
aarch64-rtems6-gcc (GCC) 13.3.0 20240521 (RTEMS 6, RSB b1aec32059aa0e86385ff75ec01daf93713fa382-modified, Newlib 1b3dcfd)
Copyright (C) 2023 Free Software Foundation, Inc.
This is free software; see the source for copying conditions.  There is NO
warranty; not even for MERCHANTABILITY or FITNESS FOR A PARTICULAR PURPOSE.
至此,环境搭建成功
三、编译
此时我们进入rtems系统代码运行如下:
OUTPUT=~/rtems/rtems6/out/
./waf configure --prefix=$OUTPUT
此时我们配置版型如下:
cat config.ini
[aarch64/zynqmp_qemu]
RTEMS_POSIX_API = True
RTEMS_SMP = True
然后构建如下
./waf
安装如下
./waf install
四、运行
rtems操作系统已经构建完成,我们通过zynqmp来实现qemu的构建。接下来我们测试运行rtems,如下
# rtems-run --rtems-bsps=zynqmp_qemu build/aarch64/zynqmp_qemu/testsuites/samples/hello.exe
*** BEGIN OF TEST HELLO WORLD ***
*** TEST VERSION: 6.0.0.87bf49b7156b9ddf45c218e5d4fa01f27b283db7
*** TEST STATE: EXPECTED_PASS
*** TEST BUILD: RTEMS_POSIX_API RTEMS_SMP
*** TEST TOOLS: 13.3.0 20240521 (RTEMS 6, RSB b1aec32059aa0e86385ff75ec01daf93713fa382-modified, Newlib 1b3dcfd)
Hello World

*** END OF TEST HELLO WORLD ***


[ RTEMS shutdown ]
CPU: 0
RTEMS version: 6.0.0.87bf49b7156b9ddf45c218e5d4fa01f27b283db7
RTEMS tools: 13.3.0 20240521 (RTEMS 6, RSB b1aec32059aa0e86385ff75ec01daf93713fa382-modified, Newlib 1b3dcfd)
executing thread ID: 0x0a010001
executing thread name: UI1
Run time     : 0:00:02.517420
如果通过qemu直接运行,可以如下指令
qemu-system-aarch64 -no-reboot -nographic -serial mon:stdio -machine xlnx-zcu102 -m 4096 -kernel build/aarch64/zynqmp_qemu/testsuites/samples/hello.exe
此时我们看到RTEMS会打印Hello World。一切正常,我们查看hello的task的源码如下
static rtems_task Init(
  rtems_task_argument ignored
)
{
  rtems_print_printer_fprintf_putc(&rtems_test_printer);
  TEST_BEGIN();
  printf( "Hello World\n" );
  TEST_END();
  rtems_test_exit( 0 );
}
可以发现,源码和行为一致
至此rtems的构建已完全完成
我们之前构建了RTEMS操作系统,这次继续构建此实时系统的应用程序,以hello kylin为例
一、准备仓库
为了编写应用程序以及管理,需要提前准备一个本地git仓库,如下
# mkdir -p app/hello
# cd app/hello
# git init .
二、waf构建工具环境
waf作为rtems的构建工具,我们需要为应用程序下载此工具,如下:
# cp ../../waf .
# git submodule add https://gitlab.rtems.org/rtems/tools/rtems_waf.git rtems_waf
三、编写应用
编写应用前,需要为RTEMS操作系统提供init.c,如下
/*
 * Simple RTEMS configuration
 */

#define CONFIGURE_APPLICATION_NEEDS_CLOCK_DRIVER
#define CONFIGURE_APPLICATION_NEEDS_CONSOLE_DRIVER

#define CONFIGURE_UNLIMITED_OBJECTS
#define CONFIGURE_UNIFIED_WORK_AREAS

#define CONFIGURE_RTEMS_INIT_TASKS_TABLE

#define CONFIGURE_INIT

#include <rtems/confdefs.h>
然后创建hello.c应用程序如下
/*
 * Hello world example
 */
#include <rtems.h>
#include <stdlib.h>
#include <stdio.h>

rtems_task Init(
  rtems_task_argument ignored
)
{
  printf( "\nHello Kylin\n" );
  exit( 0 );
}
最后为hello.c和init.c编写waf构建脚本,如下
#
# Hello world Waf script
#
from __future__ import print_function

rtems_version = "6"

try:
    import rtems_waf.rtems as rtems
except:
    print('error: no rtems_waf git submodule')
    import sys
    sys.exit(1)

def init(ctx):
    rtems.init(ctx, version = rtems_version, long_commands = True)

def bsp_configure(conf, arch_bsp):
    # Add BSP specific configuration checks
    pass

def options(opt):
    rtems.options(opt)

def configure(conf):
    rtems.configure(conf, bsp_configure = bsp_configure)

def build(bld):
    rtems.build(bld)

    bld(features = 'c cprogram',
        target = 'hello.exe',
        cflags = '-g -O2',
        source = ['hello.c',
                  'init.c'])
四、构建
此时一切准备完成之后,构建应用程序和构建操作系统的命令一致,如下:
# ./waf configure --rtems=~/work/rtems/out/ --rtems-bsp=aarch64/zynqmp_qemu
# ./waf
五、运行
通过rtems-run可以带起qemu运行应用程序,如下:
# rtems-run --rtems-bsps=zynqmp_qemu build/aarch64-rtems6-zynqmp_qemu/hello.exe
此时运行结果如下
RTEMS Testing - Run, 6.0.not_released
 Command Line: /root/work/rtems/out/bin/rtems-run --rtems-bsps=zynqmp_qemu build/aarch64-rtems6-zynqmp_qemu/hello.exe
 Host: Linux tf 6.8.0-47-generic #47-Ubuntu SMP PREEMPT_DYNAMIC Fri Sep 27 21:40:26 UTC 2024 x86_64
 Python: 2.7.18 (default, Jan 31 2024, 16:23:13) [GCC 9.4.0]
Host: Linux-6.8.0-47-generic-x86_64-with-Ubuntu-20.04-focal (Linux tf 6.8.0-47-generic #47-Ubuntu SMP PREEMPT_DYNAMIC Fri Sep
27 21:40:26 UTC 2024 x86_64 x86_64)

Hello Kylin

[ RTEMS shutdown ]
CPU: 0
RTEMS version: 6.0.0.87bf49b7156b9ddf45c218e5d4fa01f27b283db7
RTEMS tools: 13.3.0 20240521 (RTEMS 6, RSB b1aec32059aa0e86385ff75ec01daf93713fa382-modified, Newlib 1b3dcfd)
executing thread ID: 0x0a010001
executing thread name: UI1
Run time     : 0:00:00.756775
至此,一个最简单的rtems的应用程序编写完成
六、提交代码
最后提交相关代码即可
# git add init.c hello.c wscript
# git commit -m "My first RTEMS application."
